OM-278680 Page 11
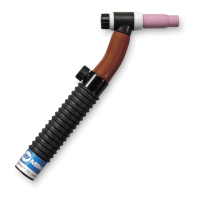
5-7. Assembling AR TIG Torch
1 AR TIG Torch
2 Backcap
3 Cup
4 Collet Body
5 Tungsten Electrode
6 Collet
7 Heat Shield
Remove backcap (counterclock-
wise).
The original backcap is not used
in the AR TIG torch assembly
and can be discarded.
Unscrew cup and collet body (coun-
terclockwise).
Remove tungsten electrode and
collet.
Remove heat shield.
8 TIG Torch AR Nozzle
9 TIG Torch AR Tip
10 TIG Torch AR Backcap
Locate TIG torch AR nozzle, tip, and
backcap supplied with system.
Insert the head of the torch into the
opening of the AR nozzle. Insert the
AR backcap through the opening in
the rear of the AR nozzle and screw
into the TIG torch head (clockwise).
Screw the TIG torch AR tip into the
TIG torch AR nozzle (clockwise).
9
8
10
2
3
4
5
6
7
1