5. Installation System Manual
Page 2-66 8/09 76.7300FP11/2, Rev A
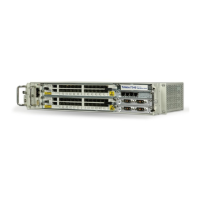
Figure 5.21 10G Switch Module Transceiver Numbering
5.56 Install transceivers by performing the following steps:
__ 1. Follow ESD precautions and make sure you are adequately grounded
before handling the SFPs/XFPs.
__ 2. Remove the SFPs/XFPs from their antistatic packaging.
__ 3. Remove dust covers from the SFPs/XFPs.
__ 4. Ensure the SFP’s/XFP’s bale (the latch on the cable side of the
transceiver) is in the open position.
__ 5. Insert the SFPs/XFPs into the 10G Switch module sockets and
carefully slide the SFP/XFP into the socket until its connector is fully
seated. Close the bale.
• The upper-row of 10G Switch module SFP/XFP sockets require
that transceivers be installed bale-side up. Refer to Figure 5.20,
page 2-65 and Figure 5.21, page 2-66.
• The lower-row of 10G Switch module SFP/XFP sockets require
that transceivers be installed bale-side down. Refer to Figure 5.20,
page 2-65 and Figure 5.21, page 2-66.
Do not force SFPs/XFPs into sockets.
__ 6. Reinsert dust covers into the SFPs/XFPs.
__ 7. Repeat steps 1, page 2-66 through 6, page 2-66 for each SFP/XFP
being installed.
Transceiver Installation
(Tellabs 7325 Switch)
5.57 The Tellabs 7325 Switch comes without SFP transceivers pre-installed.
Up to 24 1G SFPs may be installed in the Switch.
5.58 Figure 5.22, page 2-67 shows the correct orientation for inserting an SFP.
Figure 5.23, page 2-67 shows the SFP numbering scheme.
4
SFP
16
SFP
6
SFP
8
SFP
10
SFP
18
SFP
24
SFP
12
SFP
20
SFP
22
SFP
14
SFP
26
SFP
2
XFP
3
SFP
15
SFP
5
SFP
7
SFP
9
SFP
17
SFP
23
SFP
11
SFP
19
SFP
21
SFP
13
SFP
25
SFP
1
XFP
 Loading...