2
PREPARATION FOR USE
Setup Checklist
2-2 TP04300 Series Interface & Applications Manual
Section A:
. . . . . . . . . . . . . . . . . . . . . . . . . . . . . . . . . . .
Initial System Setup Checklist
Setup Checklist
STEP INITIAL SYSTEM SETUP CHECKLIST (TP04300A)
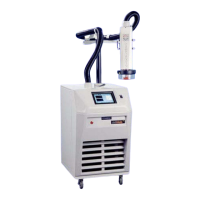
1 Receive, unpack, TP04300A System (see Unpacking/Receipt of Shipment, page 2-9)
2 Place System at DUT site, near to Air, Power (see Placement Requirements, page 2-14)
3 Attach Thermal Cap and Shroud (see Attaching the Thermal Cap and Shroud, 15)
4 Insulate DUT site (see Static, Moisture, and Extreme Temperature Protection, page 2-43)
5 Connect System to main Power (see Power Connections and Voltage Requirements, page 2-19)
6 Configure input voltage for compressor auto-transformer (see Power Connections and Voltage Requirements,
page 2-19)
7 Connect System to facility compressed air (see Air Connections, page 2-26)
8 Connect purge air (see Connecting Purged Air, page 2-29)
9 Press front panel On switch to energize System.
10 Enable "Full" Access (see Chapter 3)
11 Press "Heat/Cool, (Compr. On)" button, let compressor run 1/2 hour to allow refrigerants to separate and to
produce full range cold output (see Chapter 3).
12 Check Head & Manipulator (Vertical Stand, Arms) movement:
--unlock Vertical Stand lock, test Head up/down switches (see Chapter 3).
--test Head up/down software button (see Chapter 3).
--unlock, test movement of three locks: arm/Head (see Chapter 3).
13 Test "Flow: On/Off" button (see Chapter 3).
--listen to hear quiet "whoosh" as Air Dryer cycles every 60 seconds
--with "Flow: On," and "Head: Down," check if air flow from Head output nozzle
14 Attach sensor to DUT:
--standard attachment techniques (see Interfacing and Attaching Thermocouples, page 2-32)
--alternate attachment techniques (see Non-Standard Thermocouples, page 2-41)
15 Verify main Air sensor (see Chapter 5) and Calibrate main Air sensor if needed (see Chapter 5).
16 Verify DUT mode sensor(s) (see Chapter 5) and Calibrate DUT mode sensor(s) if needed (see Chapter 5).
17 Setup "new" Air mode test, test cycle to Hot, Cold setpoints (see Chapter 3).
18 Setup "new" DUT mode test, cycle to Hot, Cold setpoints (see Chapter 3)
19 For remote Host (prober station) control of TP04300A:
--interface RS232C, or IEEE-488.2, or MCT cable (Rear Panel I/O Ports, page 2-30).
--configure (see Remote Operation, Chapter 4), then test run to Hot, Cold setpoints
20 Begin normal System operation (see Chapter 3)
 Loading...