6. ALARM CONFIGURATION AND RELAY TEST
Thealarmcongurationandrelaytestoperationcyclesthroughdifferent
stages as follows:
a. Set thresholds for A1, A2, A3, STEL, LTEL.
These stages are used to set the A1, A2, A3, STEL and LTEL alarm
threshold points and do not affect the alarm LEDs and relays.
b. Test lamps and optional relays for A1, A2, A3, Fault, STEL, LTEL.
These stages provide a lamp test and relay test function.
Note: When not congured for STEL/LTEL threshold, a row of dashes will
be displayed instead of a level and the STEL and LTEL faclilities
will be set permanently to off.
Toselectthealarmcongurationoperation,proceedasfollows:
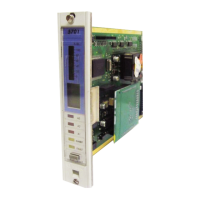
(1) Plug the Engineering Key into the Engineering Card front panel
socket and check that the Unlocked LED ( ) is illuminated.
(2) Push and hold the required control card RESET/SELECT push-
button for approximately 1.5 seconds and check that the selected
control card indicates it has been selected by displaying the select
icon.
(3) Use the Engineering Card (
) and ( ) push-buttons to select the
required channel.
(4) Push the Engineering Card ALARMS push-button for the rst
time.
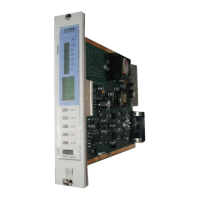
(5) Check that the selected control card message display shows A1
for a rising alarm threshold or A1 for a falling alarm threshold
alternating with the selected channel number.
(6) Check that the selected control card digital display indicates the A1
alarm threshold point.
Note: The analogue display continues to show the sensor live
measurement.
ALARMS
 Loading...