7-24 7 Service and Maitenance
WARNING
The probe tip is sharp and can cause puncture wounds. To
prevent injury, exercise caution when working around the probe.
BIOHAZARD
Wear gloves and lab coat and, if necessary, goggles.
1
Place the Power to OFF.
2
Remove the sample/reagent disk.
3
Pull the probe arm to the highest point by hand. Rotate the probe arm to
move the probe to a position above the sample/reagent compartment and
convenient to operate.
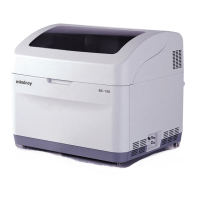
4
Grab the lower part of the arm cover with two hands and pull them slightly
outwards and remove the cover upward from the arm base. After you
remove the cover, the inside structure of the probe arm is as shown in the
figure below.
5
Hold the probe’s fluid connector with one hand and the tubing connector
with the other. Rotate the tubing connector counter-clockwise until it
disconnects from the probe. Remove the tubing from the probe.
If you are going to use a unclogging device to clean the probe, perform
the steps in section 7.6.4.2
Unclogging Probe
.
CAUTION
There is a tiny gasket inside the fluid path connector after the
probe connector is removed from the fluid path tube
connector. Exercise caution so that the gasket inside the
probe does not drop out and if it does, store it in a clean
place for later installation.
CAUTION
To be avoid of droping water from the unplugged fluid
connector, please wipe off the water with clear gauze when
necessary.