12. Enter the password again to confirm, and then press [OK].
13. Press [OK].
14. Press [Exit].
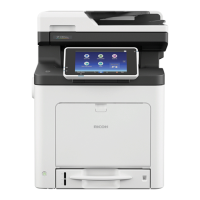
15. Press [Folder].
16. Check that [SMB] is selected.
17. Press [Enter].
18. Press [Enter], and then specify the folder.
To specify a folder, you can either enter the path manually or locate the folder by browsing the
network.
For details about how to specify the path manually, see page 86 "Locating the SMB folder
manually".
For details about how to specify the path using Browse Network, see page 87 "Locating the
SMB folder using Browse Network".
19. Press [Connection Test] to check the path is set correctly.
20. Press [Exit].
If the connection test fails, check the settings, and then try again.
21. Press [OK].
22. Press [User Tools] (
).
23. Press [Home] ( ) at the bottom of the screen in the center.
Locating the SMB folder manually
1. Press [Enter] to the right of "Path".
2. Enter the path where the folder is located.
For example: if the name of the destination computer is "User", and the folder name is "Share", the
path will be \\User\Share.
6. Scan
86
 Loading...


