22 - General description
Connectors on the Left Side of MC6-T
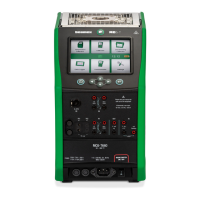
Figure 4: Connectors on the left side of MC6-T
Legend:
1. USB-A connector for connecting USB devices to MC6-T. See also
chapter Firmware Update.
2. USB-B connector for communicating with a Personal Computer. For
details see chapter PC Communication/Calibration Software.
3. Ethernet connector for connecting MC6-T to a Local Area Network.
This connector is used for Beamex internal purposes only.
4. The optional Internal Barometric Pressure Module. It has a venting
hole on the side of MC6-T. To ensure valid barometric pressure
measurements, do not plug the venting hole.
5. PX. A possibility to connect Beamex External Pressure Modules to
MC6-T.
Note: All USB connectors are USB 2.0 Full Speed ports.
MC6-T Handle
The MC6-T's handle is designed to have three positions:
• Carrying – when the handle is gripped and device is being carried,
handle is in a position where it is very close to the center of mass of the
device and the calibrator is comfortable to carry;
• Resting – when the handle is released, it falls down to a resting
position where it is easy to grip again;
• Down – when the handle is pushed down, its top surface is aligned with
the top surface of the device. Use this position during calibration and
transportation.
Warning: The handle must always be pushed to Down position
during the calibration. The resting position is designed to ensure
that it is not possible to leave the handle in carrying position,
in which case it would get very hot during calibration at highest
temperatures.