4-21
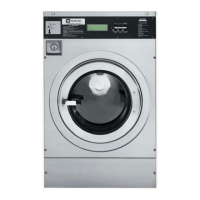
Remove front panel (See page 4-19).
Remove four 10mm bolts to disengage the
hinge from the tub.
NOTE: Hinge bolt pattern is different
across models.
TECH TIP: Use marking pen to outline
hinge as it is mounted on the tub front
before removal.
The shims, installed between the hinge and
the tub, may fall when the hinge is removed.
Make sure the shims are reinstalled during
reassembly.
1.
2.
3.
Four 10mm
Bolts
Shims
REMOVE DOOR HINGE
Electrical Shock Hazard
Disconnect power before servicing.
Failure to do so can result in death or
electrical shock.
Replace all parts and panels before
operating.
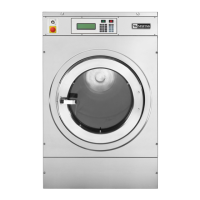
Remove the front panel (See page 4-19).
The door lock assembly is located to the left
of the door.
Remove the outer cover by removing four
flat blade screws.
NOTE: Make sure the ‘A’ on the cover plate
faces out when reinstalling the cover plate.
Components behind the cover plate include
the wiring harness connection, the door
unlock solenoid, the door closed switch, the
door lock solenoid, the door locked switch
and the bi-metal.
To remove the door lock assembly,
disconnect the wiring harness.
1.
2.
3.
4.
5.
REMOVE DOOR LOCK
NO ACCESS PANEL
Electrical Shock Hazard
Disconnect power before servicing.
Failure to do so can result in death or
electrical shock.
Replace all parts and panels before
operating.
4 Flat Blade
Screws
“A”
Faces
Out