7 Service and Maitenance 7-
4
Pinch the probe by the part near the probe arm. Gently push the probe
upward and then release the probe to see if the spring can move freely.
If yes, proceed to the next step.
If not, check for errors and try again after removing the errors.
5
Connect the probe’s circuit connector back to the circuit board.
6
Ensure the gasket is inside the probe.
NOTE
Replace the gasket, if the probe has been removed for 2-3
times.
7
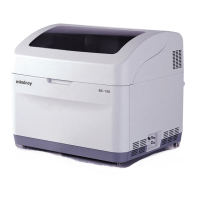
CAUTION
The fluid tube inside the probe arm should be bent into a
circle when being installed.
Exercise caution when connecting the probe. Excessive
force may bend the probe.
Screw (clockwise) the probe’s fluid connector back to the tubing connector.
8 Place the ANALYZING UNIT POWER to ON while ensuring that the sample
probe is not attaching any conducting .object, such as hands.