6‐4 Segway®PersonalTransporteri2,x2,x2TurfPartsReplacement
Fascia Removal and Installation
To remove front fascia:
1. MakesureSegwayPTispoweredoffand
unplugged.
2. Use4mmhe
xwrenchtoremove(4)
fastenersfromfrontfascia.SeeFigure6‐1.
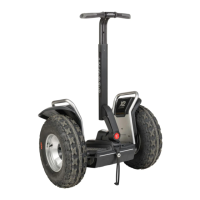
Figure6‐1:RemoveorInstallFrontFascia
3. Removefasciaandcleanalldebrisfrom
mountingsurfaces.
To remove rear fascia:
1. MakesureSegwayPTispoweredoffand
unplugged.
2. Use4mmhe
xwrenchtoremove(4)
fastenersfromrearfascia.SeeFigure6‐2.
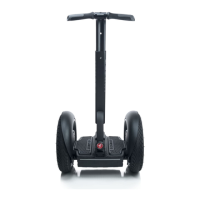
Figure6‐2:RemoveorInstallRearFascia
3. Removefasciaandcleanalldebrisfrom
mountingsurfaces.
To install front fascia:
1. MakesureSegwayPTispoweredoffand
unplugged.
2. Wi
thfender(modeli2only)andtire/wheel
assemblyoff,alignfrontfasciatabswith
holesbeneathpivotbasehub,andbesure
theyarefreeofdebrisandproperlyseated
beforethreadingfasteners.SeeFigure6‐1.
TABS ARE DELICATE AND CAN BREAK EASILY IF
NOT PROPERLY ALIGNED INTO PIVOT BASE
HOLES.
3. Thread(4)4mmfasteners(20554‐00001)into
fascia.
4. Using4m
mtorquewrench,drivefasteners
andtorqueto1.5N‐m.
To install rear fascia:
1. MakesureSegwayPTispoweredoffand
unplugged.
2. Thread(4)4m
mfasteners(20554‐00001)into
fascia.SeeFigure6‐2.
3. Using4m
mtorquewrench,drivefasteners
andtorqueto1.5N‐m.
After installing fascia:
1. (Modeli2only)Installfender(page5‐3).
2. (Modelx2only)Installbothfender
(page5‐4)an
dframeassemblies,eachasa
unit(page5‐5).
3. Installt
ire/wheelassembly:
• Modeli2(page4‐3)
• Modelx2(page4‐4)
• Modelx2Turf(page4‐5)
4. Pe
rformpost‐servicetests(pageA‐1).
tabs
pivotbase
20554-00001 (10mm)
Front Fascia
20947-00001
20554-00003 (14mm)
Rear Fascia
20948-00001
20554-00001
 Loading...