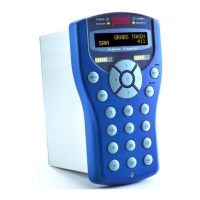
A brief description of the indicated front display items follows:
A The Alarm RGB LED indicator.
B Receiver 2 Tri-Colour LED. The text ‘Receiver’ is specific to the InSpec Sampler Controller. If you
have purchased an InSpec Blender Controller this text will state ‘Stream 2’. In either case the
LED’s indicate which current sampling can/or blending stream is in use. In the case of the sampler,
you would always expect either Receiver 1 or Receiver 2 to be lit; whereas in the case of the
Blender both streams 1 and 2 will often be active at the same time. The given colour is dependent
on the application (Sampler or Blender) and will be explained in the application section of the
manual.
C Bar Graph Indicator 2. This ten-barred array of LED’s represents the user-configured value for the
bar graph. A designated register value and associated min and max graph 2 registers
(F_GRAPH_MIN2/F_GRAPH_MAX2) are used to determine the output.
D MENU. There are five indented secondary button functions on the front display interface. This one
indicates that the ENTER button (see E that follows) also enables the user to enter/go into the
InSpec menu structure.
E ENTER. Along with the directional cursor buttons, the ENTER button will be one of the most used
buttons of the instrument. This button allows you to confirm entered alphanumeric values, to
confirm control decisions and navigate into selected menu items.
F DELETE. This indented secondary button function is associated with the RESET button. When the
instrument is being configured the secondary key functions MODE, CANCEL and DELETE are
likely to be used far more than their primary button purpose of START, STOP and RESET. The
DELETE button allows users to cancel decisions and erase alphanumeric characters from an
entered value/text.
G RESET. This is the primary function of the button and will be used daily/regularly by operators of
the instrument to reset a batch/blend. Selecting this button when there is no batch/blend in process
will result in a message explaining that there is no batch to reset
H CURSOR BUTTONS. H points to the right cursor button. Let’s look at all of the cursors. The four
cursors are primarily used to navigate around the menu. Left and right step you through the
available options at any given sub-menu or decision and up and down take you into or out of the
current sub-menu. The cursor keys have alternative uses within specific menu functions. i.e., when
an engineer is in the register access screen, the right or left cursor will search through the registry
looking for a user specified search string. Within the same screen the up and down cursor buttons
travel through the registers numerically. During text entry, the cursor buttons are used to enter text
using the up and down buttons and to move through the string with the left and right buttons. On
the front panel, the left and right cursor buttons can be used to move between the 12 configurable
front display items. In the alarm display screen, the down cursor acts as an acknowledgement
button to ‘ACK’ all active alarms. (See I below).
I ACK - Acknowledgement. The indented ACK button forms the secondary function of the Down
cursor button. ACK is used to acknowledge all unacknowledged alarms in the alarm display screen
in a two-step process. Pressing this cursor once will take you straight into the display alarms menu
option (browsed via the ‘Alarms→Display Alarms’ option). Pressing it again will acknowledge all the
alarms in the display. This gives the operator the ability to examine new alarms before
acknowledging them.
J Numeric Entry Keypad. 1 thru 9, and ‘.’, 0 and -. These keys are used during configuration and
batch/blend setup to enter values/titles. When the menu is closed these twelve keypad buttons are
each associated with the 12 user configurable display items allow the user to jump quickly to a
particular item (See Display Section).
K Centre Cursor Button. This button doubles up as an alternative Enter key (See E above).
Engineers’ may find it more convenient to use during configuration when they are spending a lot of
time using the other directional cursors.
L STOP. This is the primary function of the button and will be used daily/regularly by operators of the
instrument to stop a batch/blend. Selecting this button when there is no batch in process will result
in a message explaining that there is no batch to reset.
M CANCEL. This indented secondary button function is associated with the STOP button. The cancel
button can be used to step out of each sub-menu (repeatedly pressing cancel will close the menu
and bring you out to the front display) and can be used to cancel out of a control sequence. I.e.,
when starting a batch/blend the user will be prompted and taken through a series of questions that
the user can cancel out of using this button.

 Loading...