4 – Mixer configuration and settings
Making talkback and built-in
oscillator settings
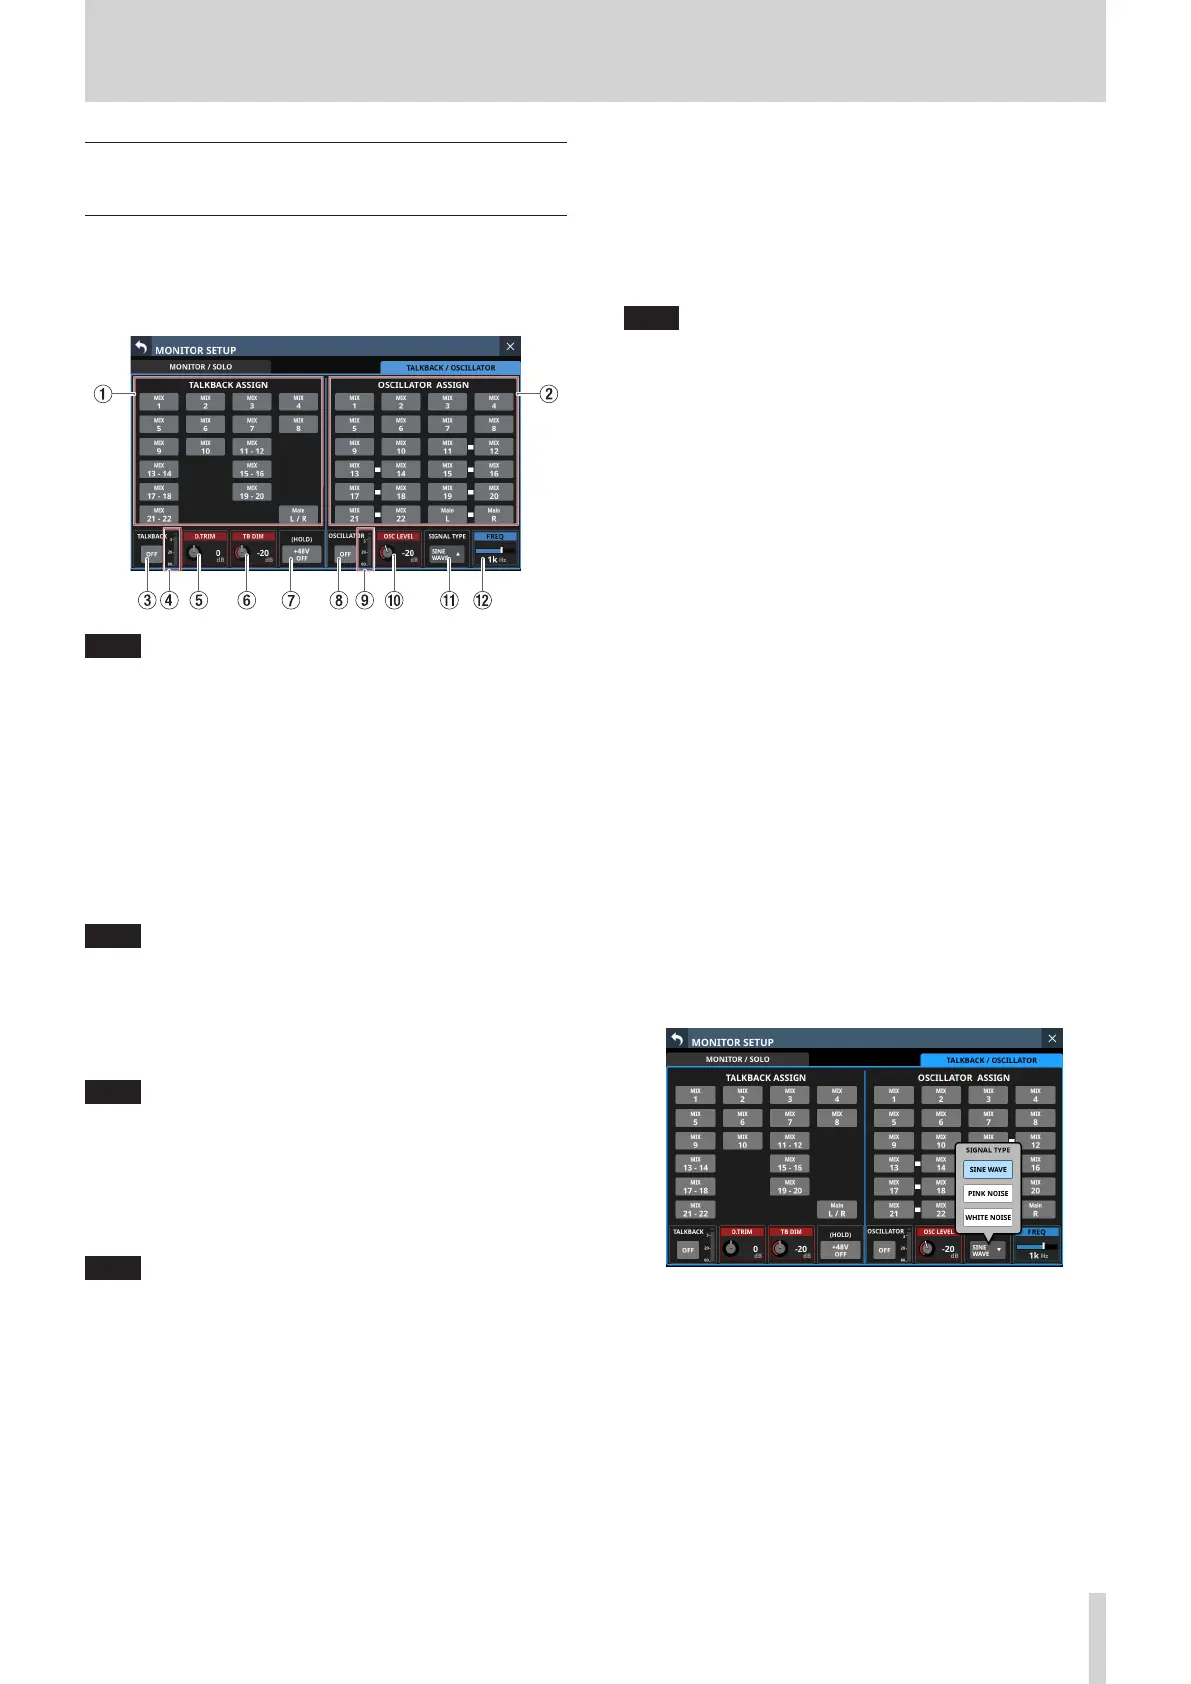
Make settings for talkback and the built-in oscillator on the
MONITOR SETUP screen TALKBACK/OSCILLATOR page.
Tap Menu Screen > Mixer Setup > Talkback/OSC Setup to open
this screen.
NOTE
i This screen can also be opened by pressing the TALKBACK
key while pressing the MENU key. (See “12 – List of shortcut
operations” on page 206.)
i Using the User Defined Control function, this screen can also
be opened with a USER KEY, footswitch or the GPIO-IN. (See
“USER DEFINED CONTROLS screen” on page 42.)
i Each level meter has an overload indicator at its top.
1 TALKBACK ASSIGN
Tap these buttons to set the outputs for the talkback signal.
(These are off by default.)
Buttons for selected outputs will be highlighted.
NOTE
Stereo buses have a single button for each pair.
2 OSCILLATOR ASSIGN
Tap these buttons to set the outputs for the built-in oscillator
signal. (These are off by default.)
Buttons for selected outputs will be highlighted.
NOTE
Outputs can be turned on/off independently even for stereo
buses.
3 TALKBACK button
Tap this button to turn the TALKBACK function ON and OFF
(default).
When this is ON, the button will appear highlighted.
NOTE
i This has the same function as the TALKBACK key on the top
panel.
i Tap this button to switch it ON and OFF. Touch this button
continuously to turn the function on only while being
touched.
i Using the User Defined Control function,
TALKBACK ON/OFF
switching is also possible with a USER KEY, the footswitch or the
GPIO-IN.
(See “USER DEFINED CONTROLS screen” on page
42.)
This function is assigned to the following GPIO-IN on the
GPIO-IN page by default.
i GPIO-IN 6 (Talkback ON/OFF)
4 TALKBACK level meter
This shows the TALKBACK signal input level.
5 D.TRIM knob
Use this to adjust the TALKBACK signal digital trim value.
Range: -20 dB – +20 dB (default: 0 dB)
Turn LCD knob 2 (lit red) to adjust it.
NOTE
Use the TALKBACK volume knob on the top panel to adjust
the TALKBACK input level. (See “h TALKBACK volume” on
page 10.)
6 TB DIM knob
When talkback is on, this adjusts the amount that the bus
being used is attenuated.
Range: -40 dB – 0 dB (default: -20 dB)
Turn LCD knob 3 (lit red) to adjust it.
7 +48V button
Use this button to supply +48V phantom power to the
TALKBACK jack on the rear panel.
Touch and hold the +48V button to turn phantom power
(+48V) ON and OFF (default).
When this is ON, the button will appear highlighted.
8 OSCILLATOR button
Tap this button to turn the built-in oscillator signal ON and
OFF (default).
When this is ON, the button will appear highlighted.
9 OSCILLATOR level meter
This shows the output level of the built-in oscillator.
0 OSC LEVEL knob
Use this to adjust the output level of the built-in oscillator.
Range: -36 dB – 0 dB (default: -20 dB)
Turn LCD knob 6 (lit red) to adjust it.
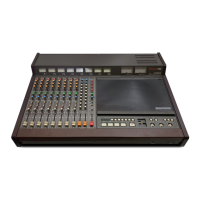
q SIGNAL TYPE button
o This shows the signal type of the built-in oscillator.
o Tap this button to open the type selection menu.
Options: SINE WAVE (default), PINK NOISE, WHITE NOISE
Tap an option button to close the menu, and show the
selected signal type.
w FREQ
This appears if the signal type is set to “SINE WAVE”.
Use this to adjust the output frequency of the built-in
oscillator.
Options: 100 Hz, 440 Hz, 1 kHz (default), 10 kHz
Turn LCD knob 8 (lit blue) to adjust it.
TASCAM Sonicview 16/Sonicview 24 V1.1.0 57