EasyManuals Logo

Xerox COLORQUBE 8870 Service Manual

Xerox COLORQUBE 8870
433 pages
To Next Page IconTo Next Page
To Previous Page IconTo Previous Page
Page #226 background imageLoading...
Page #226 background image
October 2012
4-32
ColorQube 8570/8870 Service Manual
REP 2.4
Revised, 3rd Revision - Xerox Internal Use Only
Repairs and Adjustments
Replacement
NOTE: For additional tips, refer to the Drum Assembly Installation video (also available in the
ColorQube 8570/8870 Training materials).
CAUTION
The Drum Temperature Sensor wiring harness is routed through the Exit Module. Use care
when reinstalling to avoid damaging the sensor.
NOTE: To help seat the Drum properly, steps 2-6 provide an explicit order of placement for
installing the screws to secure the Drum Assembly to the chassis.
1. Seat the Drum Assembly into the chassis.
2. Align the screw holes in the left and right sides of the Drum Assembly to the holes in the
chassis sides.
3. Install 1 screw (metal, T-20) and washer at the rear position on the left side to hold the
Drum Assembly; keep the screw loose.
4. Install 1 screw (metal, hex-head) and washer at the rear position on the right-side to hold
the Drum Assembly; keep the screw loose.
5. Align the clevis pins on the Transfix Load Arms with the holes in the mounting ears on the
Drum Assembly. The Transfix Load Arms should point in the opposite direction as the
Drum Thermistor. Position the Cam Followers on the Transfix Load Arms under the
Transfix Cams.
6. Insert the Clevis Pins through the clevis and the mounting ears on the Drum Assembly
(insert the pins from the outside). Check that the O-ring on each Clevis Pin is inside the
chassis.
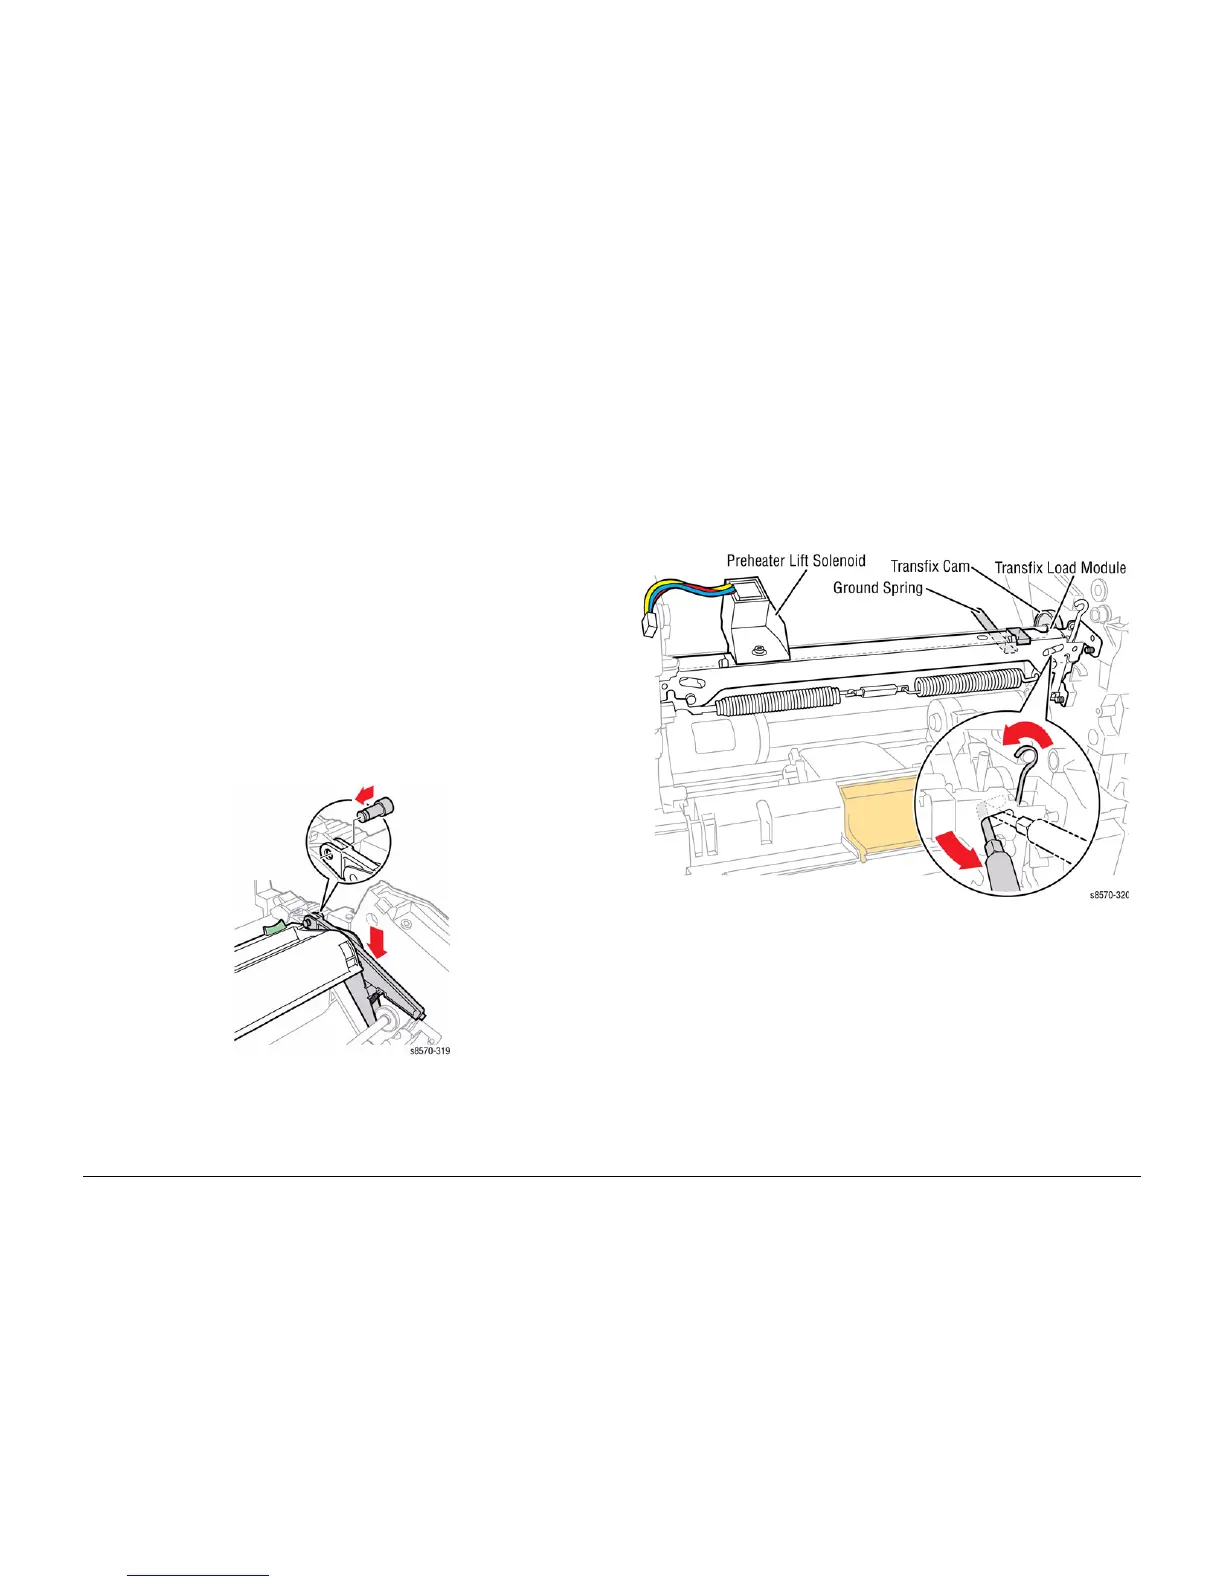
Figure 6 Installing the Transfix Load Arm Clevis Pins
CAUTION
Ensure to move the Spring Cam towards the center of the printer. Applying pressure in the
wrong direction can damage the Transfix Load Module.
CAUTION
Be careful not to pry against the Transfix Cams as shown in Figure 7 to prevent damaging the
Cam.
7. Insert a T-20 Torx bit through the right side slotted hole in the Transfix Load Module.
Engage the hole at the back of the module, and lever the module’s spring cam towards
the center of the printer while connecting the spring hooks to the Transfix Load Arms.
Repeat this process for the left side.
Figure 7 Attaching the Transfix Load Module Arm Cam Springs
8. Install the bottom screws (metal, T-20), one on each side, keeping them loose.
9. Install the front screws (metal, hex-head) (with a washer and Ground Plate), one on each
side, keeping the screws loose.
10. Tighten and torque the six screws to 25 in.-lbs. in the following order: first back screws on
both sides, second bottom screws on both sides, and third front screws on both sides.
11. Seat the Exit Module in the chassis by first engaging the 2 front locating pins, and then
the rear locating pins. Connect the Drum Temperature Sensor wiring harness.
NOTE: Rotate the Drum Assembly to verify that the Drum rotates freely. If the Drum is not
rotated freely, check the Drum Maintenance Cam at 6 o’clock position.

Table of Contents

Other manuals for Xerox COLORQUBE 8870

Questions and Answers:

Question and Answer IconNeed help?

Do you have a question about the Xerox COLORQUBE 8870 and is the answer not in the manual?

Xerox COLORQUBE 8870 Specifications

General IconGeneral
Wi-Fi-
Network readyYes
Security algorithmsHTTPS, SSL/TLS
Print technologyLaser
Maximum resolution2400 x 2400 DPI
Time to first page (black, normal)5 s
Print speed (black, normal quality, A4/US Letter)40 ppm
Maximum duty cycle120000 pages per month
Recommended duty cycle15000 pages per month
Page description languagesPCL 5c, PostScript 3
Maximum internal memory2048 MB
Sound power level (standby)24 dB
DisplayLCD
CertificationEMC Directive 2004/108/EC, FCC Part 15, Class A, Low Voltage Directive 2006/95/EC, RoHS Directive 2002/95/EC
Total input capacity625 sheets
Total output capacity350 sheets
Maximum input capacity2200 sheets
Envelopes sizesC5, DL
Maximum print size216 x 356 mm
Media weight (tray 1)60 - 220
Paper tray media typesBond paper, Card stock, Coated paper, Envelopes, Glossy paper, Labels, Photo paper, Plain paper, Recycled paper, Transparencies
Paper tray media weight60 - 220 g/m²
Non-ISO print media sizesExecutive (184 x 267mm), Legal (media size), Letter (media size), Statement (140 x 216mm)
ISO A-series sizes (A0...A9)A4, A5, A6
JIS B-series sizes (B0...B9)B5
Multi-purpose tray media typesBond paper, Business cards, Envelopes, Greeting cards, Heavyweight paper, Labels, Letterhead, Plain paper, Recycled paper, Transparencies
Maximum ISO A-series paper sizeA4
Standard interfacesEthernet, USB 2.0
Optional connectivityWireless LAN
USB 2.0 ports quantity1
Mac operating systems supportedMac OS X 10.5 Leopard, Mac OS X 10.6 Snow Leopard
Server operating systems supportedWindows Server 2003, Windows Server 2008
Windows operating systems supportedWindows 7 Home Premium, Windows 7 Home Premium x64, Windows 7 Professional, Windows 7 Professional x64, Windows 7 Starter, Windows 7 Starter x64, Windows 7 Ultimate, Windows 7 Ultimate x64, Windows Vista Business, Windows Vista Business x64, Windows Vista Home Basic, Windows Vista Home Basic x64, Windows Vista Home Premium, Windows Vista Home Premium x64, Windows Vista Ultimate, Windows Vista Ultimate x64, Windows XP Home, Windows XP Home x64, Windows XP Professional, Windows XP Professional x64
AC input voltage100 - 240 V
AC input frequency50 - 60 Hz
Power consumption (standby)107 W
Power consumption (printing)252 W
Power consumption (PowerSave)47 W
Package weight35811 g
Storage temperature (T-T)-30 - 60 °C
Operating temperature (T-T)10 - 32 °C
Operating relative humidity (H-H)10 - 80 %
Depth (imperial)20.5 \
Width (imperial)16 \
Height (imperial)14.5 \
Networking featuresGigabit Ethernet
Networking standardsIEEE 802.1x
Minimum storage drive space160 GB
Compatible operating systemsHP UX 11, HP UX 11i, Linux, Mac OS 10.5+, Solaris 10, Solaris 9, Windows 2003 Server, Windows 2008 Server, Windows 7, Windows Vista, Windows XP, Windows XP Pro
Weight and Dimensions IconWeight and Dimensions
Depth521 mm
Width406 mm
Height368 mm
Dimensions (WxDxH)406 x 521 x 368 mm

Related product manuals