October 2012
6-3
ColorQube 8570/8870 Service Manual
Printer Power On Process
General Troubleshooting
Xerox Internal Use Only - Revised, 3rd Revision
Printer Power On Process
Use Table 1 and the Mechanical Engine Initialization diagram (Figure 1), to troubleshoot fail-
ures that occur during the power-on sequence. Table 1 provides typical timing of mechanical
events that occur in the ColorQube 8570/8870 relative to power-on, assuming the printer is
cold and was shutdown properly. Timing may also vary dependent on the Printhead position
and environmental conditions.
NOTE: Warm printers reach “Ready To Print” in about 2 minutes while cold printers require up
to 12 minutes. Only cold printers require Steps 18-21 below for cleaning the Printhead. A cold
printer is defined by the Printhead temperature being below 95 - 100
°
C.
Printer Power On Sequence
The following lists the chain of events that occur when you turn on the printer. You can follow
this list as one means of determining if the printer is operating correctly. The exact chain of
events depends upon the last power down condition and where the Printhead is positioned,
this is stored in non-volatile RAM.
1. Power supply senses AC line voltage conditions (110 VAC or 220 VAC) and enables DC
voltages. If an overload occurs, the printer turns off the high voltage DC supplies, causing
a “blink” effect on the Control Panel LEDs.
2. The Boot loader performs CPU initialization and RAM test. It then sends the boot loader
version to the serial port.
3. Power-On Self Test (POST) initializes the Control Panel. The Control Panel LED turns
red, green, orange, and then off. The Control Panel LCD then goes black and then clear.
The POST version displays on the LCD and waits two seconds. During this time the oper
-
ator can press the Back button to bypass the remaining POST test.
4. Low level Power-On Self Test (POST) diagnostics are performed. The Control Panel dis-
plays status messages as each sub-test is performed. This test takes about 8 seconds.
All LEDs are off during the test.
If POST diagnostics pass, the green LED turns on.
If the test detects an error, the fault message displays on the LCD and the printer flashes
the LEDs with a repeating fault code pattern.
5. The VxWorks operating system is initialized and engine code is started. This takes about
15 seconds. The Xerox logo is displayed.
6. Print Engine Self Test (PEST) diagnostics are then performed. These test the heaters,
clutches, motors and solenoids. As each clutch is tested, you hear clicking with four high
tones as each motor is tested. This test takes about 30 seconds.
7. Energy Star is displayed on the Control Panel.
8. The printer now runs the mechanical initialization. The exact sequence depends on the
initial position of the Printhead and Wiper Assembly.
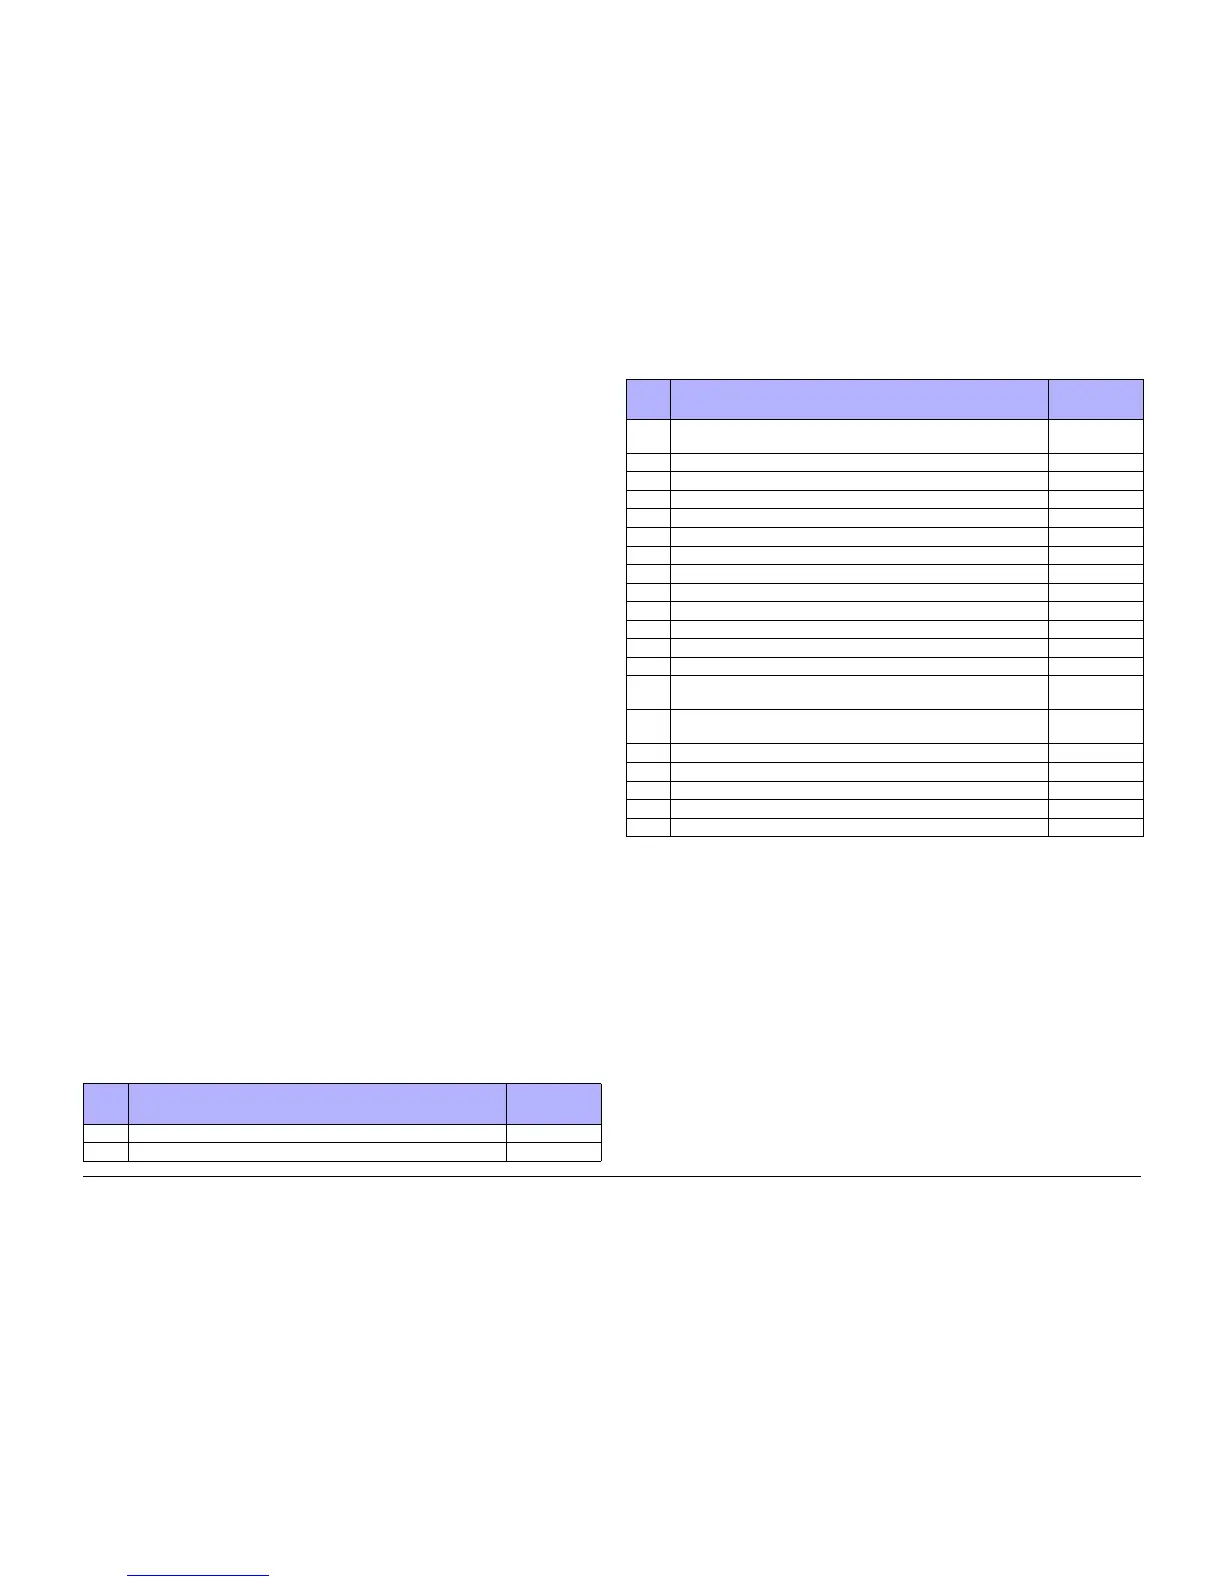
The System Power On Sequence (Table 1) is the primary reference for troubleshooting power-
up problems.
Table 1 Printer Power On Sequence
Item Power On Event
Elapsed Time
(mm:ss)
1. Set power switch to On. 00:00
2. Control Panel LED flashes red-green-yellow-orange-off. 00:03
3. Control Panel displays “ColorQube 8570_8870 Power on Self Test
Complete.”
00:04
4. Control Panel displays “Initializing.” 00:11
5. Power supply fan starts turning. 00:20
7. Control Panel displays XEROX logo & LED turns green. 00:24
8. Print Engine Self Tests (PEST) begin with solenoids and clutches. 00:26
9. Four high tones from motor testing. 00:49
10. Print Engine Self Test complete. 00:48
11. Control Panel displays Energy Star logo. 00:58
12. Mechanical initialization begins. 01:08
13. Back light on Control Panel display turns On. 01:15
14. Control Panel displays “Warming Up.” 01:24
15. Control Panel displays “Warming Up 5%.” 01:51
16. Mechanical initialization ends. 02:04
17. Control Panel displays “Warming Up xx%” (increasing toward
100%).
02:16
18. When the Control Panel displays “Warming Up 21%”, cleaning starts
--- Cold systems only.
07:34
19. Cleaning ends --- Cold systems only. 10:16
20. Control Panel displays “Printing page 1 of 4” --- Cold systems only. 11:12
21. Cleaning page exits --- Cold systems only. 11:48
22. Startup page exits (if enabled) 11:58
23. Control Panel displays “Ready To Print.” 11:59
Table 1 Printer Power On Sequence
Item Power On Event
Elapsed Time
(mm:ss)
 Loading...


