October 2012
6-5
ColorQube 8570/8870 Service Manual
Printer Power On Process, Hidden Service Menu
General Troubleshooting
Xerox Internal Use Only - Revised, 3rd Revision
Unplanned Shutdown
If the printer was not shutdown by the power switch the last time it was turned off or it was shut-
down with ink on the Drum.
As soon as the printer has warmed up, the Media Path Motor moves the Wiper to the bottom of
its travel and the Process Motor moves the Printhead to the print position as the chase page is
sent through the paper path to clean ink from the Drum.
Temperature Below Purge Threshold
If the Printhead, ink Reservoirs, or Jetstack temperature are below purge threshold, the printer
performs a Printhead cleaning cycle.
1. The printer waits for the Printhead to reach its purge temperature.
2. The printer moves the Wiper to the bottom of its travel and tilts the Printhead forward to its
Print position to check the ink levels. If the ink level is low, ink is melted into the appropri
-
ate reservoirs.
3. The Printhead tilts to the Park position and moves the Wiper Assembly to the Purge posi-
tion in front of the Printhead Faceplate.
4. The Purge Pump begins the pressure purge after about 3 seconds the Purge Pump Sole-
noid opens.
5. The Printhead tilts forward against the Wiper Assembly (Wipe position) and the purge and
wipe cycle begins.
6. The Control Panel indicates the printer is performing the cleaning process.
7. The Printhead is moved left to the tilt zone, where the Printhead can tilt back without inter-
ference, and the Media Path Motor moves the Wiper to the bottom of its travel to engage
the Printhead Tilt Cam. The Process Motor rotates the Printhead Tilt Gears, which tilt in
order to move the Printhead to the forward Print position.
8. After the print engine is in a known, valid state, the Control Panel display shows the
warm-up progress (the Ready LED flashes). When warm-up completes, the Ready LED
displays solid.
9. The temperature of the Printhead, Drum, and Paper Preheater are allowed to stabilize at
their operating temperatures and ink is melted if needed.
10. The Printhead is homed to the Print position for printing.
11. A cleaning page is printed at this time, if a purge was performed.
12. A Startup page is printed (if enabled).
13. The Control Panel displays a message that the printer is initializing and then ready.
14. The print engine is initialized and is ready to print.
Hidden Service Menu
The Hidden Service menu provides access to information pages and tests for diagnosing and
correcting printer malfunctions and accessing special features. Access the Hidden Service
menu as follows:
1. From the Control Panel menu, select Troubleshooting --> Service Tools.
2. With the cursor at the top of the Service Tools menu (Printer Status Page), press both
the Up and Down Arrow buttons to display the Hidden Service menu.
NOTE: The Hidden Service menu varies by model.
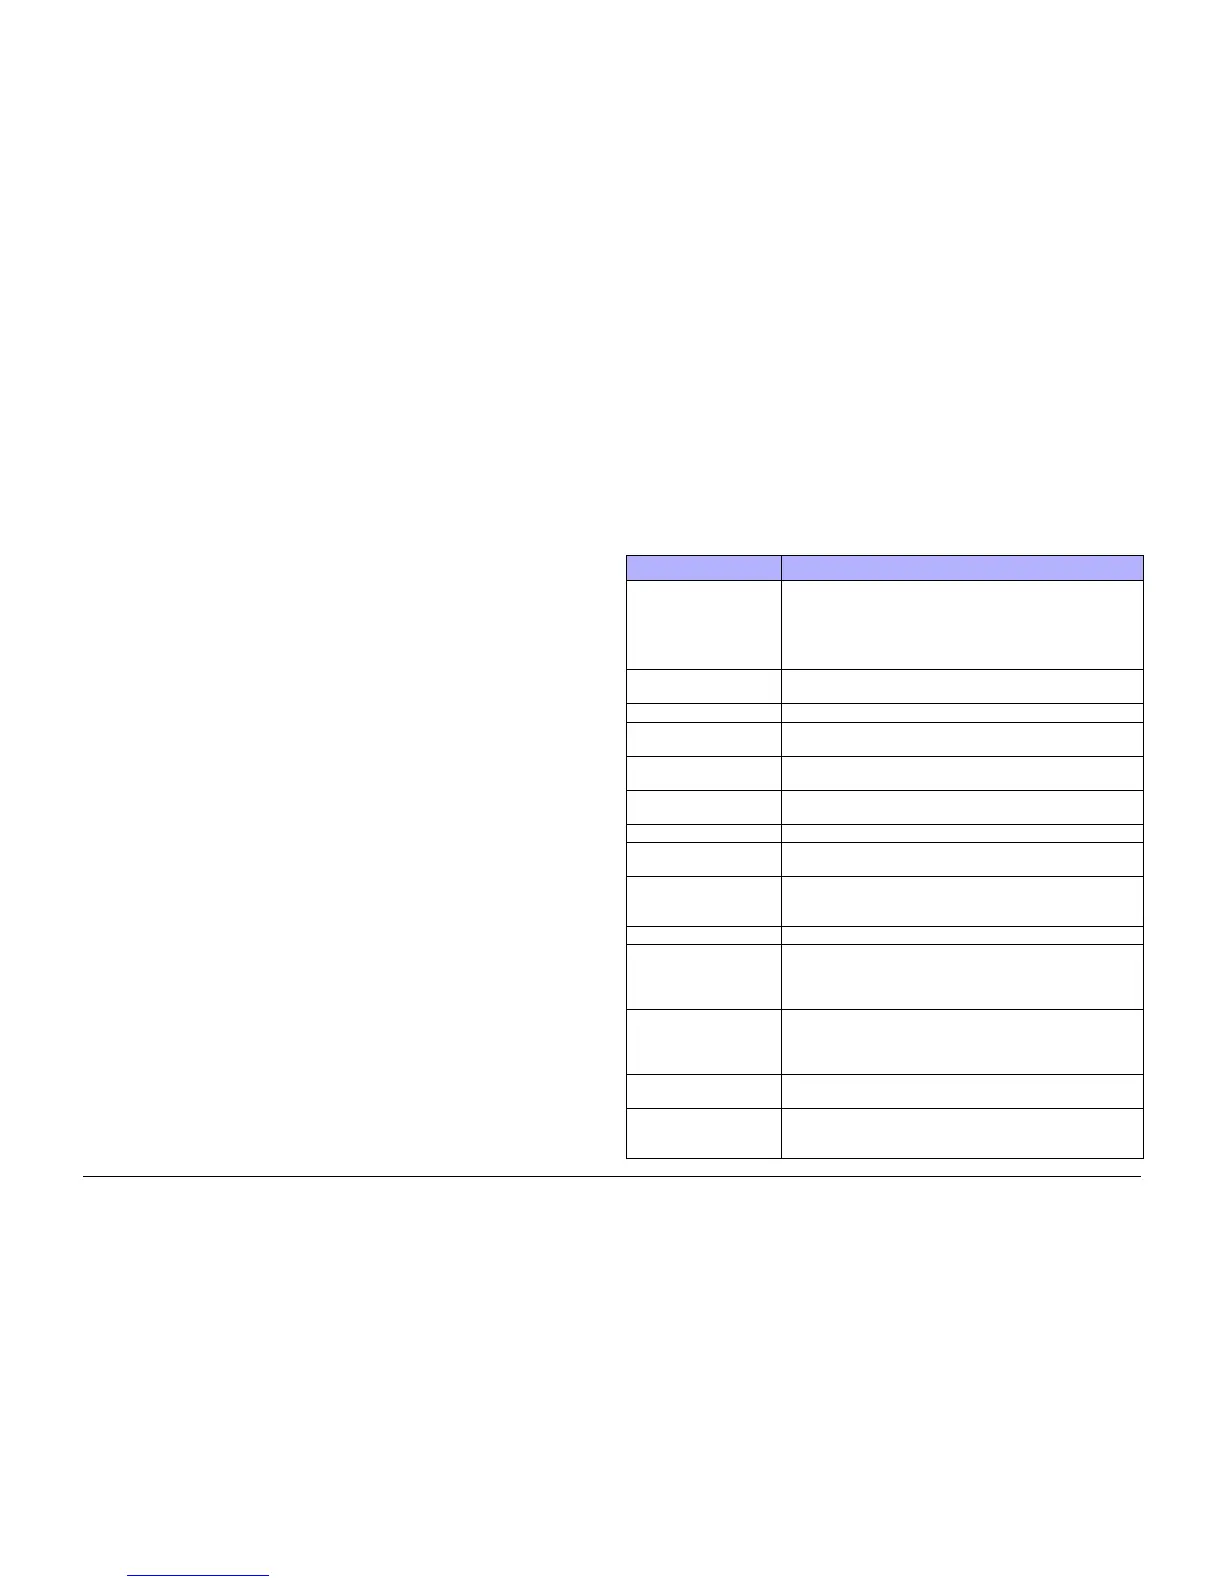
Table 1 Hidden Service Menu Selections
Menu Item Description
Manufacturing Contains various tests including Jet Check, Eliminate Light
Stripes, Solid Fills, Manufacturing Skew Margin, Check Ink Levels
for Shipping, Adjust Ink Levels for Shipping.
NOTE: The Manufacturing menu is available in Service mode
only.
Test Prints See Test Prints in Chapter 3 for description of each test print
available.
Startup Page Prints basic printer configuration and networking information.
Eliminate Light Stripes Performs a cleaning procedure to remove light stripes in prints;
this process will take about 5 minutes.
Fault History Displays available information regarding the last 15 faults
reported by a test and/or the print engine.
Jam History Displays available information regarding the last 20 jams reported
by a test and/or the print engine.
Diagnostics History Displays the results of the diagnostic tests.
Enter Diagnostic Mode See Entering Service Diagnostics for how to access Service
Diagnostics menu.
Reset NVRAM Resets the printer back to default settings and clears all network
settings. If possible, print the Configuration page before resetting
NVRAM.
Reset Printer Resets all items in the System Controls menu to default values.
Head Adjust Allows setting of the printhead voltage scale factor value. Default
value of 128. A higher value increases the voltage used to drive
the jets.
This is for manufacturing or engineering use only.
Adjust X-Axis Scale Opens a menu that allows a service technician to make adjust-
ments to the X-axis velocity scale factor by evaluating a printed
pattern.
This is for manufacturing or engineering use only.
Y-Axis Thermal Calibration Calibrates the Y-Axis Motor. This is for manufacturing or engi-
neering use only.
Drift Compensation Turns On and Off the feature to automatically adjust the Print-
head waveform for Drift.
This is for manufacturing or engineering use only.
 Loading...


