October 2012
6-41
ColorQube 8570/8870 Service Manual
Electrical Troubleshooting
General Troubleshooting
Xerox Internal Use Only - Revised, 3rd Revision
If the correct fault code is not displayed, replace the Control Panel (REP 1.6) and I/O
Board (REP 5.10) and verify the correct fault code appears. Retest Electronics Mod
-
ule, I/O Board, Control Panel combination.
If no fault code displays, return the original Control Panel and I/O Board to the
printer. Replace the Electronics Module (REP 5.1) and then continue with the next
steps of the procedure.
o. If a different fault code is displayed, see Fault Messages and Codes Troubleshooting
in Chapter 2 (Fault Messages and Codes) for a definition of the problem and the pro
-
cedures needed to solve the problem.
2. Repeat these procedures to check all circuits connected to the I/O Board:
a. Turn off the printer and wait 30 seconds for the Power Supply capacitors to dis-
charge.
b. Plug in the I/O Board connectors, one at a time, and perform steps 2.c and 2.d for
each connector.
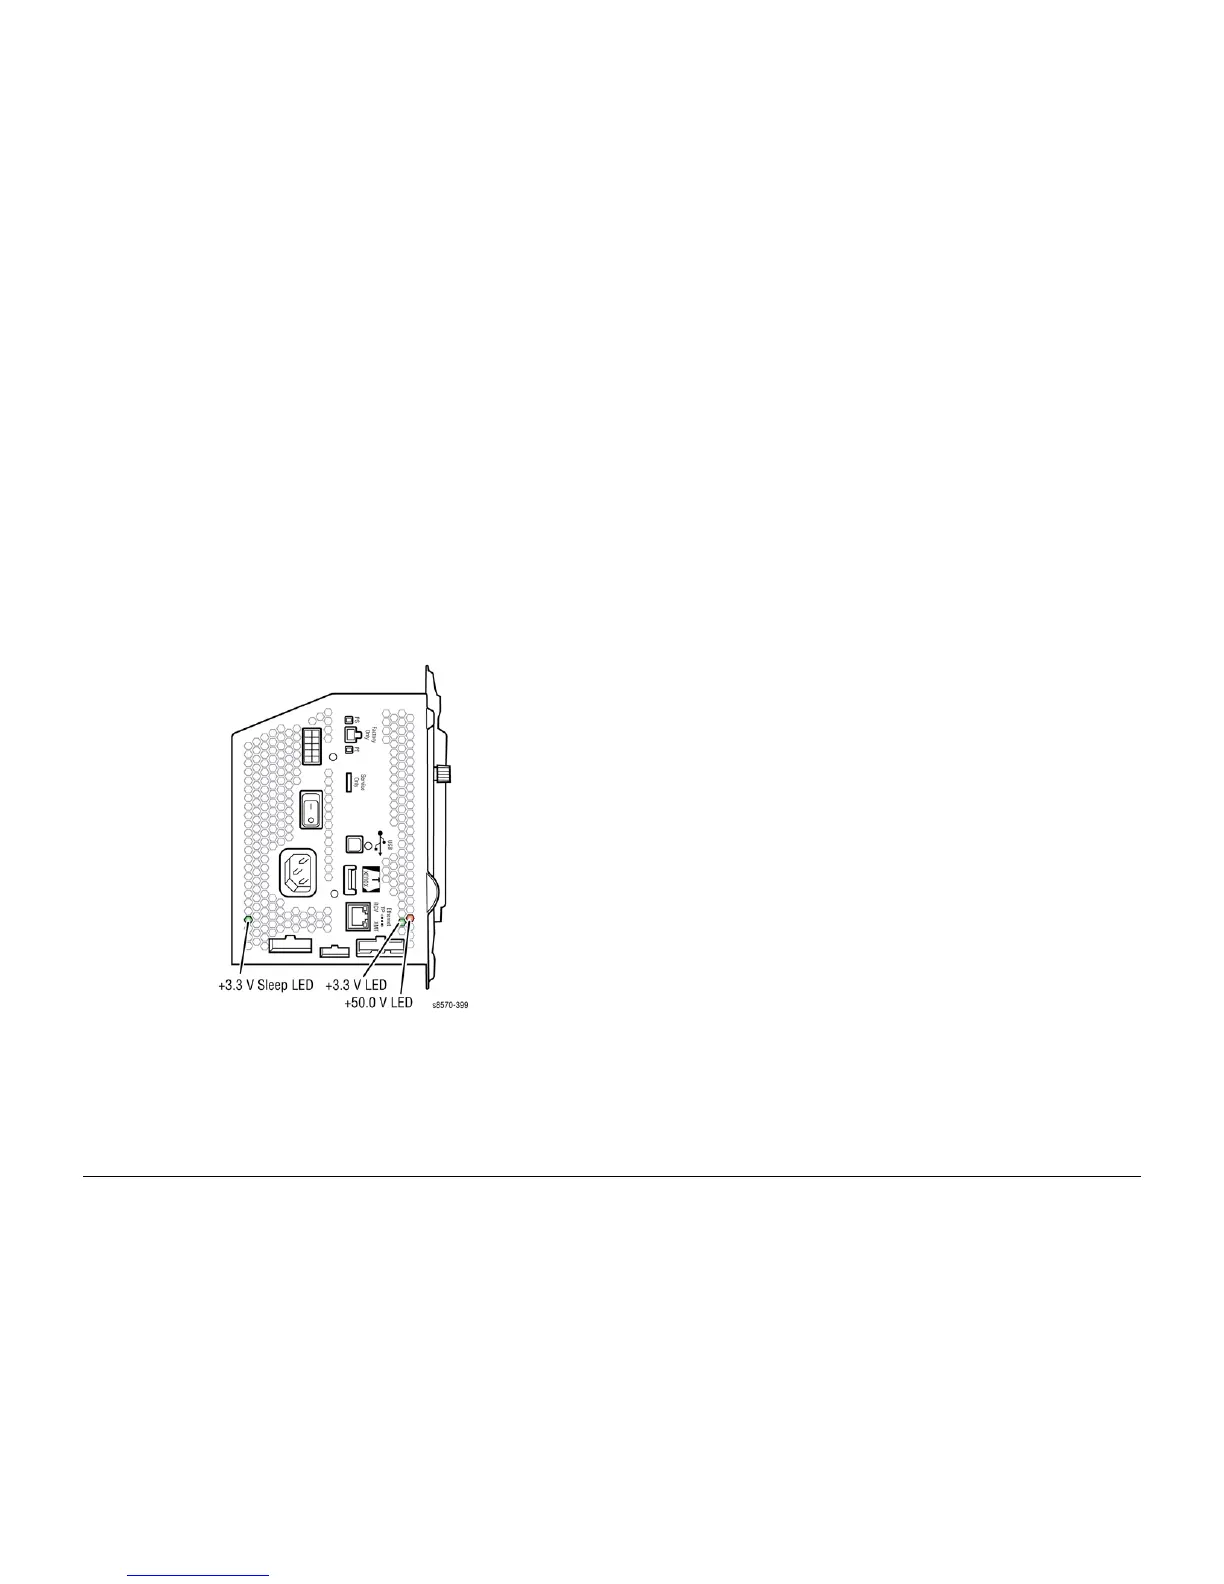
c. Turn on the printer and wait for fault code 91,900 to display. Check that the three
voltage indication LEDs inside the Electronics Module (visible through the vent holes
of the Electronics Module near the AC power switch) are lit as shown in Figure 16.
Figure 16 Electronics Module LEDs
d. If the proper fault code and LED does not appear after each I/O Board connector is
reconnected, repair or replace the faulty circuit.
e. If the proper code appears, repeat the procedures until all I/O Board connectors are
plugged back in.
f. If repairs are made during this step, plug in all connectors to the printer and retest. If
the printer is fixed, reattach the covers to the printer and perform a full test. If no
defects are found in this step, replace Electronics Module (REP 5.1), test the printer,
reattach covers to printer, and perform a full test.
Verifying Print Engine Operation by Printing Stored Pages
1. Turn on the printer. If the printer does not begin initializing, go to Measuring AC Voltages
procedure in Chapter 6 (General Troubleshooting).
2. Once the power light is on (not blinking) and the Control Panel displays Ready to Print, it
is now possible to print a stored page.
3. If a page prints, the print engine is working correctly. If not, a problem exists with the print
engine.
Control Panel Malfunction
Control Panel Not Responding
1. If the printer is powered on and frozen, open then close the Front Door to see if the Con-
trol Panel responds.
2. If the printer appears functional after operating the door, advise customer that failure may
have been due to an ESD event. Thoroughly test the printer for any other problems.
3. Skip the rest of this section if the printer is functional, otherwise continue troubleshooting.
4. With the power cord connected, touch the Electronics Module to discharge any static.
ESD damage may occur if static electricity is discharged to the printer electronics.
5. Turn off the printer and wait 30 seconds for the power Supply Capacitors to discharge.
Damage to circuits within the Electronics Module may occur if the Power Supply capaci
-
tors are not allowed to fully discharge.
6. Unplug the power cord and remove printer's covers. Use caution around motors, pulleys
and live AC connections when working with the printer covers off.
7. Examine the printer for loose grounding connections, especially the ground strap on the
Y-Axis Motor. Eliminate the possibility of internally generated ESD from affecting the
printer.
8. Plug in all the cables removed during service. Trace through all service steps performed
to reattach any cables that were unplugged during troubleshooting.
9. Reassemble and retest the printer.
Control Panel is Blank
A blank Control Panel indicates some portion of the chain of devices used to drive the LCD
may be defective. If the PS and PE LEDs are flashing a code, see Power On Self Tests in
Chapter 2 (Fault Messages and Codes). If no error indication is available, use the following
procedure to check the Control Panel.
1. If the printer is powered on, open then close the Front Door to see if the Control Panel
responds.
2. If the printer is functional after operating the door, advise customer that failure may have
been due to an ESD event. Thoroughly test the printer for any other problems.
3. Skip the rest of this section if the printer now appears functional, otherwise continue trou-
bleshooting.
4. With the power cord connected, touch the Electronics Module to discharge any static
electricity to prevent ESD damage to the printer may occur if static electricity is dis
-
charged to printer electronics.
 Loading...


