Home
ICS
Washer
Auto Sentry flex
Page 118 (Large Size Custom Buttons, 3 Services)
ICS Auto Sentry flex - Large Size Custom Buttons, 3 Services; Extra Large Size Custom Buttons, 2 Services; Figure 81. Large Size Custom Buttons, 3 Services; Figure 82. Extra Large Size 2 Services Custom Buttons
190 pages
Manual
Save Page as PDF
To Next Page
To Next Page
To Previous Page
To Previous Page
Loading...
Auto Sentry®
flex
User Manual
118
Marketing
with your Auto Sentry
Large Size Custom Buttons
, 3 Ser
vices
Figure 81.
Large
Size Custom
Butt
ons, 3 S
er
vices
Extra Large Size C
ustom Buttons
, 2 Services
Figur
e 82. Extra Large Siz
e 2 Services Custom Butt
ons
117
119
Table of Contents
Main Page
Default Chapter
3
Table of Contents
3
Chapter 1 Introduction
17
About the Auto Sentry® Flex
17
Version Considerations
18
Related Documents
19
Operating Requirements
19
System Overview
19
In-Bay Equipment
20
Washconnect®Software
20
Custom Graphic Design ICS Marketing Team
20
Table 1. System Overview
20
Safe Configuration
22
Enabling or Disabling the Safe
22
Flex-Serve Facilities with the Safe
22
Flex-Serve Facilities Without the Safe
23
Figure 1. Auto Sentry with Safe, Two Different Setups
23
Auto Sentry® Flex Hardware Description
24
Touch Screen
24
Figure 2. Facility Without Setting up the Safe
24
Single Board Computer
25
Figure 3. Custom Touch Screen Example
25
Figure 4. SBC (Single Board Computer)
25
Serial Input/Output Board (SIO)
26
Figure 5. Serial I/O Board Bill Acceptor
26
Figure 6. Bill Acceptor
26
Coin Acceptor
27
Figure 7. Coin Acceptor
27
Bill Dispensers
28
Figure 8. LT - Talaris NMD-50 Bill Dispenser RT - Fujitsu F-400 Bill Dispenser
28
Figure 9. Talaris Multimech Bill Dispenser
29
Figure 10. Gen-Mega Bill Dispenser
29
Coin Hopper
30
Card Reader
30
Figure 11. Coin Hopper
30
Figure 12. Card Reader
30
Emv
31
Figure 13. Auto Sentry Flex with EMV
31
Chip Card Reader
32
Figure 14. Moneris Card Reader Unit
32
Figure 15. Moneris Card Reader (Back of Unit)
32
Figure 16. Moneris Card Reader (Bottom of Unit)
33
Figure 17. Credit Card Reader (Face)
34
Figure 18. Moneris PIN Pad
35
Figure 19. Moneris PIN Pad Cable Port
35
PIN Pad
35
Contactless Tap and Pay Card Reader
36
Figure 20. Moneris Tap and Pay Contactless Card Reader
36
Figure 21. Moneris Tap and Pay Contactless Card Reader (Bottom View)
36
Gift Card Dispenser
37
Receipt Printer
37
Figure 22. Receipt Printer
37
Bar Code Scanner
38
Sonic Sensor - Car Sense Eye
39
Figure 23. Sonic Sensor Location in Base of Auto Sentry
39
Vandalism Alarm
40
Deterrent Warning Alarm
40
Figure 24. Sonic Sensor in Auto Sentry with Deterrent Warning Message On-Screen
40
Deterrent Break-In Alarm
41
Figure 25. Vandalism Deterrent Settings
41
Vandalism Sensor
42
Table 2. Auto Sentry Vandalism Deterrent
42
Chapter 2: OPERATING
43
Introducing the Touch Screen
43
Figure 26. Welcome Screen Descriptions Custom Graphics
43
About Touchscreen Configurations
44
Figure 27. Welcome Screen with Video on Right Custom Graphics
44
Figure 28. Welcome Screen, Two-Button Configuration
44
About Custom Graphics
45
About Damage Waiver Videos
45
Advertisement Videos
45
Figure 29. Welcome Screen with 3 Button Configuration Custom Graphics
45
About Product Information Clips
46
Figure 30. Example Custom Video
46
Figure 31. Promotional Video Clips
46
About the Secondary Language Display
47
Understanding Purchasing Scenarios
47
Figure 32. Spanish Language Interface with Custom Graphics
47
About the Purchase Buttons
48
Figure 33. Seven Purchase Buttons (Custom)
48
Table 3. Purchase Buttons
48
Figure 34. Main Menu Custom Graphics
50
Purchasing a Wash with no Extra Services
51
Figure 35. Welcome Screen and Select Wash Screen
51
Figure 36. Select Wash to Select Extra Service Screen
51
Figure 37. Custom Select Extra Service and Insert Cash or Card Screen
52
Purchasing a Wash with an Extra Service
52
Figure 38. Basic Wash with an Extra Service Purchase
53
Selling Club Memberships
54
To Enable the Active or Passive Club Sell Process, Follow These Steps
54
Table 4. Audio Prompts for Wash Purchase with One Extra Service
54
Renew Club Memberships at the Terminal
55
Figure 39. "None" Club Sell Style Screen
55
About Unlimited Wash Clubs with a Club Card
56
Purchasing an Extra Service with a Club Tag
57
Table 5. Audio Prompts for Wash Purchase with a Club Card
57
Figure 40. Wash Club Purchase with Club Tag
59
Selling Gift Cards at the Auto Sentry® Flex
60
Table 6. Audio Prompts for Wash Purchase with a Club Tag
60
Figure 41. Lt. Passive Gift Card Selling and Rt. Active Gift Card Selling Screens
61
Selling Gift Cards and Clubs Together
62
Active/Passive Selling Gift Card and Club Together
62
Figure 42. Washconnect Gift Card Settings for Passive Sell Style
62
Figure 43. Passive Sell Style Buy Wash and Buy Gift Card Buttons
62
Purchasing a Wash with a Wash Code
63
Figure 44. Wash Purchase with Prepaid Wash Code
64
Paying the Attendant to Purchase a Wash
65
Figure 45. Wash Purchase with Pay Attendant
65
Table 7. Audio Prompts for Wash Purchase with Wash Code
65
Purchasing a Wash with a Coupon
66
Table 8. Audio Prompts for Wash Purchase with Pay Attendant
66
Figure 46. Wash Purchase with Coupon and no Extra Services
67
Table 9. Audio Prompts for Purchase with Coupon and no Extra Services
67
Track Zip Codes by Using Coupons
68
Purchase a Wash with a Fleet Account Card
68
Figure 47. Wash Purchase with Fleet Account Card
70
Wash Clubs
71
Table 10. Audio Prompts for Wash Purchase with a Fleet Account Card
71
Figure 48. Wash Purchase and Extra Service with Club Card
72
Purchasing a Wash with a Club RFID Tag
73
Table 11. Audio Prompts for Wash Purchase with a Fleet Account Card
73
Figure 49. Wash Purchase with Club RFID Tag
74
Sensing a High Vehicle
75
Table 12. Audio Prompts for Wash Purchase with a Club RFID Tag
75
Understanding Payment Scenarios
76
Figure 50. High Vehicle Profile Retail Menu Custom Graphics
76
Table 13. Audio Prompts for High Vehicle Profile (HVP) Wash Purchase
76
About Credit Card and Gift Card Combinations
77
Figure 51. Payment Screen for All Payment Combinations Custom Graphics
77
Cash and Coin Payment Combinations
78
Dispensing Change
78
Figure 52. Cash Payment Combinations
78
Figure 53. Dispensing Change
78
Drive Ahead Screen
79
Figure 54. Drive Ahead Screen Custom Graphics
79
Payment Process Feedback
79
About Gift Card Payments
80
Adding Value to a Gift Card
80
Figure 55. Gift Card Add Value Option
80
Table 14. Audio Prompts for Add Value to Gift Card
81
Figure 56. Gift Card Add Value Option with Promotional Increase
82
Adding Value to a Gift Card with Bonus Increase
83
Table 15. Audio Prompts for Add Value to Gift Card with Promotional Increase
83
Figure 57. Pay Difference on Gift Card
84
Pay Difference
85
About Token Coins and Token Notes
85
Table 16. Audio Prompts for Add Value to Gift Card with Promotional Increase
85
About Receipt Options
86
About Errors and Command Buttons
86
Figure 58. Receipt Printing Options
86
Figure 59. Card Authorization Failure
86
Card Authorization Failure
87
Card Duplicate Transaction
87
Card Maximum Timeout
87
Figure 60. Card Maximum Timeout
87
Figure 61. Card Duplicate Transaction
87
Table 17. Audio Prompt for Card Authorization Failure
87
Figure 62. Wash Code Not Valid
88
Table 18. Audio Prompts for Invalid Wash Code
88
Table 19. Audio Prompts for Expired Wash Code
88
Wash Code Expired
88
Wash Code Not Valid
88
Credit Due for Canceling Transaction
89
Credit Due for Wash Payment
89
Figure 64. Credit Due for Wash Payment
89
Figure 65. Credit Due for Canceling Transaction
89
Figure 66. Unspecified Error
90
Table 20. Audio Prompts for Unspecified Error
90
Unspecified Error
90
Wash Busy
90
Back, Cancel and Replay Buttons
91
English and Spanish Buttons
91
Figure 68. Help Button
91
Figure 69. Back, Cancel, and Replay Buttons
91
Figure 70. English and Spanish Buttons
91
Help Button
91
Table 21. Audio Prompt for Help Button
91
Chapter 3 Service Unit Screen
93
Service Unit Screen Password and PIN
93
Accessing the Service Unit Screen
94
Figure 71. Service Buttons
94
Figure 72. Service Unit Screen User's Site ID
95
Figure 73. Enter PIN
95
Add Funds
97
Add Coins or Coin Tokens
97
Add Bills (to the Auto Sentry)
98
Verify Coin Hoppers
99
Remove Bill or Coins (from the Auto Sentry)
100
Removing from Bill Dispenser, Bill Acceptor, or Coin Acceptor
100
Removing from Coin Hopper or Coin Token Hopper
100
Part One: Verify the Hopper
100
Figure 74. Service Unit Screen Icons
100
Terminal Operations
101
Close Terminal - Auto Sentry
101
Bump Shift
102
Close Terminal
102
Open Terminal
103
Diagnostics
103
Table 1. Diagnostics Screen Icon Descriptions
103
Bill Dispenser Diagnostics and Life History
104
Exiting the Service Unit Screen
104
Figure 75. Exit Button on Service Unit Screen
104
Reset Alarm
104
Terminal Balances
105
Figure 76. Diagnostic Screen to Disable and Reset the Vandalism Alarm
105
Cash Management
109
About Entries in the Cash Management Journal
109
Automatically Created Shifts in the Cash Management Journal
109
Figure 77. Journals in Washconnect
109
Servicing Tips
110
Stagger Times for Cash Removal
110
Table 1. Journals Entry Descriptions with Safe Enabled
110
Check Balances Periodically
111
Verify Cash Management Transactions Daily
111
Chapter 4 Marketing with Your Auto Sentry
113
Custom Buttons
113
About Custom Buttons, Plus, and Profiles
113
Figure 78. Custom Button Enabled for PLU 5
114
Sizing Custom Buttons
115
Naming Custom Buttons
116
Saving Custom Buttons
116
Enabling Buttons
116
Table 2. Button Sizes and Specifications
116
Buttons Layout Examples
117
Small Size Custom Buttons, 6 or 5 Services
117
Medium Size Custom Buttons, 4 Services
117
Figure 79. Small Custom Button, 6 or 5 Services
117
Figure 80. Medium Custom Buttons, 4 Services
117
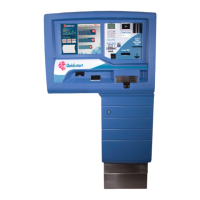
Large Size Custom Buttons, 3 Services
118
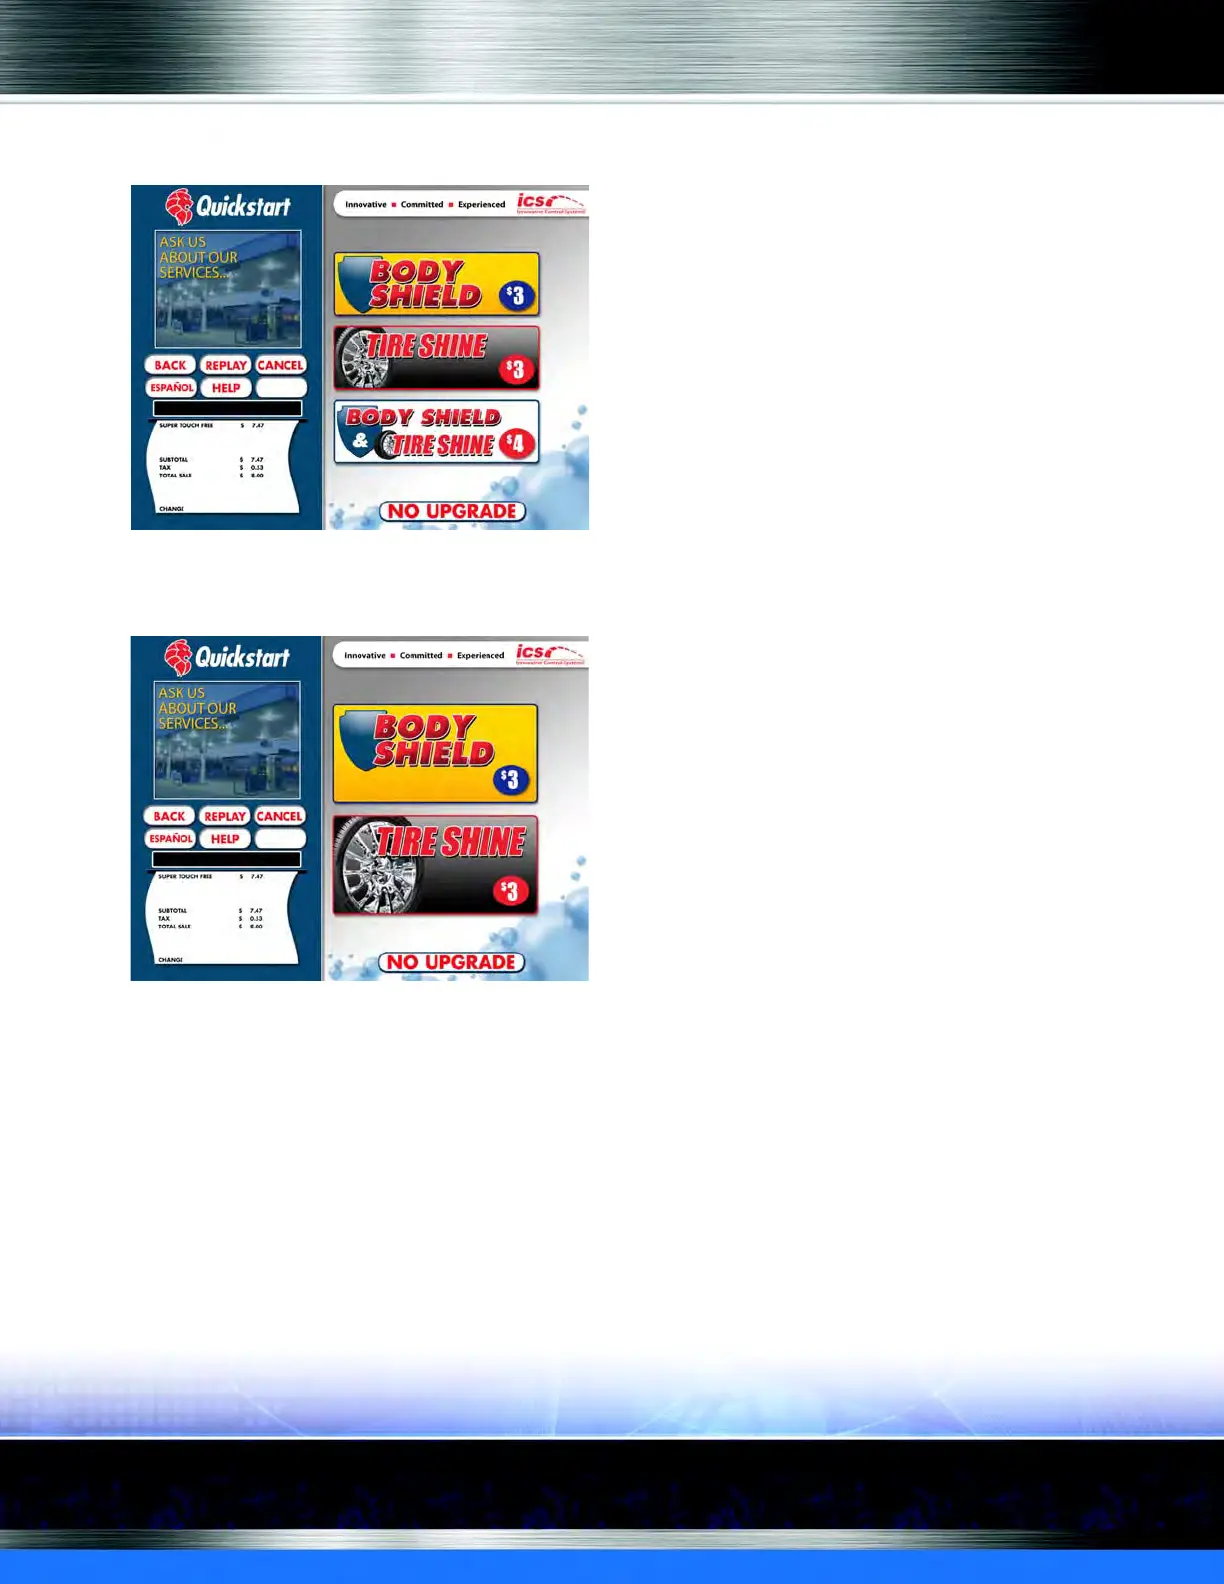
Extra Large Size Custom Buttons, 2 Services
118
Figure 81. Large Size Custom Buttons, 3 Services
118
Figure 82. Extra Large Size 2 Services Custom Buttons
118
Using Videos
119
About Promotional Clips
119
Figure 83. Extra Large Custom Button, Only Available for One Extra Service
119
Figure 84. Video Clip Info Buttons
119
Ordering Video Clips
120
Recording Video Clips
120
Naming Video Clips
120
Saving Video Clip Files
120
Figure 85. Example Video Clip File in AVI Files Directory
120
Video Clip Specifications
121
Enabling Video Clip Files for Standard Buttons
121
Table 3. Video and Audio Specifications
121
Enabling Video Clip Files
122
Figure 86. Example PLU with Video Clip Enabled
122
Enabling Welcome Videos and Damage Waivers
123
Using Profiles and Schedules
123
Figure 87. Video Clips Enabled
123
Figure 88. Example of a List of Profiles from the Profile Tab
124
About Wash Selections Based on the Day and Time
125
Display a Standard Offerings Schedule
125
Figure 89. Example Standard Offerings Schedule
125
Display a Holiday Schedule
126
Figure 90. Example Labor Day Schedule
126
Display Busy and Slow Schedules
127
Figure 91. Example Busy and Slow Schedules
127
Display an Inclement Weather Schedule
128
Figure 92. Example Buggy Thursdays Schedule
128
About Wash Selections Based on Transaction Type
129
Display a Twenty-Four Hour Schedule
129
Display Wash Selections Based on Vehicle Height
129
Figure 93. Example Twenty-Four Hour Schedule
129
Display a Retail Schedule
130
Figure 94. Example Retail Schedule
130
Display a Fleet Schedule
131
Figure 95. Example Fleet Profile Time
131
Display a Paid Ticket Schedule
132
Display an Open Ticket Schedule
132
Figure 96. Example Presell Schedule
132
Display a Club Schedule
133
Figure 97. Paid Ticket Schedule Example
133
Display a Coupon Schedule
134
Figure 98. Club Schedule Example
134
Display a Club Sales Schedule
135
Figure 99. Coupon Schedule
135
Using Discount Coupon
136
Figure 100. Club Sales Schedule
136
Figure 101. Discount Coupon Sales Item
137
Add a Discount Coupon Profile and Schedule
138
Add a Schedule for a Discount Coupon
139
Figure 102. Discount Coupon Profile
139
Using Tokens
140
Dispensing Tokens as Part of a Promotion
141
Figure 103. Token Setup
141
Figure 104. Auto Sentry® Flex
142
Figure 105. Denomination Dialog Box
143
Figure 106. Tokens and Hopper Setup for a PLU Example
144
Configure Coin Acceptor to Accept Tokens
145
Figure 107. Please Take Coins below Custom Graphic
145
Figure 108. Auto Sentry Coin Acceptor Settings
145
Add a Currency Value for the Coin Acceptor
146
Figure 109. Wash Paid with 1.00 Token
146
Figure 110. Assign Denominations Tab
146
Using Frequency Promotion
147
Figure 111. Assign Denominations Dialog Box
147
Figure 112. Frequency Promotion Example
148
Figure 113. Promo Receipt Text
149
Promo Receipt Text
149
About Promotional Plus and Extra Services
150
Figure 114. Example Frequent Promotion Receipt with a Wash Code
150
Figure 115. Receiving Free Wash PLU
151
Redeeming a Presell Ticket
152
Using Wash Club Promotions
152
Figure 116. Frequency Promotion Profile and Profile Time
152
Table 4. Business Considerations for Wash Club Promotion
153
Setting up Your Wash Club Menu
154
Retail Wash Menu
154
II.setup the Club's Base Wash Redemption PLU
154
III. Create a Package for Every Wash Club
155
IV. Set up a Club Service
155
Create a New Profile for each Wash Club
156
VI. Create a Profile for the Entire Wash Club Offerings
157
Create a Sales Item for the Discount Coupon Code (Optional)
158
VIII. Create a Profile for the Discount Coupon Code
158
Assigning Services to the Club Package
159
Selling a Club Package at the POS and Auto Sentry® Flex
159
Redeeming a Club Wash
159
Figure 117. Main Menu Select Join Wash Club
159
Figure 118. Club Member Redeemed Wash and Purchased Extra Services
159
Using Fundraiser Promotions
160
Enabling the Fundraiser Buttons
160
Setting up Fundraiser Coupon Codes
161
Figure 119. Fundraising Button Enabled
161
Setting up Fundraiser Extra Choices
162
Setting up Fundraisers in the Active Settings Dialog Box
162
Processing a Fundraiser Sale
162
Figure 120. Example Screen Progression for Fundraiser Purchase
163
Viewing Reports for Fundraising Purchases
164
Figure 121. Example Fundraising Purchase Receipt
164
Figure 122. Fundraising Report
165
Chapter 5 Reports
167
Shift Detail Report
167
Figure 123. Shift Detail Report
168
Figure 124. Shift Detail Report
169
Figure 125. Shift Detail Report
170
Table 5. Shift Detail Report Descriptions
171
Figure 126. Shift Detail Tab
176
View a Shift Detail Report
176
Journals
178
About Journal Actions
178
Figure 127. Journal
178
Table 6. Journal Actions Descriptions
178
Search for a Journal
179
View Journal Entry History
179
Figure 128. Journal History
179
Verify a Journal Entry
180
Figure 129. Select a Journal Entry to Verify
181
Figure 130. Verify Journal Dialog Box
181
Figure 131. Journal Entry Verified
182
Terminal Balance Report
183
Figure 132. Terminal Balance Report
183
View the Terminal Balance Report
184
View the Current Balances in the Auto Sentry
184
Figure 133. Terminal Balance Tab
184
Figure 63. Wash Code Expired
188
Figure 67. Wash Busy
188
Table 1. Document Change History
189