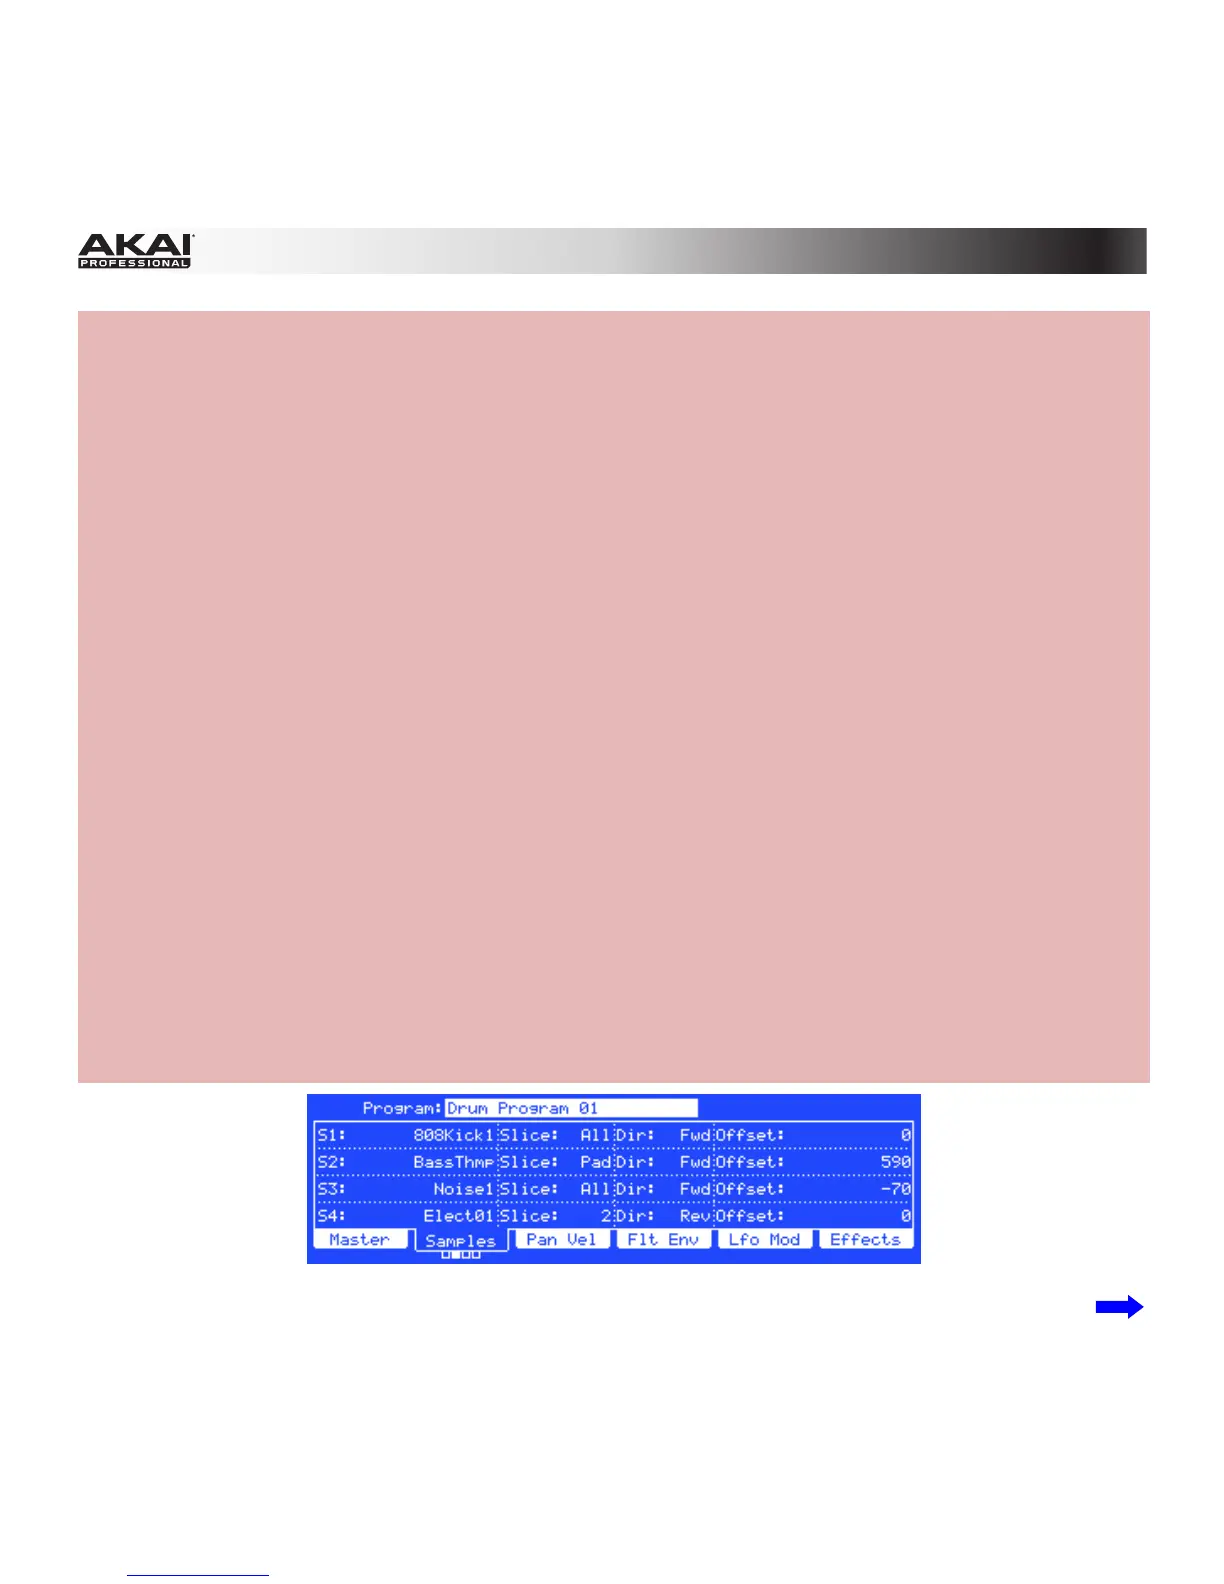
EasyManua.ls Logo

Akai MPC User Manual

Akai MPC
373 pages
To Next Page IconTo Next Page
To Previous Page IconTo Previous Page
Page #310 background imageLoading...
Page #310 background image
310
Hardware: There are several new settings in the Samples tab that affect how the sample plays when
you trigger its pad.
To edit the new Samples settings:
1. Press Prog Edit to enter Program Edit Mode.
2. Press F2 (Samples) to select the Samples tab.
Press F2 to cycle through the available four pages of the tab.
Use the Cursor Buttons to select a parameter. Use the Data Dial or –/+ buttons to adjust the
parameter value:
Slice: This determines what part(s) of the sample will play:
All: The entire sample will play.
Pad: The sample will play from the Pad Start position to the Pad End position, described
below. This also lets you activate Pad Loop.
Slice 1, 2, 3, etc.: If you have sliced the sample in Chop Mode, you can select which slice will
play when you trigger the pad.
Dir: This determines which direction the sample will play:
Fwd: The sample will play in the normal forward direction.
Rev: The sample will play in reverse.
Offset: This determines a time offset for the sample's playback.
Positive values: When the pad is played, playback will start immediately but at a later point in
the sample specified by the offset value.
Negative values: When the pad is played, playback will be delayed by the amount specified by
the offset value.
The second Samples tab in Program Edit Mode in the MPC hardware display.

Table of Contents

Other manuals for Akai MPC

Question and Answer IconNeed help?

Do you have a question about the Akai MPC and is the answer not in the manual?

Akai MPC Specifications

General IconGeneral
Impedance16 Ω
Driver unit50 mm
Magnet typeNeodymium
Ear couplingCircumaural
Headphone frequency12 - 24000 Hz
Headphone sensitivity114 dB
Cable length2.1 m
Product colorBlack, Red, Silver
Wearing styleHead-band
3.5 mm connectorYes
Connectivity technologyWired

Summary

Introduction to MPC

MPC Renaissance and MPC Studio Overview

Explains the MPC Renaissance and MPC Studio hardware-software systems and their core features.

System Requirements and Product Support

Provides information on system requirements and where to find product support.

Understanding the User Guide

About This User Guide

Details the manual's structure, terminology, and symbols used for clarity.

Navigating the Manual

Explains how to interpret highlighted text and references to other sections.

Getting Started with MPC

Important Notes Before Installation

Key considerations before using the MPC hardware and software.

MPC Software Installation

Step-by-step guide for installing MPC software on Windows and Mac OS X.

Unlocking the MPC Software

Instructions for unlocking the MPC software after installation using an internet connection.

MPC Hardware Overview

MPC Renaissance Top Panel

Detailed illustration and labeling of the MPC Renaissance top panel controls.

Navigation and Data Entry Controls

Explanation of display, function buttons, cursor buttons, data dial, and keypad.

Pad and Q-Link Knob Controls

Details on using Q-Link knobs, pads, pad bank buttons, and note repeat features.

Mode and View Controls

Description of buttons for switching between different operational modes and views.

Transport and Recording Controls

Explanation of play, stop, record, overdub, and navigation controls.

I/O and Level Controls

Details on Mic/Phono inputs, Rec Gain, Direct Mon, Main Volume, and Vintage Mode.

Front Panel Connections

Overview of footswitch inputs, mix knob, headphones, and headphone volume.

Rear Panel Connections

Description of power, USB, stereo/assignable outs, S/PDIF, mic/line, phono, and MIDI ports.

MPC Studio Hardware Overview

MPC Studio Top Panel

Illustration and labeling of the MPC Studio top panel controls.

Power and I/O Connections

Details on computer USB, power switch, and MIDI In/Out ports.

Navigation and Data Entry Controls

Explanation of display, function buttons, cursor buttons, data dial, and other controls.

Pad and Q-Link Knob Controls

Details on Q-Link knobs, pads, pad banks, and triggers.

Mode and View Controls

Description of buttons for switching modes and views.

Quick Start Tutorial

Understanding MPC Hardware Display

Explains how the MPC hardware display reflects software control and navigation.

Starting Up the MPC

Steps to power on, connect hardware, and open the MPC software.

Creating a Drum Kit

Guide to loading and assigning drum sounds to pads to create a basic drum kit.

Recording a Drum Sequence

Instructions on how to record drum patterns using the MPC hardware's Rec and Play buttons.

Organizing Samples and Editing Note Events

Process for renaming programs and samples and editing recorded note events in the grid.

Making Basic Sound Edits

How to adjust volume, panning, and add reverb to samples using Program Mixer Mode.

Recording a Bass Track

Steps to create a new track, load a bass sound, and set up a Keygroup Program.

Advanced MPC Features and Operations

Creating and Exporting Songs

Guide on arranging sequences into songs and exporting them as audio mixdowns.

Using the Step Sequencer

Learn to create sequences using pads as step buttons for drum machine-style input.

Working with Drum Loops and Chop Mode

How to chop drum loops into slices for use in programs and sequences.

Pad and Track Muting Functions

Techniques for silencing pads and tracks to isolate specific sounds or parts.

Sample Recording Process

Detailed steps for recording new audio samples using the MPC hardware or computer.

Sample Editing Techniques

Guide to trimming, processing, and transforming samples using Sample Edit Mode.

Recording Automation with Q-Link Knobs

How to automate parameters using Q-Link knobs for dynamic sound changes.

Using MPC Software as a Plugin

Information on integrating MPC software as a VST, AU, RTAS, or AAX plugin.

MPC Software Operation Details

General Features and Controls

Explains software controls like knobs, parameter values, and drop-down menus.

Switches, Buttons, and Icons

Details on how switches (LEDs) and buttons function and indicate status.

Program Types and Creation

Explains Drum, Keygroup, Plugin, and MIDI Programs and how to create them.

File Browser and Expansion Browser

How to use the File Browser and Expansion Browser to load assets.

Mode Tab Section Navigation

Details on the Mode Tab Section for switching between software modes.

Sequence, Track, and Song Management

How to manage Programs, Sequences, and Tracks via drop-down menus.

Automation Control States

Explanation of Automation states: Off, Read (R), and Write (W).

Grid View and List View for Editing

Guidance on using Grid View for editing sequences and List View for event data.

Entering and Editing Note Events

Detailed methods for creating, editing, duplicating, and deleting note events.

Manually Entering and Editing Automation

Instructions for adding and editing automation points in Grid View.

Software Menus and Functions

Details on accessing File, Edit, Time Correct, Tools, View, and Help menus.

Main Mode Functions

Overview of the most frequently used functions accessible from Main Mode.

Q-Link Section Configuration

Configuration of Q-Link Knobs for Program and FX parameter control.

Program Mode for Q-Link Knobs

How to assign parameters to Q-Link Knobs for Program control.

FX Mode for Q-Link Knobs

How to assign parameters to Q-Link Knobs for effect control.

Pad Bank Section Navigation

Selecting pads and banks for editing and playback.

Sequence Section Parameters

Setting sequence loop points, total bars, time correct, and time signature.

Track Section Configuration

Managing tracks, velocity, mute/solo, and program assignment.

MIDI Program Setup

Configuring MIDI ports, channels, program change, and bank messages.

Plugin Program Setup

Creating and configuring Plugin Programs for virtual instruments.

Program Channel Strip Controls

Using insert effects, routing, pan, solo, and mute on program channel strips.

Program Edit Mode Deep Dive

Detailed explanation of parameters for editing Programs across different types.

Master Section in Program Edit

Setting playback mode, transpose, and fine-tuning for programs.

Keygroup Play Modes Configuration

Configuring how samples play back in Keygroup Programs (Mute, Layer, Sample Play).

Key Group Section Settings

Adjusting Keygroup parameters like KG Select, Keytrack, Level, and Pan.

Edit Layers Section for Samples

Setting sample parameters for each layer within a program.

Filter Section Parameters

Controlling filter cutoff, resonance, and envelope modulation.

Velocity Sensitivity Settings

Adjusting how velocity affects pitch, filter, amplifier, and panning.

LFO Section for Modulation

Using LFOs to modulate parameters like pitch, filter cutoff, volume, and pan.

Insert Effects Application

Applying insert effects to pads, keygroups, and programs.

Program Mixer Mode Overview

Using mixer controls for levels, panning, routing, and effects per program.

Track Mixer Mode Overview

Mixing tracks within a sequence using levels, panning, and effects.

Program Assignment to Tracks

Selecting a Program to be used by a specific Track.

Managing Track and Program Levels

Adjusting volume levels for tracks and programs in Track Mixer Mode.

Panning Tracks and Programs

Setting stereo panning for tracks and programs in Track Mixer Mode.

Muting and Soloing Tracks and Programs

Using mute and solo functions to isolate or silence tracks and programs.

Effects Processing Overview

Understanding insert and send effects for pads, programs, and master mix.

Master Effects Configuration

Loading, editing, or removing up to four master effects for the entire mix.

Track View Mode for Sequence Editing

Overview of tracks and sequences for simultaneous editing.

Next Sequence Mode for Live Performance

Triggering sequences via pads for real-time song structure changes.

Sequence Playlist Management

Organizing and viewing sequences within a song.

Pad Bank Section for Sequence Assignment

Assigning sequences to pads and banks for playback control.

Next Sequence Section Options

Controlling sequence playback transitions (Next Bar, Sudden, Clear, Hold).

Song Mode Structure and Arrangement

Arranging sequences in order and repetition to create songs.

Sequence Playlist Management in Song Mode

Managing song steps, sequence assignments, repeats, tempo, and bars.

Edit Step Section for Song Structure

Adding or deleting steps within a song.

Step Sequence Mode for Note Entry

Creating and editing sequences using pads as step buttons.

Pad Select in Step Sequence Mode

Switching to step sequence events on different pads or entering pad events.

Pad Perform Mode for Creative Performance

Assigning scales, modes, chords, or progressions to pads for musical performance.

Sample Edit Mode General Operations

Overview of sample editing, including waveform display and timeline selection.

Trim Mode for Sample Editing

Auditioning samples and adjusting start/end points in Trim Mode.

Chop Mode for Slice Editing

Non-destructive slicing of samples for playback and reuse.

Program Mode for Sample Loading

Editing samples within the context of a Program and auditioning them.

Preferences Window Configuration

Setting default tempos, sequence lengths, time signatures, and pad slice behavior.

Screensaver Disable Option

Disabling the computer's screensaver while MPC software is running.

Improvements in MPC v1.9

Highlights new features and improvements in MPC software version 1.9.

Corrections for MPC v1.8 User Guide

Updates and corrections made to the MPC v1.8 User Guide.

Trim Mode Pad Section Updates

Information regarding outdated Pad Section details in Trim Mode.

Related product manuals