PAGE 6-131118824, VER. 00
To Install the Main PCA:
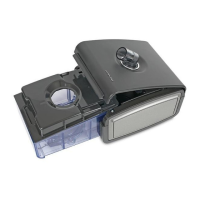
1. Place the PCA in the Bottom Enclosure. Be sure that the Flow and Pressure (if applicable) Sen-
sors properly align with the Flow Manifold.
FIGURE 6-12: FLOW MANIFOLD
2. Connect the wiring harnesses to the PCA.
3. Install the #4 x 1/2” screw.
4. Assemble the remainder of the device as instructed in previous sections.
CAUTION
The PCA’s Flow and Pressure Sensors must be in proper alignment with
the Flow Manifold. Otherwise, the device will not operate properly.
NOTE
Verify that the standoffs secure the PCA.
The PCA’s Flow and Pressure
Sensors align here.
 Loading...