Mounting Proline Prosonic Flow P 500 HART
38 Endress+Hauser
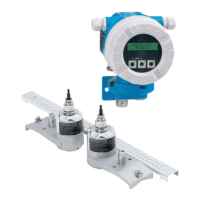
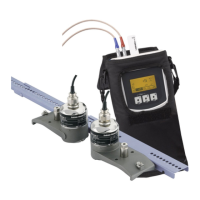
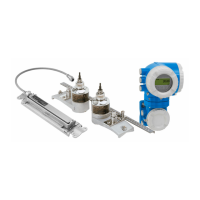
Material
The following material is required for mounting:
• Two strapping bands incl. mounting bolts and centering plates where necessary (already
pre-assembled → 32, → 33)
• Two measuring wires, each with a cable lug and a fixer to fix the strapping bands
• Two sensor holders
• Coupling medium (coupling pad or coupling gel) for the acoustic connection between the
sensor and pipe
• Two sensors incl. connecting cables
Installation is unproblematic up to DN 400 (16"); as of DN 400 (16") check the
distance and angle (180°, ±5°) diagonally with the wire length.
Procedure for using measuring wires:
1. Prepare the two measuring wires: arrange the cable lugs and fixer such that the
distance they are apart corresponds to the wire length (SL). Screw the fixer onto the
measuring wire.
1 2 3 4 5 6 7 8 9 10 11
SL
A0043379
32 Fixer and cable lugs at a distance that corresponds to the wire length (SL)
2. With measuring wire 1: fit the fixer over the mounting bolt of strapping band 1 that
is already securely mounted. Run measuring wire 1 clockwise around the measuring
pipe. Fit the cable lug over the mounting bolt of strapping band 2 that can still be
moved.
3. With measuring wire 2: fit the cable lug over the mounting bolt of strapping band 1
that is already securely mounted. Run measuring wire 2 counterclockwise around the
measuring pipe. Fit the fixer over the mounting bolt of strapping band 2, which can
still be moved.
4. Take the still movable strapping band 2, including the mounting bolt, and move it
until both measuring wires are evenly tensioned and then tighten strapping band 2
so that it cannot slip. Then check the sensor distance from the middle of the
strapping bands. If the distance is too small, release strapping band 2 again and
position it better. The two strapping bands should be as perpendicular as possible to
the measuring pipe axis and parallel to one another.
A0043380
33 Positioning the strapping bands (steps 2 to 4)
5. Loosen the screws of the fixers on the measuring wires and remove the measuring
wires from the mounting bolts.