3.4 Turning Power On and OFF
39
3
Chapter 3 Setting Preparations
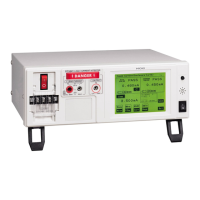
1. Confirm that the circuit breaker is turned off.
(If the instrument is turned on when the circuit breaker is
On, the circuit breaker may be triggered.)
2. Turn on the power switch (ON: ) on the front panel.
3. The LCD shows the opening message.Then the wiring
check screen appears.
4. Use the contrast adjustment dial to set the LCD for easy
viewing.
5. Turn the circuit breaker On and press to check
wires connected to LINE IN.( appears only when
wiring is incorrect. Press for advice.)
6. Press to open the fuse check screen.
See "7.5 Checking Fuses(During Earth leakage current and
protective conductor current measurements)" (p. 123)
7. Pressing in the fuse check screen opens the
relay check screen.
See "Relay Check" (p. 41)
8. Pressing in the relay check screen,The network
select screen appears by default.
If the instrument was turned off with the LCD showing
the measurement screen at last use, that measurement
screen appears.
If the instrument was turned off with the LCD showing a
screen other than the measurement screen, the initial
screen appears.
9. After turning the power on, let the instrument warm up
for about 20 minutes before starting measurement oper-
ation.
1
2
Wiring check screen
Check again.
4
Fuse check screen
Relay check screen
5
6
7
8
When "Check at each power ON operation" is enabled on the connection/VA
check screen, the connection/VA check screen appears after the power switch is
turned on.
See ."Inspecting line power supply for the equipment under test" (p. 42)
(If the power on polarity switching function was on when the instrument was last
turned off, a message to check isolation transformer connection and precautions
appear before the wiring check screen.)
When the grounding class of the equipment under test is set to internally pow-
ered equipment, is displayed, and after the initial measurement, the volt-
age value will not be renewed as long as "Renew" is not pressed.