109
Copyright 2017 SolarCity Corporation. All rights reserved.
Chapter 1 - Welcome
10.4 - Replacing the Inverter
This section describes how to remove and replace the SolarCity H6 inverter top section.
10.4.1 - Inverter (Remove)
If needed, the SolarCity H6 inverter can be replaced entirely. Alternatively, the top section
can be removed and replaced while leaving the wiring box in place.
To remove the SolarCity H6 inverter top section:
1. Power down the inverter as described in
“Powering Off the Inverter” on page 86
.
2. Turn the back-feed breaker in the main electrical panel to the OFF position.
3. Move the AC Bypass Switch to the BYP position.
4. Move the DC Disconnect Switch to the OFF position and secure it with a padlock.
5. Remove the wiring box cover as described in
“Remove Wiring Box Cover” on page 59
.
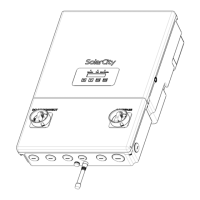
6. Remove all of the wires (1) from the top section spring-clamp connectors, as shown in
Figure 10-1
.
7. Using a 10mm wrench, remove the three nuts (2) holding the top section of the inverter to
the wiring box section.
8. Position one person on either side of the SolarCity H6 inverter and lift it straight up and
off the mounting tabs.
SHOCK HAZARD: DO NOT TOUCH ANY OF THE AC OR DC ELECTRICAL
CONNECTIONS INSIDE THE BOTTOM OF THE INVERTER WIRING BOX.
FATAL OR SERIOUS ELECTRIC SHOCK MAY OCCUR.
WARNING: THE SOLARCITY H6 INVERTER WEIGHS 62LBS (28KG). ALL
LIFTING MUST BE PERFORMED BY TWO PEOPLE, PER OSHA
REQUIREMENTS. ALWAYS LIFT WITH YOUR LEGS AND FOLLOW ALL OTHER
APPLICABLE BEST PRACTICES FOR AVOIDING INJURY WHEN LIFTING
HEAVY LOADS.
WARNING: KEEP LEGS, FEET, AND OTHER BODY AREAS AWAY FROM THE
AREA DIRECTLY UNDERNEATH THE INVERTER UNTIL IT IS SECURELY
INSTALLED ON THE MOUNTING BRACKET AND YOU HAVE VERIFIED THAT
THE MOUNTING BRACKET IS CAPABLE OF SUPPORTING THE FULL WEIGHT
OF THE INVERTER WITH NO DEFORMATION OR MOVEMENT.