H6 Hybrid Inverter - Installation & Operation Guide
130
Copyright 2017 SolarCity Corporation. All rights reserved.
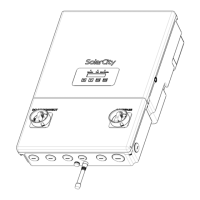
B.2 - Installing the SMART RSS
To install the SMART RSS:
1. Press the bracket into the groove on the module frame until the bracket is flush with the
module frame. See
Figure B-3
.
2. Press on the ground tab to lock the SMART RSS into the groove. Make sure that the tab is
flush with the front face of the bracket. If needed, use a rubber mallet to gently tap the
SMART RSS into place.
3. Connect the PV strings directly to the SMART RSS inputs.
SHOCK HAZARD: BOTH THE POSITIVE AND THE NEGATIVE LEADS MUST BE
STRICTLY ISOLATED ELECTRICALLY FROM BOTH GROUND AND EACH
OTHER IN ORDER TO ENSURE MAXIMUM PROTECTION AGAINST
HAZARDOUS VOLTAGES DURING SYSTEM ASSEMBLY.
SHOCK HAZARD: THE DC CONDUCTORS OF THIS PHOTOVOLTAIC SYSTEM
ARE UNGROUNDED AND MAY BE ENERGIZED.
WARNING: INSTALLATION AND COMMISSIONING MUST BE PERFORMED BY
A QUALIFIED PERSONNEL IN ACCORDANCE WITH LOCAL, STATE, AND
NATIONAL ELECTRICAL CODE ANSI/NFPA 70 REQUIREMENTS. IN CANADA,
THE INSTALLATION AND WIRING METHODS USED MUST COMPLY WITH THE
CANADIAN ELECTRIC CODE.
WARNING: ALWAYS DE-ENERGIZE THE AC BRANCH CIRCUIT BEFORE
SERVICING. NEVER DISCONNECT THE DC CONNECTORS UNDER LOAD.
WARNING: PRESS THE FIREMAN SWITCH AFTER DISCONNECTING AC
POWER TO THE INVERTER AT THE MAIN ELECRICAL PANEL, AND THEN
PRESS THE FIREMAN SWITCH TO INITIATE A RAPID SHUTDOWN.
Note: The SMART RSS bracket provides both a UL-listed bonding path to
ground and a mechanical connection to the PV panel frame.