H6 Hybrid Inverter - Installation & Operation Guide
6
Copyright 2017 SolarCity Corporation. All rights reserved.
• Wall bracket that fits two studs as 16” spacing or a single stud at 24” stud spacing, as well
as concrete and masonry walls.
• Easy inverter replacement without needing to shut off power to the whole home.
• Smooth enclosure edges with handle grooves to facilitate easy lift and carry.
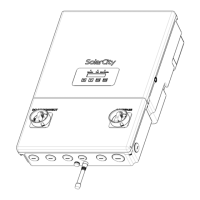
• Three LEDS that indicate power (green), alarms (yellow), and faults (red).
• Two-line LCD with 16 characters per line for status display.
• Four push buttons for menu navigation and adjusting parameters.
• Integrated ZigBee communications for wireless status reporting and inverter/battery
pack firmware upgrades using the SolarCity Communication Protocol.
• Over-the-air (OTA) status updates of all critical information.
• Built-in battery pack compatibility checking.
1.3 - Package Contents
The H6 inverter ships with one (1) each of the following items:
• Inverter unit
• I-shaped Inverter Mounting Bracket
• ZigBee antenna
• SolarCity H6 Hybrid Inverter – Quick Installation Guide
The following items ship separately:
• Rapid Shutdown Box (SMART RSS) with PV module Zep mounting bracket
1.4 - Additional Tools
The following additional tools are needed to complete installing and commissioning the
SolarCity H6 inverter:
• Allen wrench, ratchet type, with 5mm bit (such as the Great Neck 51063, Neiko Tools
03044A, or the Husky Tools 66604). See
Figure 1-3
, below.
• 1/8” flat screwdriver with a long shank. See
Figure 1-3
, below.
• Chip puller to replace the ZigBee chip.