Do you have a question about the SolarCity H6 and is the answer not in the manual?
Details the required training and experience for personnel installing the inverter.
Outlines the key general features and capabilities of the SolarCity H6 inverter.
Lists the items included with the SolarCity H6 inverter and those shipped separately.
Specifies the necessary tools required for installation and commissioning.
Explains the manual's structure, formatting conventions, and symbols used.
Provides a list of additional documentation available for the SolarCity H6 inverter.
Identifies where additional installer resources can be accessed.
Provides contact information for technical and customer support.
Presents general safety instructions applicable to all parts of the installation.
Details specific safety instructions for the SolarCity H6 inverter itself.
Illustrates and explains the safety and type labels found on the inverter.
Provides crucial safety instructions related to the battery pack system.
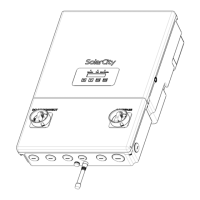
Illustrates the physical layout and components of the SolarCity H6 inverter.
Displays physical dimensions and minimum clearance requirements for installation.
Details the features and mounting configurations for the inverter bracket.
Describes the function and operation of the DC and AC disconnect switches.
Explains the connections within the inverter's wiring box for various interfaces.
Overview of systems for switching between grid and backup power.
Provides details on external components connected to the SolarCity H6 inverter.
Explains the components and function of the rapid shutdown safety system.
Instructions for visually inspecting the inverter upon receipt.
Criteria and requirements for choosing an appropriate installation location.
Step-by-step instructions for physically mounting the inverter.
Presents wiring diagrams for a complete SolarCity H6 inverter installation.
Describes how to remove and refit the inverter's wiring box cover.
Details the use of conduit plugs and the importance of watertight fittings.
Explains the requirements for connecting equipment grounding conductors.
Provides instructions on how to use the spring clamp connectors.
Details the procedures for connecting the PV array wires to the inverter.
Explains how to connect the battery pack to the SolarCity H6 inverter.
Describes how to wire the AC grid and backup panel connections.
Explains the connections and setup for system communications.
Describes the inverter's LEDs, LCD display, and push buttons.
Details the inverter's menu structure and how to navigate it.
Outlines the steps required to commission the SolarCity H6 inverter for operation.
Step-by-step instructions for powering on the SolarCity H6 inverter.
Step-by-step instructions for powering off the SolarCity H6 inverter.
Procedure for bypassing the inverter, typically for maintenance or fault conditions.
Refers to accessing the inverter's wiring box cover for maintenance.
Describes the different operating modes for power flow between grid, PV, and battery.
Lists the general, mechanical, PV input, AC output, and battery interface specs.
Details the integrated protection features of the SolarCity H6 inverter.
Lists the standards and directives the inverter conforms to.
Describes the communication capabilities and protocols used.
Presents performance data through charts for de-rating, voltage, and efficiency.
Lists the regulatory approvals and certifications obtained by the inverter.
Describes the intended applications and limitations of the inverter.
Provides a general procedure for diagnosing and resolving issues.
Lists common alarms, faults, and warnings with their causes and solutions.
Step-by-step guide for removing and replacing the inverter top section.
Instructions for replacing internal components like fuses, fan, or ZigBee chip.
Information regarding the product warranty and return process.
Defines key terms and abbreviations used throughout the manual.
Displays physical dimensions and minimum clearance requirements for the SMART RSS.
Provides instructions for installing the SMART RSS unit.
Details the procedure for safely removing the SMART RSS from its mounting.
Explains the grounding requirements and methods for the SMART RSS.
Specifies the required wording for the warning label on rapid shutdown systems.
Describes the automatic self-test function of the SMART RSS devices.
Lists the mechanical specifications, ratings, and compliance standards for the SMART RSS.