Do you have a question about the Ultrasonix SonixTouch Q+ and is the answer not in the manual?
Defines the intended audience for the service manual, emphasizing trained personnel.
Advises users to ensure system use adheres to specified electrical conditions.
Notes limitations and responsibilities for system networking options and wireless adapters.
Recommends regular backup and purging of patient data to protect privacy.
States that service instructions may vary based on system options and configurations.
Outlines the terms and conditions of the software license agreement.
Lists patents and trademarks associated with Ultrasonix systems and software.
Provides a general description of the SonixTouch Q+ Ultrasound System's capabilities.
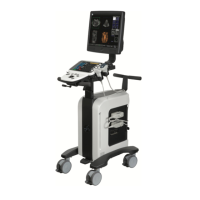
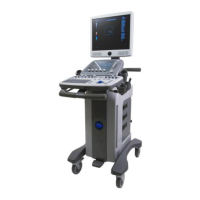
Details the physical components and features of the ultrasound system.
Lists the physical dimensions of the ultrasound system in metric and US units.
Specifies the electrical input requirements and power ratings for the system.
Explains the system's voltage operating range and the importance of correct selection.
Details environmental and electrical requirements for system installation.
Outlines operational and storage environmental specifications for the system.
Specifies electrical requirements, including input power ratings and cord specifications.
Discusses causes and prevention of ESD damage to system components.
Explains EMC compliance and how to mitigate potential interference.
Details requirements for main AC and network connections, including cabling.
Covers preliminary inspection and unpacking procedures before system installation.
Describes how to inspect the shipping crate for damage and tipping indicators.
Provides step-by-step instructions for safely unpacking the ultrasound system.
Guides the user through the physical installation and setup of the system components.
Details inspection of wheels, LCD display, and console adjustments.
Explains how to adjust the console's height, angle, and swivel.
Covers the EMI filter, voltage rating label, and power panel components.
Details how to check and configure the system's voltage settings via the EMI filter.
Instructions for connecting the power cord and turning on the system.
Describes how to turn on the main power switch, with cautions.
Provides instructions for replacing system fuses.
Guides the user through configuring the Uninterruptible Power Supply (UPS).
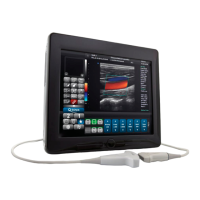
Instructions for inspecting transducers before connecting them to the system.
Steps for initializing the system after installation, including transducer connection.
Instructions for unpacking and inspecting system peripherals.
Guide for setting system date/time and installing software licenses.
Procedures for testing the console, touch screen, and dials for proper operation.
Steps to conduct an image test using different transducers and checking for image anomalies.
Lists supported removable hardware for the system.
Instructions for testing the functionality of the Uninterruptible Power Supply (UPS).
Procedure for conducting a pulsed Doppler sound test to verify audio output.
Instructions on how to check system license status and re-import if necessary.
Describes methods for updating the system software via the internet or a USB device.
Step-by-step guide to updating system software using an internet connection.
Instructions for updating software using a file downloaded from a USB device.
Guide on how to manage protocol visibility using the service mode.
Procedure for repairing a corrupted patient database.
Advises consulting technical support before performing a system recovery due to data loss risk.
Identifies the location and purpose of the peripheral receptacle.
Lists devices approved for connection to the system's peripheral receptacle.
Instructions for setting up and connecting a printer to the system.
Details the steps for connecting and configuring a local USB printer.
Guide for setting up and connecting a network printer using an example.
Explains how to configure custom key functions for printing and triggers.
Instructions for connecting and configuring USB footswitches.
Describes how to assign functions to footswitch pedals.
Information on connecting and storing the barcode reader.
Describes methods for connecting an external TV display.
Introduces system accessories, including transducer disclaimers and models.
Emphasizes backing up and exporting patient data before performing service.
Details how to export user data (presets, settings, etc.) to external media.
Instructions for restoring previously saved user data from external media.
Guide for copying patient and exam data to external media for backup.
Instructions for reinstalling patient/exam data from external media.
Method for backing up patient/exam data using the service mode.
Method for restoring patient/exam data using the service mode.
Procedures for turning UPS breakers on and off for maintenance.
How to check the status of UPS breakers without removing shrouds.
Steps to turn off or reset the UPS breakers.
Steps to turn on the UPS breakers in the correct order.
Information on accessing the system's modulo for service.
Detailed instructions for removing the system's side shrouds.
Steps for correctly reinstalling the system's side shrouds.
Comprehensive guide for removing and installing the system's modulo.
Step-by-step instructions for safely removing the modulo unit.
Detailed procedure for installing the modulo unit into the system.
Guidance on properly reconnecting all cables and wiring after modulo service.
Procedures to test the modulo and UPS after installation or servicing.
Specific testing steps for systems without an installed UPS.
Guide for servicing the front block and ultrasound module components.
How to access the front block without removing the main modulo.
Instructions on how to open the front block/ultrasound module for access.
Detailed steps for removing the front block/ultrasound module.
Instructions for reinstalling the front block/ultrasound module.
Steps for correctly closing the front block/ultrasound module.
General information and procedures for servicing the UPS unit.
Information on obtaining and performing UPS firmware upgrades.
Guidelines for packaging and shipping the UPS unit.
Information on reconfiguring or troubleshooting the barcode reader.
Procedures for testing transducers to diagnose image problems.
Step-by-step guide to testing a transducer using a coin for image quality.
Method to test the transducer board by swapping transducer ports.
Lists and describes miscellaneous system parts like holders and hooks.
Details on the installation and removal of transducer holders and cable hooks.
Information regarding the peripheral tray and its basket.
Outlines the process for returning defective parts, including RMA.
Specific requirements for shipping transducers for service.
Guidelines for shipping UPS units containing lithium-ion batteries.
Overview of available DICOM configuration settings.
Configuration of globally applied DICOM settings for the system.
Settings for configuring DICOM image storage and AE devices.
Configuration of Application Entity (AE) devices for DICOM storage.
Specifies how images are stored, including compression preferences.
Defines global parameters for image storage, including schedule and error handling.
Adjusts brightness and contrast settings for DICOM images.
Configures parameters for SonixHub integration with DICOM.
Settings for configuring DICOM printing and AE properties.
Configuration of Application Entity (AE) properties for DICOM printing.
General print properties configuration for DICOM.
Advanced printing options configuration for DICOM.
Adjusts brightness and contrast for DICOM print images.
Advanced settings for configuring DICOM Worklist Service Class User (SCU).
Configuration of AE properties for DICOM Worklist.
Guide for overall DICOM configuration, including network and status bar settings.
Information required from IT department for DICOM configuration.
Steps to configure network settings for DICOM compatibility.
Detailed steps for configuring various DICOM aspects.
Configuration of local host settings for DICOM.
Detailed configuration of DICOM storage settings.
Configuration of custom keys for DICOM store functionality.
Detailed configuration of DICOM print settings.
Detailed configuration of DICOM worklist settings.
Instructions for configuring network connections (LAN, Dialup, Wireless).
Steps to configure a hard-wired Ethernet (LAN) connection.
Guide for setting up a dial-up internet connection.
Instructions for configuring a wireless network connection.
Information on enabling and accessing real-time chat support.
Steps to enable the chat support feature.
Procedures for initiating and using the chat support session.
Instructions for setting up and using remote support for diagnostics.
Guide on obtaining and transferring the license.key file to the system.
Steps to re-import the license.key file from a local drive.
Provides a table outlining recommended maintenance frequencies and tasks.
General instructions for cleaning external system components.
Specific cleaning instructions for the LCD display and its cabinet.
Cleaning instructions for the operator console's touch screen.
Cleaning instructions for the operator console.
Cleaning instructions for the system's power cord.
Cleaning instructions for the barcode reader.
Cleaning instructions for an externally connected wireless adapter.
Refers to the SonixGPS User Manual for cleaning and maintenance details.
Cleaning instructions for transducer holders and cable hooks.
Cleaning instructions for the footswitch.
Cleaning instructions for the peripheral tray and basket.
Procedures for cleaning the system filter and resetting reminders.
Detailed steps for cleaning the system filter.
Instructions for cleaning the modulo's fan and exhaust filters.
Guidance on cleaning the system's internal fans to prevent dust accumulation.
Comprehensive guide on handling, cleaning, and maintaining transducers.
Recommendations for inspecting and using transducers safely.
Lists recommended ultrasound coupling gels and cautions against using lotions.
Covers general maintenance practices including inspection and storage.
Guidelines for inspecting transducers before each use.
Procedures for properly cleaning, disinfecting, and storing transducers.
Important warnings and recommendations for cleaning and disinfecting transducers.
Procedures for cleaning and disinfecting non-invasive transducers.
Step-by-step guide for cleaning non-invasive transducers.
Instructions for disinfecting non-invasive transducers.
Procedures for cleaning and disinfecting endocavity transducers.
Notes that sterilization is not possible and refers to cleaning/disinfection guidelines.
Customer responsibilities for ensuring proper disinfection and packaging of transducers for shipping.
Presents emissions test compliance levels and guidance.
Details electromagnetic immunity test levels and guidance.
Manufacturer's declaration regarding electromagnetic immunity compliance.
Manufacturer's declaration regarding electromagnetic immunity compliance.
Table related to conducted RF immunity test levels and guidance.
Table showing recommended separation distances for RF communications equipment.
Provides recommended separation distances to prevent RF interference.
| Brand | Ultrasonix |
|---|---|
| Model | SonixTouch Q+ |
| Category | Medical Equipment |
| Language | English |