EasyManua.ls Logo

Endress+Hauser PROline promag 53 - User Manual

Endress+Hauser PROline promag 53
190 pages
Print Icon
To Next Page IconTo Next Page
Loading...
Products Solutions Services
BA00053D/06/EN/14.15
71280319
Valid as of version:
PB DP: V 3.04.XX (Device software)
PB PA: V 3.04.XX (Device software)
Operating Manual
Proline Promag 53
PROFIBUS DP/PA
Electromagnetic flowmeter

Table of Contents

Other manuals for Endress+Hauser PROline promag 53

Questions and Answers

  • R
    Robert TorresAug 2, 2025
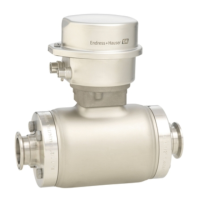
    How to change language on Endress+Hauser PROline promag 53 Measuring Instruments?
    • S
      Shannon DennisAug 2, 2025
      If the display texts on your Endress+Hauser Measuring Instruments are in a foreign language, switch off the power supply. Then, press and hold down both OS buttons while switching the measuring device back on. The display text will then appear in English (default) and at maximum contrast.
  • O
    ojordanAug 9, 2025
    What to do if Endress+Hauser Measuring Instruments display is not visible but output signals are present?
    • T
      Thomas HuffAug 10, 2025
      If there is no display visible but the output signals are present on your Endress+Hauser Measuring Instruments, here are a few things you can check: 1. Ensure that the ribbon-cable connector of the display module is correctly plugged into the amplifier board. 2. The display module might be defective, requiring spare parts. 3. The measuring electronics could also be defective, which would also require ordering spare parts.
  • T
    toddreginaldAug 17, 2025
    Why Endress+Hauser PROline promag 53 Measuring Instruments display is not visible and no output signals are present?
    • K
      Kevin RichardsonAug 17, 2025
      If there is no display visible and no output signals present on your Endress+Hauser Measuring Instruments, consider the following checks: 1. Verify the power supply at terminals 1 and 2. 2. Inspect the power line fuse. For 85 - 260 V AC, it should be a 0.8 A slow-blow / 250 V fuse. For 20 - 55 V AC and 16 - 62 V DC, use a 2 A slow-blow / 250 V fuse. 3. The measuring electronics might be defective, potentially requiring you to order spare parts.
  • P
    pstevensonAug 25, 2025
    What to do if Endress+Hauser Measuring Instruments have no display and output signals?
    • K
      Kristin WalkerAug 26, 2025
      If your Endress+Hauser Measuring Instruments show no display and no output signals, here are a few things to check: First, verify the supply voltage at terminals 1 and 2. Next, inspect the device fuse. For 85 to 260 V AC, the fuse should be 0.8 A slow-blow / 250 V. If you're using 20 to 55 V AC or 16 to 62 V DC, it should be 2 A slow-blow / 250 V. If these steps don't resolve the issue, the measuring electronics may be defective, and you may need to order spare parts.

Summary

Safety Instructions

1.1 Designated Use

Specifies the intended application for measuring conductive fluids in closed pipes.

1.2 Installation, Commissioning and Operation

Guidelines for safe installation, commissioning, and operation by qualified personnel.

1.3 Operational Safety

Notes on using the measuring system in hazardous environments and general safety requirements.

1.4 Returns

Procedures for returning the device for repairs or calibration, following ISO-certified processes.

1.5 Safety Conventions and Icons

Explains safety symbols (Warning, Caution, Note) used throughout the manual.

Identification

2.1 Device Designation

Describes the components of the flow measuring system and available versions.

2.2 Certificates and Approvals

Lists the applicable standards, regulations, and certifications the device complies with.

2.3 Registered Trademarks

Lists registered trademarks associated with the product and its components.

Installation

3.1 Incoming Acceptance, Transport and Storage

Procedures for receiving, transporting, and storing the device safely and correctly.

3.2 Installation Conditions

Details on dimensions, mounting locations, and environmental conditions for proper installation.

3.3 Installation

Step-by-step instructions for installing different sensor types (E, H, L, P, W) and related components.

Wiring

4.1 PROFIBUS Cable Specifications

Technical specifications and bus structure guidelines for PROFIBUS DP and PA cables.

4.2 Connecting the Remote Version

Procedures for connecting the sensor and transmitter in a remote configuration.

4.3 Connecting the Measuring Unit

Terminal assignments and connection diagrams for PROFIBUS DP and PA transmitters.

4.4 Potential Matching

Explains the importance of and methods for potential equalization in different installation scenarios.

4.5 Degree of Protection

Requirements for maintaining IP 67 (NEMA 4X) protection after installation and servicing.

4.6 Post-connection Check

Checklist for verifying electrical installation and connections after wiring.

Operation

5.1 Quick Operation Guide

Overview of options for configuring and commissioning the device using local display or software.

5.2 Local Display

Details on the local display, its operating elements, and display modes for reading parameters.

5.3 Brief Operating Manual to the Function Matrix

Guide to navigating the function matrix for configuring device parameters and functions.

5.4 Error Messages

Explanation of system and process error types, messages, and their meanings.

5.5 Operating Options

Information on available software tools like FieldCare and SIMATIC PDM for device operation.

5.6 Hardware PROFIBUS DP Settings

Configuration of write protection, device address, and terminating resistors for PROFIBUS DP.

5.7 Hardware PROFIBUS PA Settings

Configuration of write protection and device address for PROFIBUS PA.

Commissioning

6.1 Function Check

Checklist for final checks before starting up the measuring point.

6.2 Switching on the Measuring Device

Procedure for powering on the device and the sequence of self-tests.

6.3 Quick Setup

Menus for quick configuration of important parameters for standard operation and specific functions.

6.4 Commissioning the PROFIBUS Interface

Step-by-step guide for commissioning PROFIBUS DP and PA interfaces.

6.5 PROFIBUS DP;PA System Integration

Information on device master files (GSD) and selecting them for PROFIBUS system integration.

6.6 PROFIBUS DP Cyclic Data Transmission

Description of the block model and modules for cyclic data transmission via PROFIBUS DP.

6.7 PROFIBUS PA Cyclic Data Transmission

Description of the block model and modules for cyclic data transmission via PROFIBUS PA.

6.8 PROFIBUS DP;PA Acyclic Data Transmission

Explanation of acyclic data transmission types (MS2AC, MS1AC) for parameters and measurements.

6.9 Adjustment

Procedure for empty-pipe/full-pipe adjustment (EPD/OED) to ensure correct flow measurement.

6.10 Data Storage Device

Information on HistoROM/S-DAT, HistoROM/T-DAT, and F-CHIP for data storage and configuration.

Maintenance

7.1 Exterior Cleaning

Guidelines for cleaning the exterior of the measuring device using appropriate agents.

7.2 Seals

Information on cyclic replacement of sensor seals, especially for aseptic versions.

Accessories

8.1 Device-Specific Accessories

List of accessories specific to the Promag 53 transmitter and various sensor models.

8.2 Measuring Principle-Specific Accessories

Accessories related to the measuring principle, such as mounting kits and ground cables.

8.3 Service-Specific Accessories

Accessories for service and maintenance, including software and diagnostic tools.

Troubleshooting

9.1 Troubleshooting Instructions

Checklist and common troubleshooting steps for faults occurring after commissioning or during operation.

9.2 System Error Messages

Details on system errors, their display, and how to interpret device status on PROFIBUS.

9.3 Process Error Messages

Information on process errors, their display, and potential causes and remedies.

9.4 Process Errors Without Messages

Troubleshooting steps for common process issues that do not trigger specific error messages.

9.5 Failsafe Mode of Outputs

Explanation of failsafe modes for current, pulse, and frequency outputs and positive zero return.

9.6 Spare Parts

Identification and ordering information for spare parts for PROFIBUS DP and PA transmitters.

9.6.3 Removing and Installing Printed Circuit Boards

Procedures for safely removing and installing circuit boards in the field and wall-mount housings.

9.6.4 Replacing the Device Fuse

Step-by-step guide for safely replacing the device fuse on the power unit board.

9.6.5 Replacing Exchangeable Measuring Electrodes

Instructions for replacing or cleaning measuring electrodes, particularly for Promag W sensors.

Technical Data

10.1 Technical Data at a Glance

Overview of applications, measuring principle, input/output variables, and basic specifications.

10.1.5 Power Supply

Details on supply voltage, cable entries, power consumption, and switch-on current.

10.1.6 Performance Characteristics

Information on measured error, repeatability, installation, environment, and resistance to shock/vibration.

10.1.9 Process

Permitted medium temperature ranges for various Promag models and lining materials.

10.1.10 Mechanical Construction

Details on design, dimensions, weight, materials, and process connections for different Promag models.

10.1.11 Human Interface

Information on display elements, operating elements, and language groups.

10.1.12 Certificates and Approvals

Lists CE mark, C-Tick, Ex approval, sanitary compatibility, drinking water approval, and PROFIBUS certifications.

10.1.13 Ordering Information

Sources for detailed ordering information and product configuration tools.

10.1.15 Documentation

List of available technical information documents and supplementary Ex documentation.

Endress+Hauser PROline promag 53 Specifications

General IconGeneral
Device TypeElectromagnetic flowmeter
Measurement PrincipleFaraday's law of electromagnetic induction
Measured VariableVolume flow
Process Temperature–40 °C to +150 °C
Process PressureUp to 40 bar
Output Signal4 to 20 mA
Communication ProtocolsHART, PROFIBUS PA, FOUNDATION Fieldbus
Housing MaterialAluminum, Stainless steel
Degree of ProtectionIP67
Lining OptionsPTFE, PFA
Electrode OptionsPlatinum

Related product manuals