Note
•
The supported USB ash drive format is FAT 32.
•
The system supports the USB ash drive with the storage of
1G to 32G. Make sure the free space of the USB ash drive is
more than 512M.
•
The exported user data is a BIN
le, which cannot be edited.
8.4.2 Import Data
Steps
1.
Plug a USB ash drive in the device.
2.
On the Transfer page, tap Import User Data, Import User Prole
Photo, or Import Access Control Param.
3.
Tap Yes on the pop-up window and the data will be imported
from the USB
ash drive to the device.
•
If you want to transfer all user
informaon from one device
(Device A) to another (Device B), you should export the
informaon from Device A to the USB ash drive and then
import from the USB
ash drive to Device B. In this case, you
should import the user data before imporng the prole
photo.
•
The supported USB ash drive format is FAT 32.
•
The imported picture should be saved in the root directory
(enroll_pic) and the picture le's name should be follow the
rule below:
Card No._Name_Department_Employee ID_Gender.jpg
•
The employee ID should between 1 and 99999999, should
not be duplicated, and should not start with 0.
•
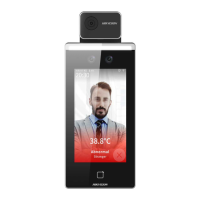
Requirements of face picture: It should be taken in full-face
view, directly facing the camera. Do not wear a hat or head
covering when taking the face picture. The format should be
JPEG or JPG. The
resoluon should be more than 640 × 480
pixel and less than 2160 × 3840 pixel. The picture size should
be between 40 KB and 200 KB.
8.5 Time and Aendance Status Sengs
Set me and aendance status. You can set the aendance mode
as check in, check out, break out, break in,
overme in, and over
according to your actual situaon.
Note
The funcon should be used cooperavely with me and
aendance funcon on the client soware.
8.5.1 Set Manual Aendance
Set the aendance mode as manual, and you can select a status
manually when you take
aendance.
Before You Start
Add at least one user, and set the user's authencaon mode. For
details, see User Management.
Steps
1.
Tap T&A Status to enter the T&A Status page.
2.
Set the
Aendance Mode as Manual.
22

 Loading...