Result
When you authencate on the inial page, the authencaon will
be marked as the congured aendance status according to the
congured schedule.
8.5.3 Set Manual and Auto Aendance
Set the aendance mode as manual and auto and the system will
auto change the aendance status according to the congured
parameters. At the same me you can manually change the
aendance status aer the authencaon.
Before You Start
Add at least one user, and set the user's authencaon mode. For
details, see User Management.
Steps
1.
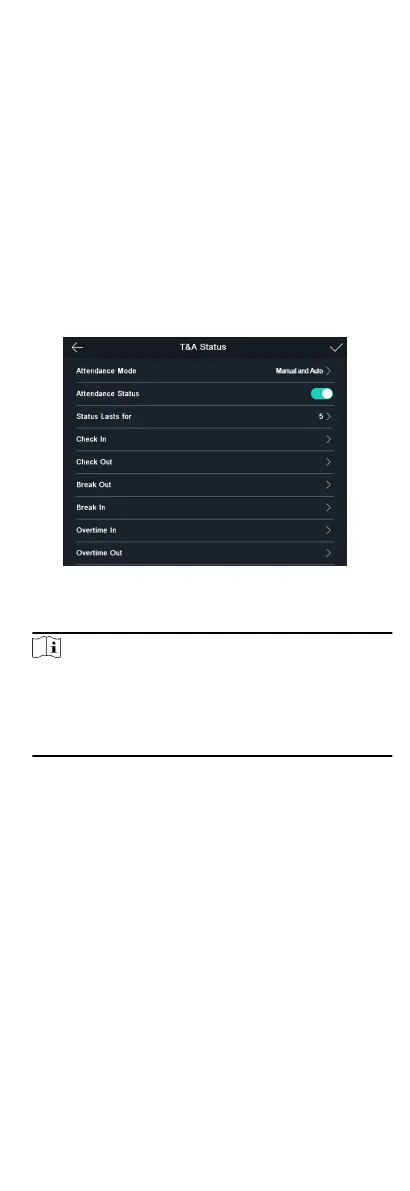
Tap T&A Status to enter the T&A Status page.
2.
Set the Aendance Mode as Manual and Auto.
Figure 8-8 Manual and Auto Mode
3.
Select an aendance status and set its schedule.
Note
The aendance status will be valid within the congured
schedule. For example, if set the break out's schedule as
Monday 11:00, and break in's schedule as Monday 12:00, the
valid user's authencaon from Monday 11:00 to 12:00 will be
marked as break.
Result
Enter the inial page and authencate. If you do not select a
status, the authencaon will be marked as the congured
aendance
status according to the schedule. If you tap Select
Status and select a status to take aendance, the authencaon
will be marked as the selected aendance status.
8.5.4 Disable
Aendance Mode
Disable the aendance mode and the system will not display the
aendance status on the inial page.
Tap T&A Status to enter the T&A Status page.
Set the
Aendance Mode as Disable.
You will not view or congure the aendance status on the inial
page. And the system will follow the aendance rule that
congured on the plaorm.
8.6 Identy Authencaon
24

 Loading...