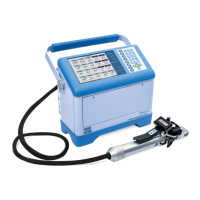
CIRAS-3 Operation Manual V. 1.09 61 support@ppsystems.com
Basics of Navigating Console Screens and Menus
Let’s begin with a quick example of an action you are likely to perform – establishing the repeatable
baseline settings features that will appear each time you power on your system. We refer to these
settings as global, that is they define the operational environment of CIRAS-3 prior to making
measurements and collecting data. Power on the system and press Settings (F2) to open the Settings
dialog.
Several default setting files are included, representing the standard applications that can be run with
CIRAS-3. Use the Arrow keys or Expand List (F4) to select PLC3 from the Settings File list. Press the
TAB key to move to the next field, Accessory, and choose the appropriate cuvette window size, such as
18 x 25 mm shown above. Move down through the fields to make other changes to CO
2
, water vapor,
light, temperature control, etc. Holding down the TAB key will move the cursor very quickly through the
various fields, so don’t worry if you only need to change the last field in a dialog. Accept (F2) the
changes and continue to the data screens. Now, each time you power on the system these settings will
be loaded, unless you choose a different Settings File. Later you can define the default global settings for
other CIRAS-3 applications, such as soil respiration.
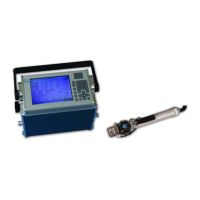
Controls functions are different from Settings in that they are used to update settings and make
necessary adjustments dynamically while operating CIRAS-3. During normal operation you will use
Controls (F3) almost exclusively to make alterations to the leaf chamber environment and to customize
how data is presented on the screen.