Chapter
11
Troubleshooting
_1_._T_r_ou_b_I_e_sh_o_o_u_n_g
__________________________
~4JH3(BXGE
I
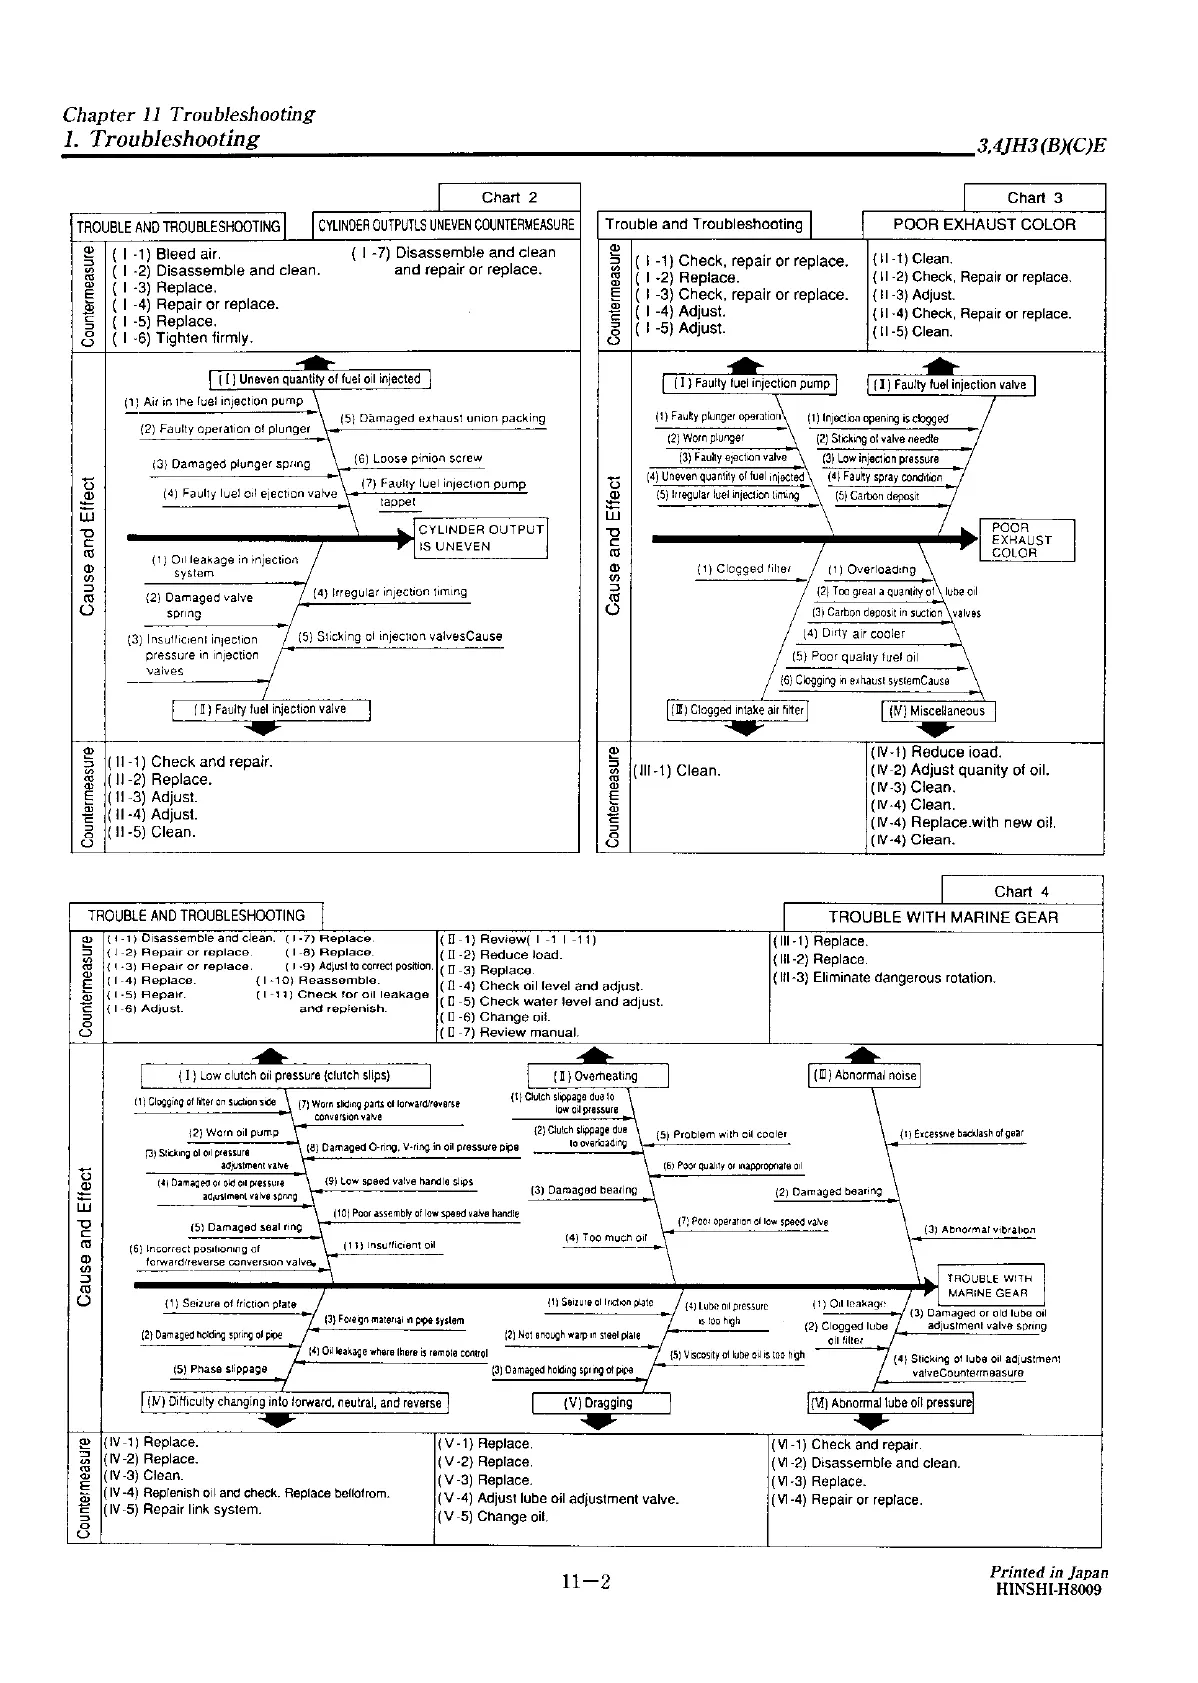
Chart
2
Chart
3
TROUBLE
ANO
TROUBLESHOOTING
I
I
CYLINDER
OUTPUTLS
UNEVEN
COUNTERMEASURE
Trouble
and
Troubleshooting
POOR
EXHAUST
COLOR
~
( I
-1)
Bleed
air.
( I -
7)
Disassemble
and
clean
::::,
"'
( I -2)
Disassemble
and
clean.
and
repair
or
replace.
ro
Q)
( I
-3)
Replace.
E
.si
( I
-4)
Repair
or
replace
.
C
( I -5)
Replace.
::::,
0
( I
-6)
Tighten
firmly.
u
~
I ( I I
Uneven
quantity
of
fuel
oil
injected
I
(1:
Air
in
1he
Juel
inieclion
pump
\
(2)
Faulty
operation
ol
plunger
\
15)
Damaged
exhaust
union
packing
(3)
Damaged
plunger
sp1mg
(6) loose pinion
screw
t3
(4)
Faulty
luel
o,I
eiec1,on
valve\
(7)
Faulty
luel
in1ec11on
pump
2
1appe1
LU
\
---
"O
...
I CYLINDER OUTPUT I
C
,,
I
IS
UNEVEN
(U
(;
I
0,1
leakage
in
injec1i0<1
/
(I)
(/)
system
::::,
/
14)
Irregular injection
timing
(U
12
I
Damaged
valve
0
spring
(3)
lnsullic1en1
in1eclion
/ (5) Slicking
ol
1n1ec11on
valvesCause
pressure
in
1n1ecuon
valves
I
I
(
Il
I
Faulty
luel
injection
valve
I
~
~
(
11
-
1)
Check
and
repair.
::::,
"'
ro
( IJ-2)
Replace.
Q)
E
(
11-3)
Adjust.
a3
"E
(
11-4)
Adjust.
::::,
(
11-5)
Clean.
0
u
a,
5 ( I -1)
Check,
repair
or
replace.
~
( I -2)
Replace.
(
11-1)
Clean.
(
11
-2) Check, Repair or replace.
(
11
-3) Adjust. E ( I -3)
Check,
repair
or
replace.
~
( I -4)
Adjust.
(
11-4)
Check, Repair or replace.
(
11
-5) Clean.
c3
( I -5)
Adjust.
ti
(I)
CT]
"O
C
(U
(I)
(/)
::,
(U
0
~
(I)
Faulty
luel
injeclion
pump
I [)
Faulty
Juel
injection
valve
(1)
Fautty
plunger
oporatia11
121
Worn
plueger
131
F,uhy
e10ct<Jn
valve
(4)
Uneven
quantity
ol
luel
iniocted
\:5)
lueguta:r
luel
m1ecl1on
timLng
1 t J
lnjoclioo
opening
is
cl:)gged
121
Sl~k1ng
ol
valve
needle
131
Low
injecl,in
pressure
(41
Fauly
spray
cond,!ion
15)
Carbon
depose
\
( i )
Overload,ng
(2)
Too
grea1
a
quan1ity
al
lube
od
l3i
Carbon
deposit
,n
Sl.lCl<>n
valves
/2
/
(4)
Diny
air
cooler
15)
Poor
qua1t1y
Juel
oil
I
Clogging
,n
e,hausl
syslemCause
POOR
EXHAUST
COLOR
(
IV
-1)
Reduce
ioad.
~
(Jll-1)
Clean.
(
IV
-2)
Adjust
quan
ity of oi
I.
( IV-3)
Clean.
(]J
E
(]J
"E
::::,
0
u
(IV
-4)
Clean.
(IV-4)
Replace.with
new
oil.
( IV-4)
Clean.
I
Chart
4
TROUBLE
AND
TROUBLESHOOTING
!
I
TROUBLE
WITH
MARINE
GEAR
a,
:S
V>
ro
Q)
E
a3
"E
::,
0
u
ti
2
LU
"O
C
(U
Q)
(/)
::::,
(U
0
~
:::,
"'
ro
(]J
E
w
"E
::::,
0
u
t I
-1}
Disassemble
and
dean.
(
1-7)
Replace
(
II
-1
} Review( I
-1
I
-11)
(
Ill
-1) Replace.
{ J
-2}
Repair
or
replace.
( I
-8)
Replace.
(
II
-2) Reduce load.
(
111-2)
Replace.
{ I
•3)
Repair
or
replace.
( 1
-9)
AdJus1
to
correct
posrtioo
( II -3) Replace.
( I
-4)
Replace
( I
-iO}
Reassemble
(
111-3}
Eliminate dangerous rotation.
( II
-4)
Check oil level and adjust.
< I
-5)
Repair.
(I
-11)
Check
for
oil
leakage-
(
□
-5)
Check water level and adjust.
{ I
-6)
Adjust.
and
rep+enish.
(
□
-6)
Change oiL
(
□
-
7)
Review manual.
.....
.....
......
I
(I)
low
clutch
oil
pressure
(clutch
slips)
I
I
[}
Overheating
I
I
(Ill)
Abnormal
noise
I
(1)
Clogglnq
o-1
lih&r
or,
!iuci1on'5ide
.\
(7J
WrM
5lld1og
parts
ot
l{lrwardhevars.e
(I)
Clulch
,1wage
du•
to
_ \
\
iow
o~
pres.sure
I
cofwar5ion11alve
O)
Worn oil
pump
\
12)
CMch
<l~age
duo
(5) Problem
w1!h
ml
coaler
\ I
l
facessive
~a.el.lash
of
gear
\ l8) Damaged
O-r1ng,
V·ring in oil pressure pipe
IOOVirkladmg
fJ)
S?01rig
ol
0,1
p1euure
ad)1J-stmerit
vatvE:
\
161
Poo,
quality
o,
~•Pl>•ll9f>ate
011
. \
(A~
DarriaQe-cl
o,
old
od
P4essur1:
\
(9)
low
spaed
valve handle
sJips
(3)
Damaged
bearing
\
ad1uslme<1I
val,,.e
spnng
\
\2)
Damaged bearn,g
\
I
10)
Poo1
assembly
of
low
speed
v.alve
handle
(51
Damaged
sa;al
ting.
(7)
P-oo.r
operat1a-n
al
low
speed
11aN8
\
(JJ
Abno,maJ
v1bra11on
141
Too
much~\
(6}
In.correct
pos1t1omng
or
\
( 11) lnsulhc10nt
011
\.
I "°""'
"""
I
lorwardlfeverse
conversion valve, \
\
I
/
H-)
L~Oil'
011
press1.uc
/
~
MARINE
GEAR
( 1 t Seizure-
al
fric11on
pl.ite
t1
I
Seizure
ol
1,cct10n
plate
( 1)
011
loa>age
I
(
3)
Damaged or old lube
01!
/ m
Foreigr)
117,1t,e1i.al
h'I
p~
S~5le-m
I
is
ioo
t•ug~
(2)
Clogged
lube L
adjustment
valve
sprmg
11)
Damage<l
holding
5Prl"'l
ol
?,;><'
I
111
Nol
anolJ\lh
wa,p
in
s1,,1
pla1e
I
oil M!or
J
I
i4)
oa
leakage
wherij
l~ere
is
u:1moie
c:ontrol
/
{51
Viscosi)
ol
l"be
011
"too
hgh
I {4) Stick.mg
o1
lube oil
adiustment
151
Phase slippage
I
131
Dam3!)&d
ho~illQ
$D•ing
01
p,pa
I
11alveCounlermaasure
'
I
I (N)
Ditt1culty
changing
into lorward,
neutral,
and
rever.e
l
I
l
VI
Dragging
I
I
NI
Abnormal
tube
oil
pressure!
......
~
.....
( IV-1) Replace.
(V-1)
Replace.
(
VI
-1)
Check and repair.
(
IV
-2) Replace.
( V -2) Replace.
(
VI
-2)
Disassemble and clean.
(
IV
-3) Clean.
( V -3) Replace.
(
VI
-3)
Replace.
(
IV
-4)
Replenish
01
I and
check.
Replace
bellofrom.
( V -4) Adjust lube oil adiustment valve.
(Vl-4} Repair or replace.
( IV-5) Repair link system.
( V -5) Change oil.
11-2
Printed in Japan
HINSHl-H8009