40
Recording an additional performance while listening to
an existing performance—Overdubbing
The tracks for which the REC TRACK button is lit in green
(or alternately in orange and green) are tracks that already
have data recorded on them.
The process of listening to a previously recorded
performance while you record additional material on
another track is called “overdubbing .” By recording the
bass, guitar, and vocals on different tracks, you can then
adjust the volumes of each instrument with respect to one
another, change the left-right sound balance, exchange data,
and perform other operations.
1. Press one of REC TRACK [1] to [4] to select the track to
which to record.
By selecting a different track to record from the track
that you previously recorded, you can record a new part
while listening to the previously recorded part.
The status of each track can be determined from the
indicator on the button.
Off: No recorded data exists on the track.
Green: Recorded data exists on track.
Red: The track is selected for recording.
If a track with existing data is selected for recording, the
indicator will light alternately in orange and green.
* If you choose a track to record that already contains data
(where the REC TRACK button is lit in green), the indicator
lights alternately in orange and green, and the new music
overwrites the previously recorded data.
“Selecting the recording track” (p. 33)
2. Adjust the faders so the tracks being played back are at
a suitable level.
3. Press [REC].
[REC] flashes in red and the BR-532 enters the recording
standby state.
4. Press [PLAY].
The [REC] and REC TRACK button indicators change
from flashing in red to being continually lit and
recording begins.
[PLAY] lights up
Only what you are currently playing is recorded to the
new track. The music that is being played back is not
recorded.
* If you use the INPUT LEVEL knob to turn down the volume of
the input source during recording, the sound will be recorded
in the audio track at a low volume, so that noise will be more
apparent when you raise the volume of the audio track for
playback.If you want to lower the sound of the input source
that you are monitoring, lower the volume with the MASTER
fader. To change the volume of the music being played back, use
the TRACK fader for the respective tracks.
Changing the position of the
input sound
When you record new material while listening to a recorded
performance, your playing may tend to be buried in the
existing performances, making it difficult for you to play.
If this is the case, you can change the positioning (or
panning) of the INPUT (the instrument you are playing) and
record it so that it is not buried underneath the other sounds.
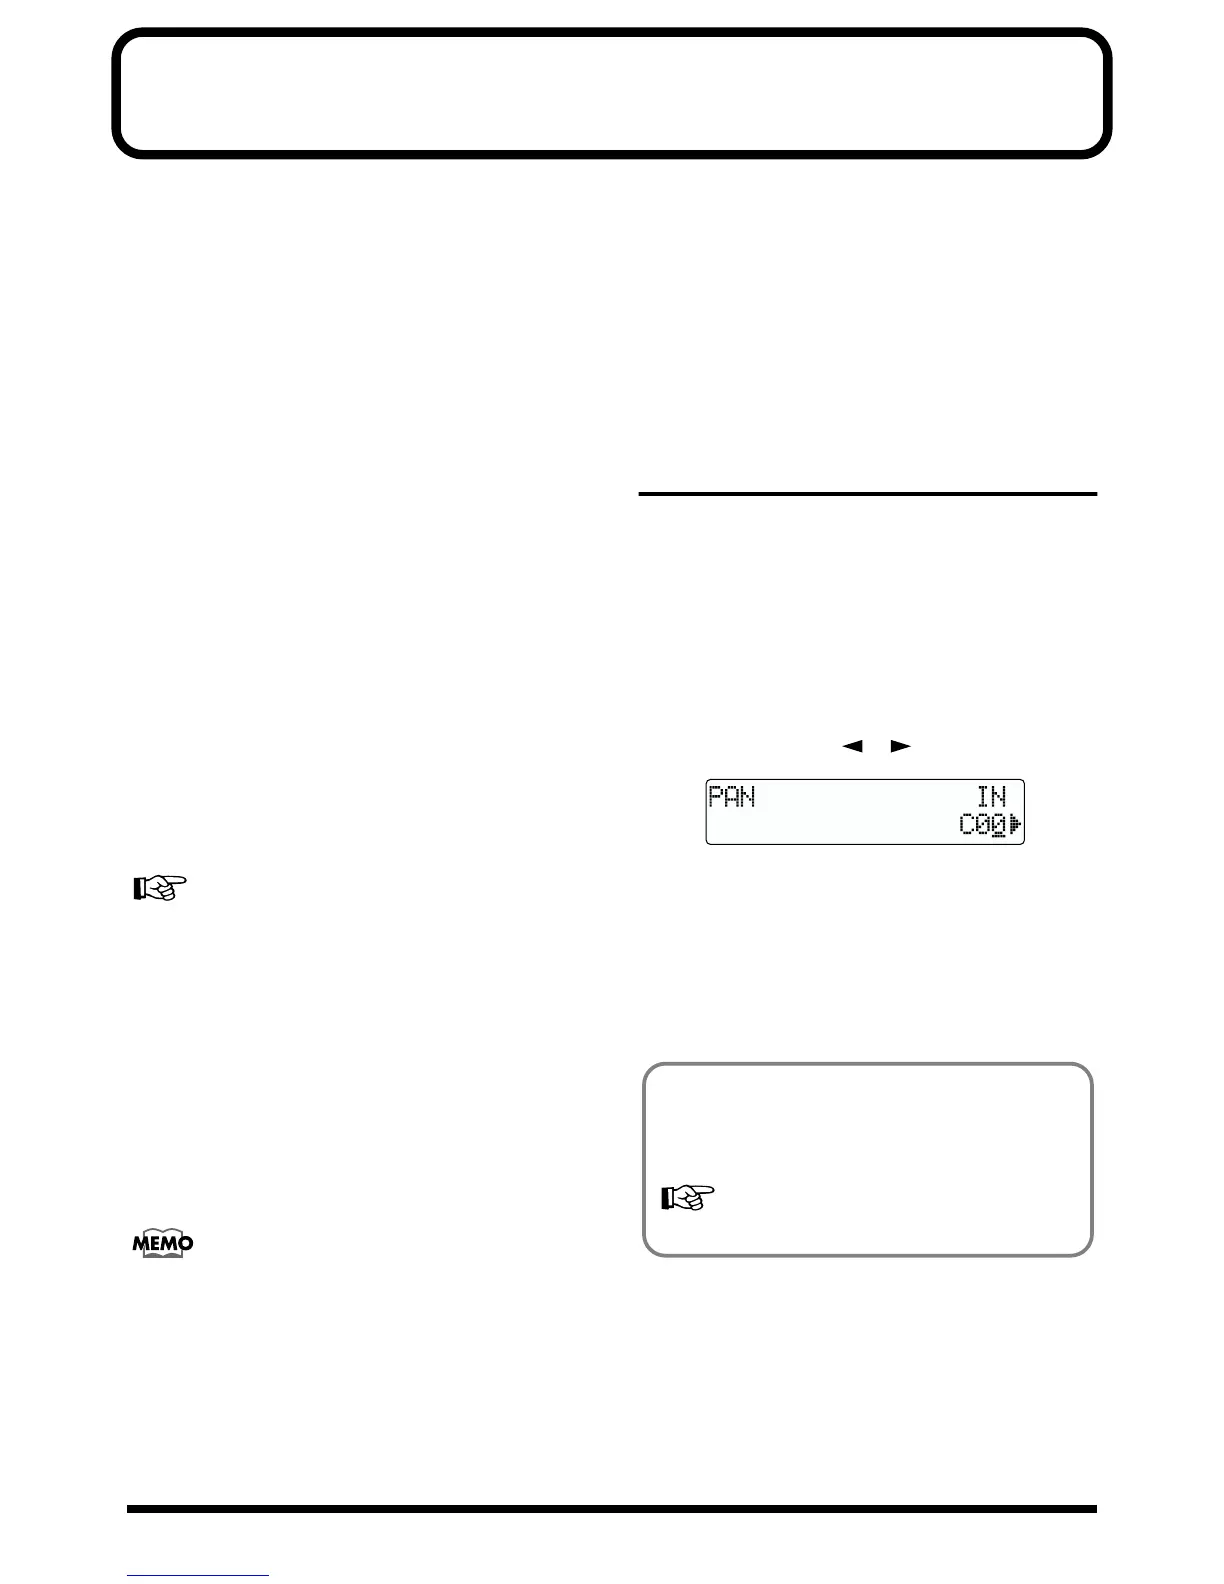
1. Press [PAN].
The Pan settings screen appears.
2. Press PARAMETER [ ] [ ] to display “IN.”
fig.R02-01
3. Turn the TIME/VALUE dial to change the pan settings.
The pan settings made here are automatically applied to
the track that you are recording to, so that after
recording is complete, you can listen to the track with
the same pan as that when it was recorded.
4. Press [EXIT] (or [PAN]) to return to the Play page.
By panning the track that you are playing back to the left
(or right) and then panning the music that you are
playing to the right (or left), it will be easy to hear it
during playback.
“Setting the sound positioning (pan)” (p. 42)