Do you have a question about the BST CLS Pro 600 and is the answer not in the manual?
General user responsibilities and safety observance for safe operation.
Defines the intended audience for this operating manual.
Guidelines for manual storage at workplace and distribution.
Explains the significance of safety symbols and warnings used throughout the manual.
Explains symbols used for operation guidance and action requirements.
Illustrates key combinations for operating the system.
Points to additional documents and online resources for more info.
Introduces the CLS Pro 600, emphasizing safety and manual adherence.
Specifies the applications and purpose of the CLS Pro 600 sensor.
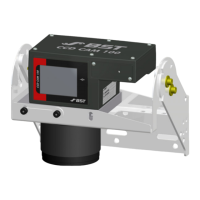
Overview of the system components and their arrangement.
Describes the components and physical layout of the CLS Pro 600 system.
Explains how the sensor detects position and interacts with the controller.
Explains key terms and concepts used in the document.
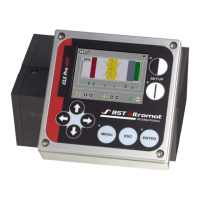
Explains the basic layout of the control panel display windows.
Defines the set point and how it's indicated on the display.
Specifies the physical dimensions of the sensor's scanning area.
Defines the section within the measuring area for evaluation.
Explains where sensor and controller statuses are displayed.
Describes the function of the footer for operating help and parameter info.
How to define the edge for line scanning.
Describes the main screen display for parameters and menus.
Details the different key groups and their functions on the control panel.
General safety precautions for installation and operation.
Information about the laser used as a positioning aid.
Details on the sound level emissions of the equipment.
Specifies environmental and site conditions for installation.
Procedures for installing the sensor.
Introduces the process of sensor installation using holders.
Instructions for mounting the sensor using the provided holder.
How to mount the sensor using a customer-provided holder.
Procedure to set the optimal gap using protective packaging.
Instructions on how to change the control panel's mounting position.
Details on how to rotate the control panel on its supporting ring.
Overview of control panel installation versions and cable extensions.
Steps to remove the holder before dismounting the control panel.
Detailed steps for mounting the control panel on a wall.
Instructions for installing the control panel in a console.
Safety and connection guidelines for all cables.
Information related to the sensor's physical connections.
Details the function and layout of sensor enclosure sockets.
Information about LEDs on the sensor indicating status.
Explains the meaning and status of bus communication LEDs.
Explains the meaning of the unit status LED.
Configuration of DIL switches for application-specific settings.
Overview of the menu structure and types (Main, Quick, Setup).
Explains menu-controlled operation and parameter organization.
Details how to make entries and select options within menus.
Describes navigation and structure of the main menu.
Procedures for integrating the sensor with external controllers.
Instructions for commissioning with the ekrPro Com60 controller.
Instructions for commissioning with ekr 500 Plus/digital controllers.
Instructions for commissioning with EKR 1500/CCD Line Guider.
Overview of sensor operation and onsite setup.
Information on how the sensor's display changes based on mode.
Explains the display content and symbols in setup mode.
Explains the display content and symbols in scanning mode.
Details the icons and meanings displayed in the status bar.
How to control the controller remotely via the sensor panel.
Explains how to perform setup and configuration in manual mode.
Describes automatic material web controlling based on selected mode.
How to keep the material web in the servo-center position.
Adjusting the set point position using arrow keys.
Moving the guiding device left or right in manual mode.
How to reset the controller gain via a specific parameter.
General operating principles and setup during operation.
How to select line or edge setup using specific keys.
Overview of standard operation after selecting a job.
How to load and select pre-configured jobs for specific applications.
Step-by-step guide to setting up for edge guiding.
Step-by-step guide to setting up for line guiding.
Advanced operations for optimizing settings beyond pre-configured ones.
How to assign or change user levels for access control.
Procedures for saving, selecting, and deleting jobs.
How to assign access rights to parameters based on user levels.
Customizing quick menus for faster access to parameters.
Manages saving, loading, and deleting sensor setups.
How to save current sensor configurations to setup slots.
How to load previously saved sensor configurations.
How to remove unwanted saved setups from slots.
Explains parameters found in the main menu.
Parameters for sensor, panel, and mounting settings.
Configuration parameters for the control panel.
Configuration parameters for the control panel.
Configuration parameters specific to the sensor.
Parameters for controller remote control settings.
Settings for defining the sensor's mounting position.
Defines menu access rights and quick menu positions.
Parameters related to the measuring process.
Details on job administration procedures.
Parameters for setting up the sensor's illumination.
Settings for over/underexposure in automatic mode.
Parameters for contrast detection settings.
Optimizing tracking conditions for exceptional materials.
Parameters for checking plausibility using comparable values.
Settings for plausibility check using comparable values.
Setting expected deviation for tracking splices or broken edges.
Defining tolerance for line width checking.
Applying measured value averaging for control process.
Defining step width for scanning after contrast loss.
Switching automatic web movement detection on/off.
Setting controller's remote gain factor.
Configuring how the sensor signal is displayed on the panel.
Displays general system information for equipment identification.
Explains pre-set device addresses for sensor and panel.
Setting the sensor's device address using the rotary switch.
Setting the control panel's device address using the rotary switch.
Information on internal terminator resistors for sensor and panel.
How to switch the sensor's internal terminating resistor on/off.
How to switch the control panel's terminating resistor on/off.
Procedure to reset all settings to factory defaults.
Technical specifications for the sensor.
Specifies operating and storage temperature/humidity.
Details voltage and power consumption requirements.
Technical specifications for digital inputs.
Technical specifications for digital outputs.
Technical specifications for analogue output.
Material specification for the measuring window cover.
Technical details of the control panel interface.
Specifies the weight and dimensions of the sensor.
Technical specifications for the control panel.
Specifies environmental conditions for the control panel.
Details the voltage for the control panel's power supply.
Technical specifications for the control panel's LCD display.
Specifies the weight and dimensions of the control panel.
Provides detailed dimensional drawings for installation planning.
Details the pin assignments for control panel and controller connectors.
General safety and procedures for maintenance and cleaning.
Instructions for cleaning and maintaining the sensor's optical components.
Information on cleaning the control panel casing.
Guidelines for shipping and transporting the equipment.
Specifies storage conditions for the sensor and control panel.
Describes the blockage signal and its effect on the analogue output.
Explains the analogue output as a control signal and its interpretation.
Steps for connecting and configuring the sensor for stand-alone mode.
How to configure parameters for the guiding block output.
Notes on defining mounting position in stand-alone mode.
Procedure for backing up system configurations and jobs via USB.
Steps to load new firmware onto the sensor.
Steps to load new firmware onto the control panel.
Step-by-step guide for installing wiring for EMC compliance.
Instructions for positioning the teach-in template relative to the sensor.
| Brand | BST |
|---|---|
| Model | CLS Pro 600 |
| Category | Accessories |
| Language | English |