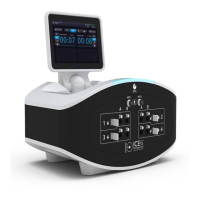
ICEfx™ Cryoablation System
3-3
3.3 Setting up the Console
CAUTION. If the Console is not attached to a cart, ensure that the Console is placed on a at, stable
surface. The Console should never be tilted.
1. Verify that the power switch, Argon Shuto Valve, and Vent Valve on the rear of the Console are
easily accessible.
NOTE: Allocate space with adequate ventilation and free airow. In order to guarantee proper
ventilation, always keep the sides of the Console at least 0.5 meters (20 inches) from walls or
other obstructions to airow.
2. Lock the wheels on the cart.
3. Plug the power cord into a hospital grade power outlet (electrical mains outlet) with a ground
connection. Galil Medical recommends using a stable and uninterruptable power outlet.
NOTE: If the power supply to the ICEfx Console is not stable or is noisy, the MTS temperature
readings may be inaccurate.
WARNING. To avoid risk of electric shock, this equipment must only be connected to a
hospital grade electrical power outlet with a protective earth.
OPTIONAL: When performing a prostate cryoablation procedure, set up a urethral warmer
system by following the directions provided in the Urethral Warming Set Instructions for Use.
4. Conrm that the Argon Shuto Valve on the rear of the Console is in the ON position. If needed,
turn the knob counterclockwise to the ON position.
Figure 3-3. Argon Shuto Valve - ON Position