DESCRIPTION AND INSTALLATION
25364 Issue 8 March 2018 2-15
Communicator II
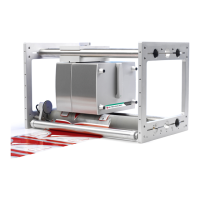
(1) Mount the printer in the bracket system, using four screws (M6 x
35mm).
Note: When mounting the printer in the CM bracket, ensure the print
he
ad is mounted on the top point of the rubber roller. This may
be adjusted to obtain the best print quality.
(2) Adjust the height between the rubber roller or platen using the
a
ppropriate shims provided.
Note: The height may need to be adjust
ed once the services are
connected.
Fitting Shim between the Bracket and Printer
(3) When the correct distance is obtained, tighten the screws.
Mount the I/O box and power supply. See “Connectivity - Co
mmunicator II”
on page 2-34.