FX-20
This Menu adjusts the Pitch Curves for the following Flight
Conditions:
• Normal: For starting and stopping the motor
• IDLE UP 1: For hovering flight
• IDLE UP 2: For circuit flying
• IDLE UP 3: For aerobatics
• HOLD: For autorotation landings
Switching between these flight conditions is made using the
assigned (CONDITION) switches. When turning on the Trans-
mitter, the NORMAL flight condition must be selected, other-
wise a WARNING alarm will sound and you will be questioned
whether to transmit a signal. This may be programmed in the
MIX-ALARM option.
Example of the Pitch Curve for
‘NORMAL’ flight condition. Program
the curve so that the motor r.p.m. re-
mains as constant as possible across
the entire pitch range.
Example of a Curve for ‘IDLE UP 1’.
For hovering, the settings are adju-
sted so that the correct rpm is held
for all pitch settings.
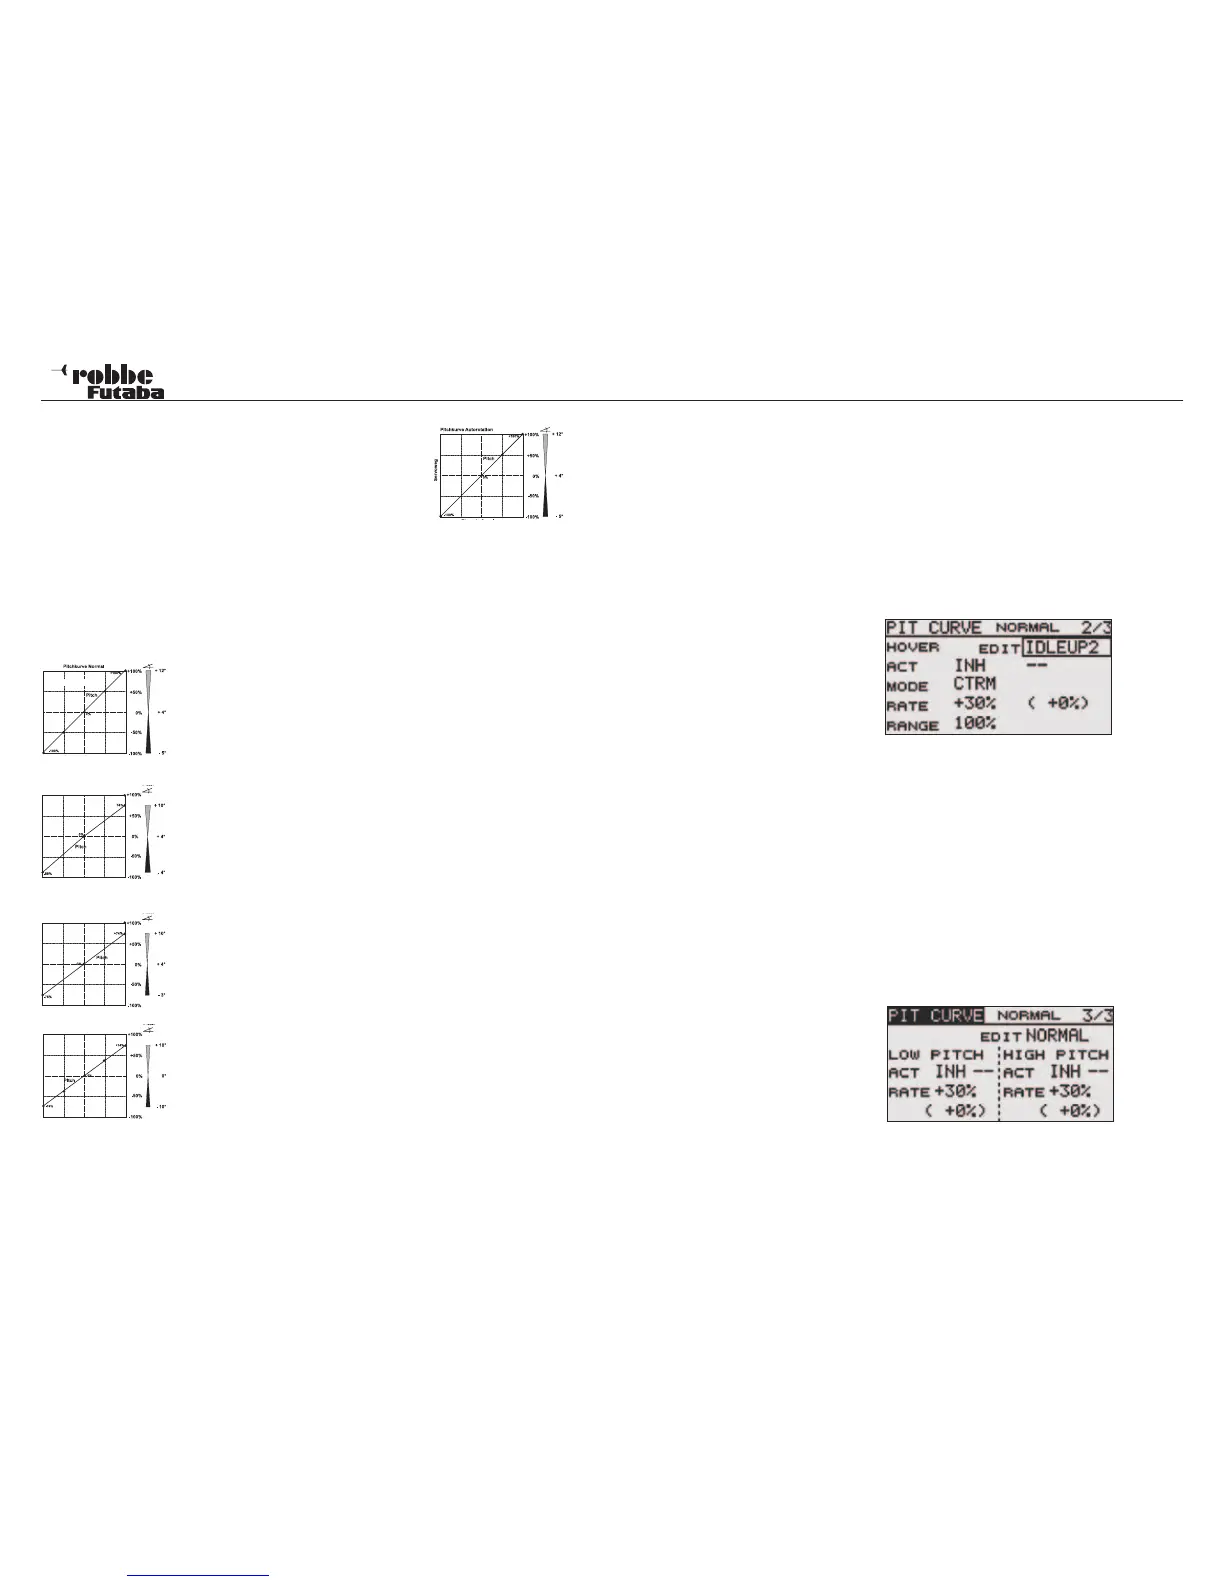
Example of a Curve for “IDLE UP2”.
For circuit flying, the settings are ad-
justed so that the correct rpm is held
for all pitch settings.
Example of a Curve for “IDLE UP3”.
For aerobatic flying, the basic curve
is a straight line and the settings are
adjusted so that the correct rpm is
held for all pitch settings.
Example of a Curve for “HOLD”. For
autorotation, the lower portion of the
throttle curve is adjusted so that eit-
her the motor is cut or returns to a
reliable idle.
The lower part of the pitch curve is adjusted so that the highest
possible rotor head speed is achieved. Thereby giving the most
stored rotor energy to flare and land the helicopter under full
control.
The illustrated curves are only shown as examples, since
you must test fly your machine and adjust the individual
settings to suit the specific model characteristics!
The programming for all flight conditions is as follows:
• Program Pitch Curve
The programming of the Curve, in the first Menu is made in
the usual method. The Curve must be set up. Highlight the
point (1-5) on the Pitch Curve that needs adjustment with
the “CAP TOUCH SENSOR“ and scroll the sensor to adjust
the %age value to achieve the pitch setting required.
• Copy Pitch Curve
To copy the created Pitch Curve, using the “CAP TOUCH
SENSOR“ within the source Pitch Curve Display, scroll and
select “COPY“. Select the target Pitch Curve to be over writ-
ten and confirm YES or NO prompt with RTN.
• Carry out Pitch Trimming
On pages 2 and 3 of the Display, the Pitch Trim can be opti-
mized. In the second menu page, the Hovering Pitch (IDLE
UP1) will be set up. The function must be activated by tur-
ning ON.
In the line ‘--’ the Tx control is assigned to act as Pitch Trim-
mer (the rotary knob LD is pre-set). After highlighting the
control with the “CAP TOUCH SENSOR“ and confirming
with “RTN”, the H/W SELECT menu appears and an alter-
native can be assigned using the normal control assign-
ment method.
• Now program the ‘MODE’ for the Pitch-Trim. The modes
‘NORM’ and ‘CTRM’ are available. With NORM, the trim
area is symmetrical about the neutral point and will also
move the end points of the servo travel respectively. The
Centre Trim (CTRM) works also around the servo neutral
point but does not change the servo end point. The trim
throws work asymmetrically.
• Furthermore, the trim RANGE can also be programmed. If a
smaller Trim Range is required, then the trim only operates
near the neutral stick point. Also, further Flight Conditions
can be configured from pages 2 & 3 of the Menu in case
that no control has been assigned in the flight condition
menu.
Scroll the
cursor to the field beside “EDIT“ and confirm with “RTN“.
Using the “CAP TOUCH SENSOR“, select the required flight
condition.
• The third page of the menu is used to adjust ‘MIN’- and
‘MAX-PITCH’, for the end limits of the pitch servo.
• The programming is totally identical to that used for the
IDLE UP 1 (hovering) trim settings. No Trim mode and Trim
Range may be entered here. Finally, the Trim RATE is ente-
red. The adjustment is made from -30 to +30% of the con-
trol throw. The pre-set value is +30%. After highlighting and
activating this option, scroll the ‘CAP TOUCH SENSOR’
to set the required value. Touching ‘RTN’-key for at least 1
second will return to the pre-set value of 30%.
Model menu helicopter
54