6
2.2 Connecting the Receiver to a Network
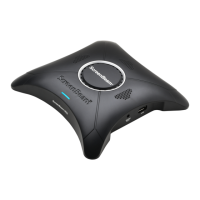
ScreenBeam 960 receiver supports both wired and wireless connections. You can deploy
ScreenBeam 960 receivers based on your network requirements.
Note: The setups in this section are optional.
2.2.1 Wired Connection
ScreenBeam 960 receiver provides a built-in Ethernet port, allowing direct connection to an
Ethernet network.
To connect the receiver to a network, follow this procedure:
1. Go to the receiver’s Local Management Interface, and set IP address assignment and
DNS assignment to auto in the Remote Management tab page.
Note:
If you want to set the receiver’s IP address or DNS server to static, consult your
network administrator.
Refer to Section 5.2 Using Local Management on ScreenBeam for detail on how to log
into the receiver’s Local Management Interface.
Refer to Section 5.3.7.2 Setting up the Receiver’s IP Address for detail on how to set
up the receiver’s IP address.
Refer to Section 5.3.7.3 Specifying a DNS Server for the Receiver for detail on how to
set up the receiver’s DNS server.
2. Connect your ScreenBeam receiver to your network with a quality Ethernet cable.
3. The receiver will be assigned an IP address after a few seconds, if a DHCP server is
available in your network.