5.
Create an administrator prole (see “Create an administrator instrument prole
during initial start-up“ on page 27).
6.
Select one of the following options.
• Link the instrument prole to the Thermo Fisher Cloud (see “Link an existing
instrument prole with the Thermo Fisher Cloud“ on page 38).
• Touch Skip.
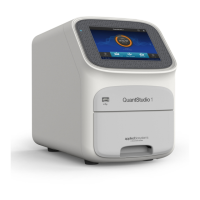
Installation and instrument verification
Before the rst use of the instrument, complete the following tasks:
• Install the instrument (see “Unpack and install the instrument“ on page 79).
• Verify instrument performance (see “Perform instrument verication using
RNase P plates“ on page 57).
Note:
·
Instruments are factory calibrated, so no calibration is necessary at installation.
However, we recommend that you verify instrument performance before using
the instrument.
·
Regular calibration and verication should be performed according to the
calibration and verication schedule (see “Calibration and verication
schedule“ on page 49).
Use the instrument without signing in
If the instrument is congured by an Administrator to allow guest access
( Seings4Manage Users4Sign In Required set to o), you can use the
instrument without signing in.
The following limits are in place if you do not sign in to the instrument:
• All actions are recorded to Guest user prole.
• You have access only to the Public folder for selecting and storing experiments.
• You cannot transfer data to the Cloud (only to USB or network drive).
Chapter 3 Configure the instrument and manage instrument profiles
Installation and instrument verification
3
26
QuantStudio
™
1 Real-Time PCR System Installation, Use, and Maintenance Guide