Configuration
LITECOM, Commissioning and maintenance instructions 17.0 | 04.2024 | en 133
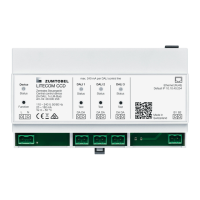
10.Tap the Assign room/group/zone button.
ÜThe Assign rooms/groups/zones view is displayed.
11.Select the desired rooms/groups/zones you wish to assign to the user.
Note
· You can filter the rooms, groups and zones by tapping Show all or
Show assigned only in the dropdown menu. You can also search for
rooms, groups and zones in the search field.
· When a room is assigned to a user, the user will also have access to
any groups created in this room in future.
12.Tap the Save button.
ÜThe room/group/zone is assigned.
ÜThe New user view is displayed.
13.Tap the Save button.
ÜThe user is created.
ÜThe User has been created view is displayed.
14.Tap the Copy and close button to save the one-time password to the clipboard
and close the view.
– or –
14.Tap the Close button.
ÜThe User management view is displayed.
15.Tap this button to access the app overview.
Note
The user needs a user name and one-time password in order to log in for
the first time.
 Loading...