Do you have a question about the Emerson Fisher FLOBOSS 407 and is the answer not in the manual?
Describes the manual's coverage, including sections, appendices, and glossary.
Lists information covered in Section 1, with section and page numbers.
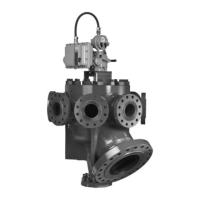
Provides a general description of the FloBoss 407 Flow Manager and its capabilities.
Outlines the topics covered in Section 2, focusing on the base unit components and their functionality.
Details the functionality, processor board, and termination board of the FloBoss 407 base unit.
Provides instructions and guidelines for installing the FloBoss 407 unit and its options.
Explains how to connect the FloBoss 407 to power, ground, I/O devices, and communication devices.
Offers procedures for identifying and resolving issues with the FloBoss 407, including LED indicators and backup procedures.
Lists the technical specifications for the FloBoss 407, covering processor, memory, ports, power, and environmental data.
Describes the I/O modules used with the FloBoss 407 and ROC300-Series products.
Details the available I/O modules, including analog inputs, outputs, discrete modules, pulse inputs, RTD, and HART.
Provides steps for installing and setting up I/O modules in the ROC/FloBoss.
Explains how to connect various types of I/O modules to field wiring.
Offers guidance on troubleshooting and repairing I/O modules, with specific procedures for analog and discrete modules.
Details procedures for removing, adding, and replacing I/O modules, including configuration impacts.
Lists detailed specifications for various I/O modules, including input/output types, power, and environmental ratings.
Introduces the section on communications cards for FloBoss 407 Flow Managers.
Describes the available communications cards: EIA-232, EIA-422/485, Radio, Leased-Line, and Dial-Up modems.
Covers the initial installation of communication cards, including card orientation, jumper settings, and attenuation levels.
Provides wiring schematics and signal connections for various communication cards to the COM2 terminal block.
Offers guidance on troubleshooting and replacing communications cards, emphasizing backup procedures and cautions.
Lists detailed specifications for serial, radio, leased-line, and dial-up modem communication cards.
Introduces the section on the FloBoss 407 display and keypad, covering data access and parameter configuration.
Describes the 2-line LCD display and membrane keypad for on-site parameter viewing and editing.
Defines keypad operations in Normal, Edit, and Alt modes, explaining key functions and their usage.
Shows expected displays for various functions selected via the keypad, including I/O Summary and Flow Rates.
Explains security features implemented through ROCLINK software, including logging off and continually displaying parameters.
Outlines troubleshooting steps for keypad and display issues, referencing processor board removal procedures.
Introduces the appendix on the Lightning Protection Module (LPM) for ROC and FloBoss units.
Describes the LPM module, its purpose in preventing damage from transients, and its connection terminals.
Provides steps for installing an LPM into terminal block sockets to protect I/O channels.
Explains how to connect field wiring and ground wires to the LPM module, including resistor sockets.
Offers troubleshooting steps for LPM issues, focusing on continuity checks and replacement.
Lists the electrical, mechanical, environmental, and approval specifications for the LPM.
Introduces the appendix on Multi-Variable Sensors (MVS) for orifice flow calculation.
Describes integral and remote MVS units, their electronics, and how they interface with the FloBoss 407.
Details mounting procedures for integral and remote MVS units, including pipe, panel, and flange mounting options.
Explains field wiring connections for integral and remote MVS units, including wire types and terminal identification.
Covers configuring the MVS, specifically setting interface addresses for multi-drop setups using ROCLINK software.
Provides a 5-point calibration procedure for the MVS using the FloBoss 407 keypad or ROCLINK software.
Offers troubleshooting steps for MVS issues, including lockup and incorrect readings, and contacting support.
Lists detailed specifications for the Remote MVS101 and MVS205, covering inputs, outputs, power, and approvals.
Introduces the appendix on simulating inputs and outputs to verify ROC/FloBoss operation using I/O modules.
Shows wiring for simulating analog outputs to analog input loop and differential modules.
Demonstrates using a meter to check analog output source modules by reading current or voltage.
Illustrates simulating discrete voltage levels or relay contacts between discrete output and input modules.
Shows how to simulate turbine meter pulses or relay contacts using discrete output modules for pulse inputs.
Demonstrates using potentiometers to simulate transmitters for analog input loop and differential modules.
Illustrates using switches to simulate discrete voltage levels or relay contacts for discrete input modules.
Shows using switches to simulate relay contacts or pulses for pulse input modules.
| Brand | Emerson |
|---|---|
| Model | Fisher FLOBOSS 407 |
| Category | Control Unit |
| Language | English |