Helpful Technical Information
7
165
UHK-430/CCU-430 1710 VER2 (E)
7.7 Adjusting the Lens
7.7 Adjusting the Lens
■
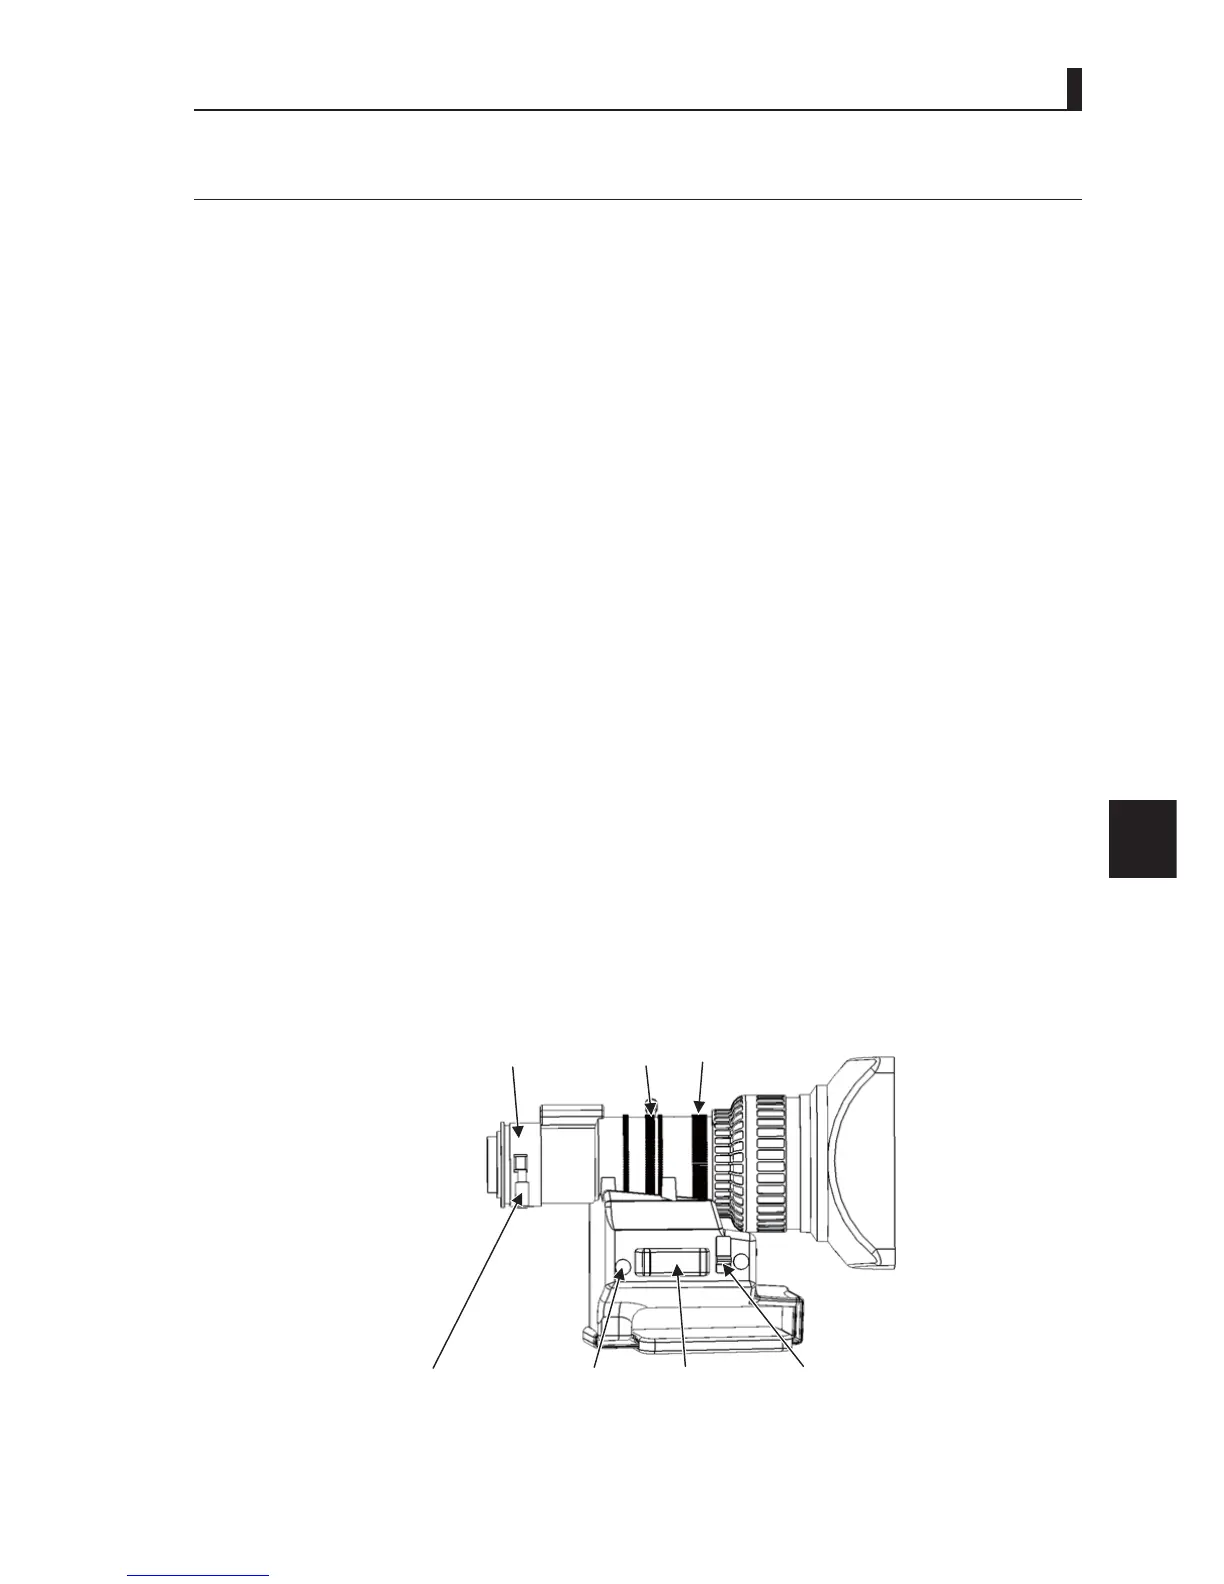
Adjusting the Lens Flange Back
7RRSHUDWHWKH]RRPOHQVWKHIRFXVHVRIERWK7(/VLGHWHOHVFRSHDQG:,'(ZLGHDQJOHKDYHWREHDGMXVWHG
,IWKHOHQVLVUHSODFHGZLWKDQRWKHURQHDQG]RRPHGWKHIRFXVPD\QRWEHDGMXVWHG7KLVRFFXUVZKHQWKHÀDQJHEDFNRIWKHOHQV
GLVWDQFHIURPWKHOHQVPRXQWVLGHWRWKHLPDJLQJVXUIDFHRILPDJLQJHOHPHQWLVQRWLQWKHDSSURSULDWHSRVLWLRQ,IWKH]RRPOHQV
LVRQFHIRFXVHGZKHQWKHGLVWDQFHWRWKHVXEMHFWLVFRQVWDQWLWFDQVWD\IRFXVHGUHJDUGOHVVRIWKH]RRPRSHUDWLRQ0RYHWKHÀDQJH
back position to adjust and stay focused. Once adjusted, it is not necessary to readjust the lens until the lens is replaced with
another one.
$QH[DPSOHRIDGMXVWPHQWPHWKRGLVVKRZQEHORZ
1 Set the IRIS mode switch of zoom lens to “M” (manual).
2 Open the IRIS (F1.4).
It becomes harder to identify the change in video against the rotation of focus ring because the status degree of the IRIS
diaphragm (F value is greater) and the depth of the subject get greater.
Note
/RRNDWWKHYLHZ¿QGHUVFUHHQDQGVKRRWWKHVXEMHFWLQZKLFKWKHYLGHROHYHOGRHVQRWJHWVDWXUDWHG¿OOHGZLWKZKLWH7KHVXEMHFW
with detailed patterns is easier to adjust the focus.
,IWKHVXEMHFWLVWRREULJKWDQGVDWXUDWHGHYHQLQWKHUHOHDVHGVWDWXVHPSOR\WKH1'¿OWHUDQGGDUNHQWKHOLJKWLQJHWF
- Siemens star chart is recommended for the subject. The center part has detailed patterns, so it is easy to adjust the focus. (Refer to the
next page.)
3 Shoot the subject about 5 m away.
4 Press the zoom switch "T", and fully enlarge the lens to the TELE (telescope) side to adjust the focus ring in
focus.
5 Press the zoom switch "M", and fully reduce the lens to the WIDE (wide angle) side. (At this time, be sure not to
move the focus ring.)
6 Loosen the flange back knob, and turn it to adjust the focus.
7 Repeat the procedures 4 - 6, and tighten the flange back knob with “T” and “M” both in focus.
Flange back adjust ring
Flange back knob RET switch Zoom switch IRIS mode switch
IRIS ring Focus ring
T
W