Installation
98
Aastra 470 ab R3.0
syd-0337/1.5 – R3.0 – 05.2013
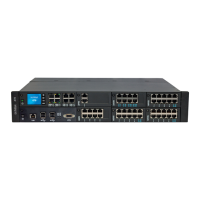
4. 2. 6. 1 Rack-mounting procedure
Materials required:
• Fastening kit for rack mounting
• Screwdriver
To rack-mount a communication server proceed as follows:
1. Pull off the screw covers on the left and right of the front panel.
2. Secure the cage nuts in the appropriate positions in the rack’s fastening rails.
3. If necessary install the redundant fan unit (see "Fitting an additional fan",
page 98).
4. Connect the earthing (see "Connecting the earthing wire", page 101).
5. Secure the communications server to the rack’s fastening rails using the M6
screws and the cage nuts.
6. Fit the screw covers on the left and right of the front panel.
7. Connect the earthing (see "Connecting the earthing wire", page 101).
8. Always observe the location requirements set out in Tab. 37.
4. 2. 6. 2 Fitting an additional fan
An additional fan can be fitted in front of the standard fan already integrated. Both
fans always rotate at the same time and at the same speed, depending on the tem-
perature inside the communications server. The redundant fan unit increases the
system’s operating reliability. If one fan fails, the second fan dissipates the heat. A
fan failure generates an event message, allowing the defective fan (or both fans) to
be replaced.
Note
Fans have a limited service life. So if a fan fails become of age ( approx. 5
years) it is advisable to replace both fans as a precautionary measure.
Materials required:
• Aastra 470 additional fan premounted on fastening frame
• Set of screws for additional fan
• Screwdriver
 Loading...