Do you have a question about the ADVANTEST R3131 Series and is the answer not in the manual?
Explains warning labels and symbols used in the manual.
Lists essential safety precautions for operating the instrument.
Describes caution symbols and their meanings within the manual.
Lists safety marks found on Advantest products.
Lists parts with limited lifespan and when they should be replaced.
Advises on proper disposal of harmful substances according to state law.
Provides guidelines for placing the instrument for safe and optimal operation.
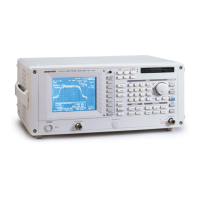
Describes the R3131 Series spectrum analyzer and its key features.
Lists standard accessories shipped with the spectrum analyzer.
Details the required environmental conditions for operating the spectrum analyzer.
Lists power supply specifications and requirements for the spectrum analyzer.
Explains the location and procedure for checking or replacing the power fuse.
Describes the power cable and its connection for electrical shock protection.
Details the procedure for performing the initial self-test on the spectrum analyzer.
Provides instructions for cleaning, storing, and transporting the spectrum analyzer.
Provides instructions for cleaning the spectrum analyzer and its display filter.
Advises on storing the spectrum analyzer in suitable environmental conditions.
Provides guidelines for packing and shipping the spectrum analyzer for service or repair.
Lists parts with limited lifespan and when they should be replaced.
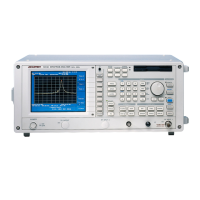
Describes the front and rear panel controls and connectors of the spectrum analyzer.
Details the components of the spectrum analyzer's front panel sections.
Details the components of the spectrum analyzer's display section.
Identifies the power switch and various connectors on the front panel.
Describes the floppy disk drive components on the front panel.
Details the measurement-related keys on the front panel.
Explains the numeric keys, units keys, and data knob for inputting data.
Describes the marker keys and their functions for trace analysis.
Details the control keys for setting bandwidth, trigger, pass/fail, display, trace, and sweep.
Explains the system keys for local control, preset, shift, save, recall, and copy functions.
Covers miscellaneous keys like auto tune, counter, and power measure.
Explains the various elements displayed on the spectrum analyzer screen.
Identifies terminals and connectors located on the rear panel.
Explains how to use panel and soft keys to navigate menus and enter data.
Explains how to use panel and soft keys to navigate menus and enter data.
Guides on displaying spectrums and using markers for analysis.
Describes measuring windows and lines for trace comparison.
Details how to use the counter function for accurate frequency measurement.
Explains how to use the auto tuning function to display signals with unknown frequencies.
Covers signal tracking and continuous peak search functions.
Explains UNCAL messages and procedures to correct measurement errors.
Describes how to set RBW to properly observe adjacent signals.
Explains how to increase dynamic range by adjusting noise level and bandwidth.
Describes input saturation and gain compression errors.
Explains harmonic distortion produced by input mixer non-linearity.
Details intermodulation distortion caused by multiple input signals.
Guides on performing calibration routines for accurate measurements.
Describes how to create and edit custom antenna correction data tables.
Provides practical examples of measurements using the spectrum analyzer.
Explains how to measure channel power using the spectrum analyzer's power measurement function.
Details how to measure the occupied bandwidth using the OBW function.
Explains measuring adjacent channel leakage power using ACP functions.
Describes the ACP GRAPH method for measuring adjacent channel leakage power.
Explains how to measure the VA ratio for television carriers.
Details how to perform Pass-Fail judgments using marker and window settings.
Describes a method for measuring harmonic distortion using step keys.
Explains measuring band-pass filter characteristics using the TG option.
Covers additional functions such as floppy disk operations and data management.
Details how to use the 3.5-inch floppy disk drive for saving and accessing data.
Explains how to save, protect, load, and delete data files.
Describes saving screen data to floppy disk or printing it.
Explains how to set the date and time displayed on the spectrum analyzer.
Provides an alphabetical index of menu keys and their page numbers.
Visual representation of menu structures and key functions.
Detailed explanation of each panel key and its associated menus.
Describes the AUTO TUNE key for displaying the maximum peak.
Explains how to change resolution and video bandwidth settings.
Details the calibration routines accessible via the CAL key.
Describes configuration options for printers, floppy disks, and GPIB/RS-232.
Explains how to send screen data to a selected destination.
Details activating the frequency counter mode and its resolution settings.
Describes functions for display line, reference line, measuring window, and zoom.
Explains detector modes, antenna selection, and sound functions for EMC measurements.
Describes setting center, start, and stop frequencies, and step size.
Explains how to activate/deactivate Hold mode, disabling most key inputs.
Details setting reference level, attenuator, amplitude scale, and units.
Explains how to turn off GPIB remote control.
Describes setting noise/Hz, units, and XdB down functions.
Details functions for setting normal, delta, and peak markers.
Explains how to use marker data as center frequency or reference level.
Describes enabling Pass-Fail judgment based on level window settings.
Explains how to display frequency and level of the marker at the maximum trace level.
Details functions for measuring channel power, total power, average power, and OBW.
Explains how to reset the analyzer to its default factory settings.
Describes reading out data from files selected from the file list.
Explains how to activate the continuous sweep mode.
Details saving setup conditions, trace data, correction data, and normalization data.
Describes activating self-test mode and executing test items.
Explains how to pause and resume a single sweep.
Describes setting frequency span, zero span, peak zoom, and last span.
Details setting sweep time and gated sweep function.
Explains setting TG output level and performing normalization calibration.
Describes write, view, blank modes, detector modes, and averaging functions.
Explains trigger modes like free run, line, video, external, and slope.
Provides values for various settings used with the spectrum analyzer.
Lists center frequency and frequency span set resolutions.
Provides auto settings for RBW, VBW, and SWP Time based on frequency span.
Lists default analyzer parameters and settings reset by PRESET.
Details default settings used when the Defaults Config softkey is pressed.
Explains how to remotely control the spectrum analyzer using GPIB.
Lists GPIB interface functions like handshake and controller roles.
Describes how the analyzer responds to interface messages like IFC and REN.
Explains the process of exchanging commands and response data via GPIB.
Defines the format for command programs used in GPIB communication.
Details the numeric and unit data formats used for GPIB input/output.
Explains the hierarchical status register structure and its components.
Provides sample BASIC programs for PC9801 and HP series for GPIB control.
Explains available output formats for measured data and set conditions via GPIB.
Describes transferring trace data (501 points) via ASCII or binary format.
Explains how to use status bytes for monitoring the spectrum analyzer's state.
Explains how to control the spectrum analyzer using the RS-232 interface.
States that control codes are similar to GPIB except for specific references.
Lists functions controllable via serial communication.
Shows the parameter setup window for RS-232 communication.
Illustrates the physical connection between the spectrum analyzer and a personal computer.
Explains how panel controls are affected during remote operation.
Provides typical remote control command examples using Microsoft Quick Basic.
Lists frequency range, accuracy, span, stability, and bandwidth specifications.
Details amplitude measurement range, input levels, and display/reference ranges.
Lists sweep time, accuracy, trigger mode, and sweep mode specifications.
Specifies noise level, gain compression, harmonic distortion, and spurious factors.
Provides accuracy specifications for calibration, frequency response, and scale indication.
Details specifications for RF input, reference input, trigger, phone, GPIB, serial, printer, floppy, and probe power.
Lists specifications for the external gate signal used with gated sweeps.
Covers operating environment, storage, AC input, power, mass, and dimensions.
Lists specifications specific to the TG option.
Defines resolution bandwidth and its importance in spectrum analysis.
Explains how reference level affects input signal level reading and accuracy.
Defines gain compression as an error in linearity due to high input signals.
States the maximum sensitivity for detecting signals, influenced by resolution bandwidth.
Specifies the maximum level allowed for the analyzer's input circuit.
Defines residual FM as short-term frequency stability of local oscillators.
Measures suppression of spurious signals generated by leaks like local oscillation output.
Evaluates noise energy for impulse noise, defining parameters for evaluation.
Represents amplitude characteristics (flatness) of input attenuator and mixer.
Describes operation where the horizontal axis is time, not frequency.
Identifies undesired signals that interfere with the target signal.
Defines spurious signals of inherent frequency generated by the analyzer, also called residual response.
Explains distortion caused by higher harmonic spurious signals in the input mixer.
Describes noise appearing near the spectrum, affecting analyzer efficiency.
Defines bandwidth at a certain attenuation range and its ratio to 3 dB width.
Expresses deviation from the nominal 3 dB lowered point for IF filter accuracy.
Defines error generated when switching IF filters for difference in loss.
Specifies conditions under which the warranty does not apply.
Instructs on inspecting and claiming for shipment damage.
| Frequency Range | 9 kHz to 3 GHz |
|---|---|
| Input Impedance | 50 Ω |
| Total Amplitude Accuracy | ±1.5 dB |
| Phase Noise | -90 dBc/Hz at 10 kHz offset |
| Input Connector | N-type female |
| Power Requirements | 100 to 240 VAC, 50/60 Hz |