A1000 99 532210 04 - Rev.A
88
89
0.0
RESET/SETUP
DL2
DL11
MAIN
F1
USB
+
-
F
ERR
BAT1
OPEN
EMERG
BAT2
SIC
_
OP
SIC
_
CL
J10
J14
J11
J12
J13
V G
S1
G
T
J1
J17
V RX TX G
J8
E1 G E2
J7
T1 G
T2
R1
G R2
J9
V G 01 02 02
J22
J21
V
G
I1
I2
G
I3
I4
V
J18
G CH CL G
J23J24
J25
V G
S2
G
T
J2
0.0
RESET/SETUP
DL2
DL11
MAIN
F1
USB
+
-
F
ERR
BAT1
OPEN
EMERG
BAT2
SIC
_
OP
SIC
_
CL
J10
J14
J11
J12
J13
V G
S1
G
T
J1
J17
V RX TX G
J8
E1 G E2
J7
T1 G
T2
R1
G R2
J9
V G 01 02 02
J22
J21
V
G
I1
I2
G
I3
I4
V
J18
G CH CL G
J23J24
J25
V G
S2
G
T
J2
F2 F3F1
90
F3
1 1
1
2
4
3
1
6
6
Nm
Translation of the original instructions
ENGLISH
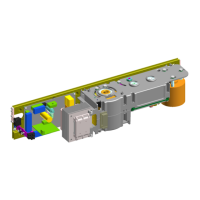
Emergency battery replacement
F
Before proceeding, disconnect mains power supply.
1. Disconnect the battery from the E1SL board.
2. Unscrew the 2 screws with washer 88-
and remove the
battery.
3. Install the new battery 88-
.
4. Connect the battery to the E1SL board.
Electronic board replacement
F
Before proceeding, disconnect the mains power supply and disconnect
the emergency battery.
It is recommended to download the data to a USB storage device in order
to upload it (update) to the new board 72.
1. Remove all connections.
2. Remove the screw 89- and the screw with washer 89-.
3. Remove the board from the support.
4. Insert the new board in the seats 89-.
5. Fasten using the screw and screw with washer .
!
The washer 89- ensures that the board is earthed.
6. Restore all connections.
7. Program the new board.
If programming files that were previously saved to a USB storage device
are available, upload (update) these to the board 72.
8. Carry out the SETUP procedure 53.
Replacing the fuses
F
Before proceeding, disconnect the mains power supply and disconnect
the emergency battery.
1. Remove the fuse F1 by pressing and turning anti-clockwise.
Remove fuses F2 and F3 by gently using a screwdriver as a lever.
2. Assemble the new fuse.
!
Only use the fuses indicated 90.
F1 8 A T (delayed)
F2 2 A F (quick)
F3 2.5 A T (delayed)