556
GPI Input Setting (GPI Input Assign Menu)
Chapter 22 DCU Setup (DCU)
a) As for the setting values, see “Selectable actions for various trigger
types” (page 556)
b) When knob 2 selection is “Aux ? O’ride Src ??”
c) When knob 2 selection is “Key Snapshot”
d) When knob 2 selection is “Snapshot” or “Shotbox”
e) When knob 2 selection is “Macro”
f) When knob 2 selection is “Effect”
g) The following values apply to the MVS-8000X.
For primary inputs: 1 to 144
For premium inputs: 145 to 164 ((PREM1) to (PREM20) indicated
after the number)
For format converter dedicated inputs: 165 to 180 ((FC1) to (FC16)
indicated after the number)
h) The values from 1 to 80 apply to the MVS-7000X.
5
To confirm the setting in step 4, press [Action Set].
This confirms the setting, which appears in the status
area.
Selectable actions for various trigger types
• When the trigger type is other than “Level”
(In M/E-x, the x is the M/E bank number (1 to 4); in
DSKx the x is the DSK number (1 to 8); in Keyx the x is
the key number (1 to 8)).
M/E-x Cut, M/E-x Auto Trans, P/P Cut, PP Auto Trans,
M/E-x Keyx Cut, M/E-x Keyx Auto Trans, P/P DSKx
Cut, P/P DSKx Auto Trans
FTB Auto Trans, FTB Cut, Master SS ? Recall, SS ?
Recall, M/E-x Keyx SS ? Recall, P/P DSKx SS ? Recall,
Master Effect ? Recall, Effect ? Recall, Effect ? Recall &
Run, KF Run, KF Stop, KF Rewind,
FM Src1 Field Freeze, FM Src1 Frame Freeze, FM Src1
Freeze Off, FM Src2 Field Freeze, FM Src2 Frame
Freeze, FM Src2 Freeze Off, FM Src1 Clip Record, FM
Src1 Clip Stop, FM Src2 Clip Record, FM Src2 Clip
Stop, FM1 to FM8 Clip Cueup, FM1 to FM8 Clip Play,
FM1 to FM8 Clip Stop,
Shotbox ? Recall, Macro Take, Macro ? Recall, No
Action
• When the trigger type is only “Rising Edge” or
“Falling Edge”
Aux? O’ride Src??
• When the trigger type is “Level”
(In M/E-x, the x is the M/E bank number (1 to 4)).
System Format, System Aspect, M/E-x Aspect, P/P
Aspect, DME Ch1 Aspect, DME Ch2 Aspect, DME Ch3
Aspect, DME Ch4 Aspect, DME Ch5 Aspect, DME Ch6
Aspect, DME Ch7 Aspect, DME Ch8 Aspect, Level
Enable, No Action
• “Level Enable” is a function that determines whether
GPI inputs are enabled (“Enable”) or disabled
(“Disable”) for the “Aspect” and “System Format”
actions that can be used when the trigger type is Level.
When Level Enable is used, if the input is “Disable” then
it is not possible to switch “Aspect” or “System Format”
by GPI input.
If a GPI to switch “Aspect” or “System Format” occurs
when powering the system off, the action triggered by
the GPI may start immediately before the power goes off
and the power may go off before the action is completed.
This may corrupt the setup settings. It is therefore
recommended to use Level Enable to avoid such a
situation.
• As for “Aux ? O’ride Src ??,” when “Rising Edge” is
selected, on a rising edge the set AUX bus input is used.
On a falling edge, the original state of the cross-point is
restored. If the GPI trigger is applied repeatedly at short
intervals (0.5 second or less), the cross-point switching
may not be carried out correctly. In this case, apply the
GPI trigger again.
• If “System Format” is selected for “Action” when the
format converter is used on the switcher, you can set the
conversion format of the format converter for “FC Input
1-4,” “FC Input 5-8,” “FC Input 9-12” (MVS-8000X
only), “FC Input 13-16” (MVS-8000X only), “FC
Output 1-2,” and “FC Output 3-4.”
Carrying out level settings
To set the low level and high level, first set the trigger type
to “Level,” then use the following procedure.
1
In the DCU >GPI Input Assign menu, select the action
to be set, and press [H/L Set].
The H/L Set menu appears.
2
Using any of the following methods, select the
settings.
• Press directly on the list in the status area.
• Press the arrow keys to scroll the reverse video
cursor.
• Turn the knob.
3
To apply the selection made in step 2 when the input
is the GPI high level, press [H Set]. To apply the
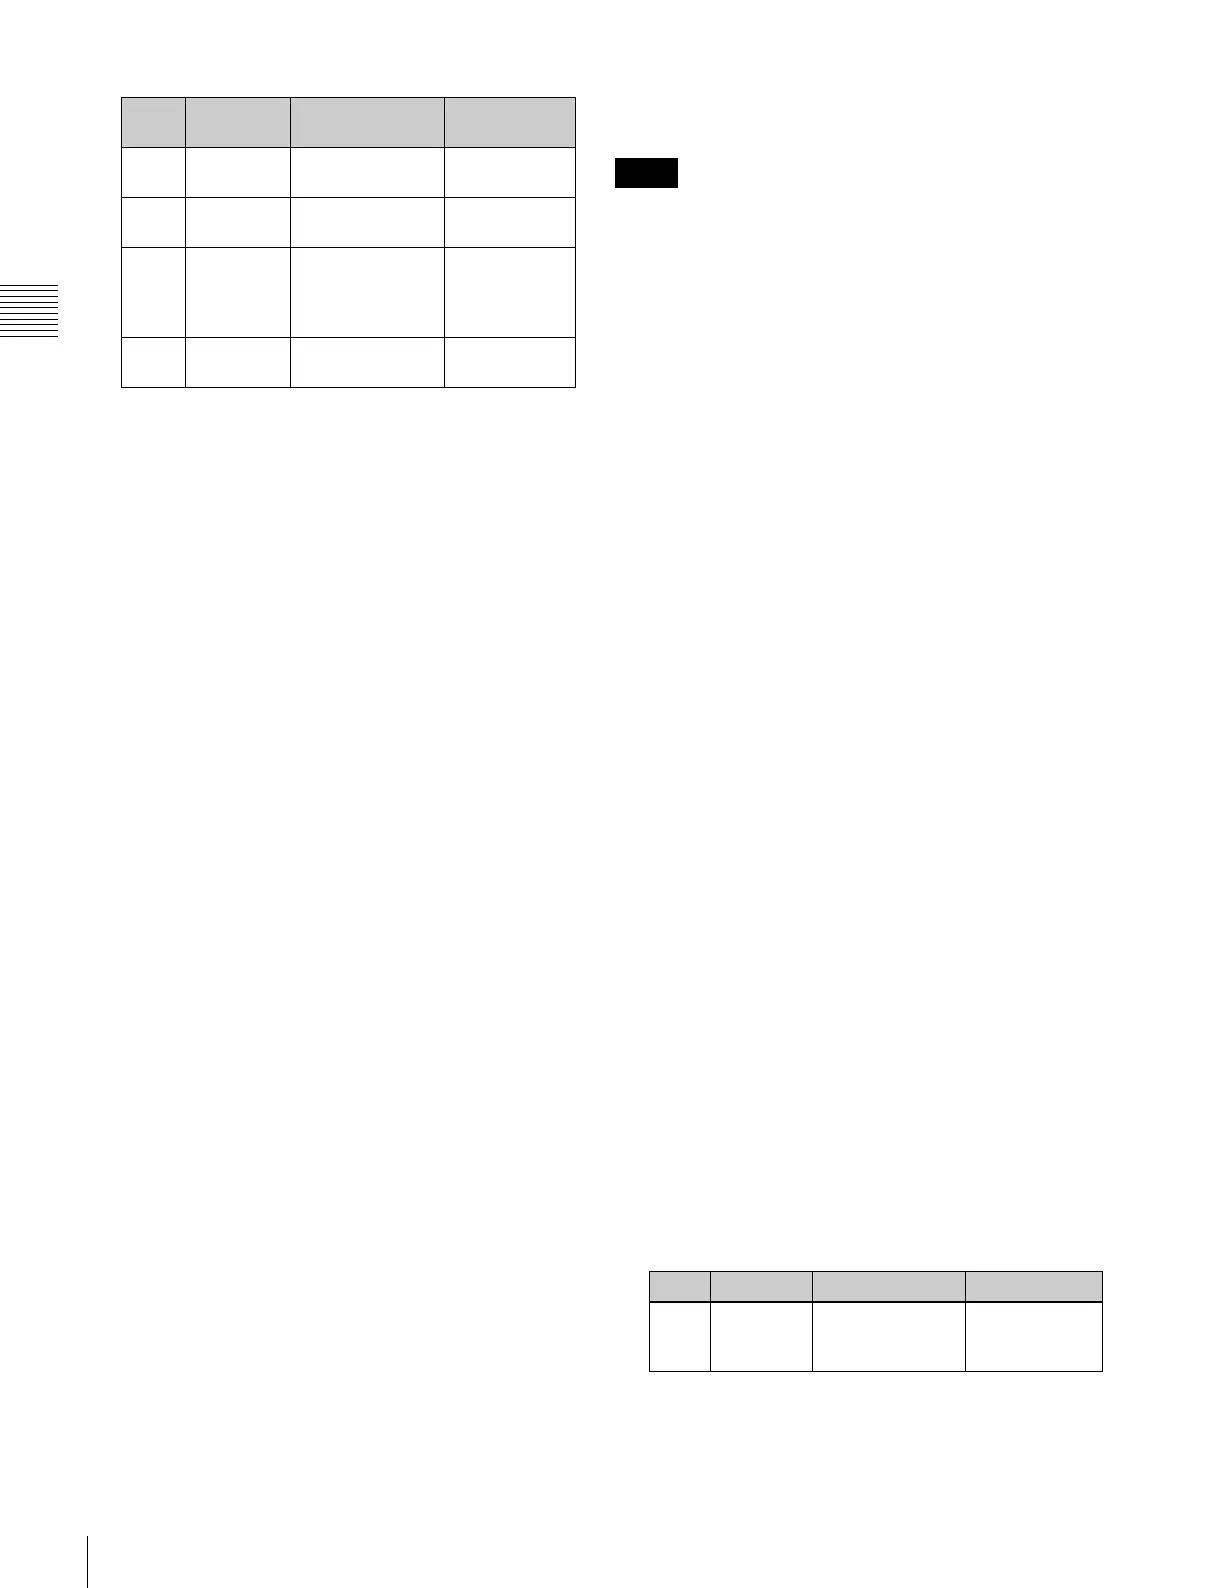
Knob Parameter Adjustment Setting
values
2 Action Action selection 1 and
upwards
a)
4Aux Bus
No
AUX bus
selection
1 to 48
b)
5 Reg No Register number 1 to 4
c)
1 to 99
d)
1 to 250
e)
1 to 399
f)
5 Src No Source signal
selection
1 and
upwards
b) g) h)
Notes
Knob Parameter Adjustment Setting values
1 No Signal format/
screen aspect
ratio selection
1 and upwards
 Loading...


