Home
Sun Microsystems
Desktop
Ultra 20 M2
Sun Microsystems Ultra 20 M2 User Manual
4
of 1
of 1 rating
136 pages
Give review
Manual
Specs
To Next Page
To Next Page
To Previous Page
To Previous Page
Loading...
Chapter 5
Maintaining the Workstation
5-9
4.
Push
the
plastic
latch
in
the
direction
of
the
engraved
arrow
(away
from
the
metal
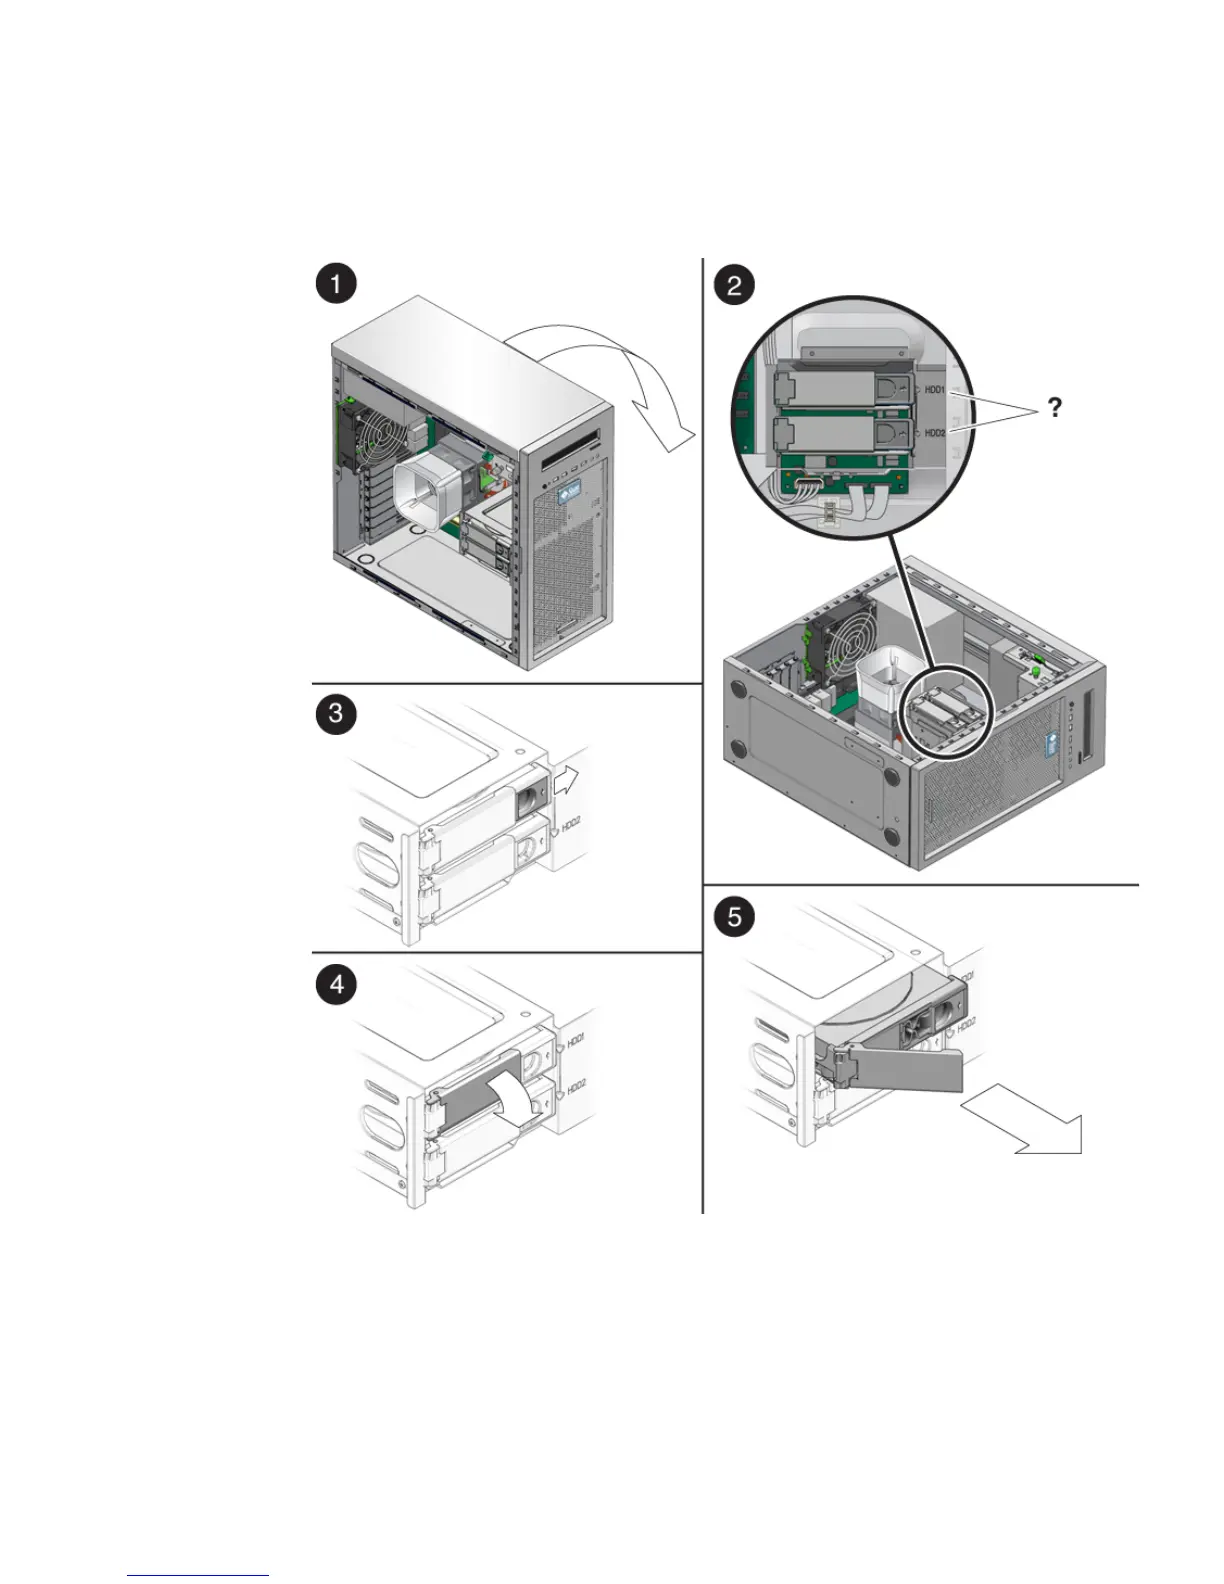
locking
handle)
until
the
HDD
handle
pops
out
(see
FIGURE
5-5
).
FIGURE
5-5
Removing
a
Hard
Disk
Drive
5.
Grasp
the
HDD
handle
and
pull
straight
up
to
remove
the
HDD
from
the
system.
6.
Set
the
HDD
on
an
antistatic
surface.
64
66
Table of Contents
Table of Contents
3
Preface
11
Typographic Conventions
12
Index
13
Safety Information
14
1 Sun Ultra 20 M2 Workstation Hardware Features
17
Front Panel
18
FIGURE 1-1 Front Panel Components
18
TABLE 1-1 Front Panel Components
18
Back Panel
19
FIGURE 1-2 Back Panel Components
19
TABLE 1-2 Back Panel Components
19
Internal Components and Cables
20
FIGURE 1-3 Internal System Components
20
TABLE 1-3 Internal System Components
20
Figure
21
Power Supply and Component Cable Connections to Motherboard
21
TABLE 1-4 Power Supply and Component Cable Connections to Motherboard
21
Unpacking, Cabling, and Powering the Sun Ultra 20 M2 Workstation
23
Figure
24
Planning the Installation Process
24
Process Flow for Setting up the Sun Ultra 20 M2 Workstation
24
Section 2.1, "Planning the Installation Process
24
Checking Package Contents
25
TABLE 2-1 Items Included in the Sun Ultra 20 M2 Workstation Box
25
Section 2.2, "Checking Package Contents
25
Connecting External Devices to the Workstation
26
FIGURE 2-2 External Cable Connections
26
Section 2.3, "Connecting External Devices to the Workstation
26
FIGURE 2-3 Connecting the Monitor to the System
27
Powering on the Workstation
28
Powering off the Workstation
28
Section 2.4, "Powering on the Workstation
28
Section 2.5, "Powering off the Workstation
28
3 Troubleshooting
31
Troubleshooting Overview
31
Visual Inspection
32
Performing an External Visual Inspection
32
Performing an Internal Visual Inspection
32
Troubleshooting Procedures
33
TABLE 3-1 Troubleshooting Procedures
36
Obtaining Technical Assistance
38
TABLE 3-2 Sun Web Sites and Telephone Numbers
38
Running Diagnostics
39
Section 4.1, "Understanding the Diagnostic Partition
40
Section 4.2, "Starting Pc-Check Diagnostics
40
Starting Pc-Check Diagnostics
40
Understanding the Diagnostic Partition
40
Section 4.3, "System Information Menu
41
System Information Menu
41
TABLE 4-1 System Information Menu Options
41
Advanced Diagnostics
42
Section 4.4, "Advanced Diagnostics
42
Hard Disk Drive Testing
44
TABLE 4-3 Parameters for the HDD Tests
45
TABLE 4-2 Advanced Diagnostics Tests Menu Options
42
Immediate Burn-In Testing
46
Section 4.5, "Immediate Burn-In Testing
46
TABLE 4-4 Continuous Burn-In Testing Options
46
Deferred Burn-In Testing
48
Section 4.6, "Deferred Burn-In Testing
48
Create Diagnostic Partition
49
Adding a Diagnostic Partition to the First Bootable Disk
49
Section 4.7, "Create Diagnostic Partition
49
Creating a Log File on the Diagnostic Partition
50
Accessing the Diagnostic Partition under Red hat Linux
51
Accessing the Diagnostic Partition under the Solaris 10 Operating System
52
Accessing the Diagnostic Partition under Windows XP
54
Show Results Summary
55
About Pc-Check
56
Exit to DOS
56
Print Results Report
56
TABLE 4-5 Show Results Summary
56
5 Maintaining the Workstation
57
Electrostatic Discharge (ESD) Precautions
58
Opening the Workstation
58
Tools and Supplies Needed
58
FIGURE 5-1 Removing the Side Access Panel
59
Powering off the System and Removing the Left Side Access Panel
59
FIGURE 5-2 Removing the Front Bezel
60
Removing the Front Bezel
60
Closing the Workstation
61
Installing the Front Bezel
61
Postinstallation Instructions
61
Installing the Left Side Access Panel
62
FIGURE 5-3 Installing the Front Bezel
62
FIGURE 5-4 Installing the Left Side Access Panel
63
Removing or Adding a Hard Disk Drive
64
Removing a Hard Disk Drive
64
FIGURE 5-5 Removing a Hard Disk Drive
65
Installing a Hard Disk Drive
66
FIGURE 5-6 Installing a Hard Disk Drive
67
Installing SAS Card, Cables, and Hard Drives
68
FIGURE 5-7 Installing a SAS Card
69
Replacing the Storage Backplane
71
FIGURE 5-8 Location of the Storage Backplane
71
Removing the Storage Backplane
71
FIGURE 5-9 Removing the Storage Backplane
72
FIGURE 5-10 Installing the Storage Backplane
73
Installing the Storage Backplane
73
Replacing the DVD Drive
75
Removing the DVD Drive
75
FIGURE 5-12 Installing the DVD Drive
76
Installing the DVD Drive
76
FIGURE 5-13 Location of Power and IDE Cables
77
Removing or Installing Dimms
78
FIGURE 5-14 DIMM Locations
78
Removing Dimms
78
FIGURE 5-15 Removing a DIMM
79
Installing Dimms
79
FIGURE 5-16 Installing a DIMM
80
Reconfiguring the System Memory
80
Removing and Installing a PCI-E Card
81
Removing a PCI-E Card
81
FIGURE 5-17 Removing a PCI-E Graphics Card
82
Installing a PCI-E Card
83
FIGURE 5-18 Installing a PCI-E Graphics Card
84
Removing and Installing PCI Cards
85
Removing a PCI Card
85
FIGURE 5-19 Removing a PCI Card
86
Installing a PCI Card
87
FIGURE 5-20 Installing a PCI Card
88
Replacing the System Battery
89
FIGURE 5-21 Removing the System Battery
90
FIGURE 5-22 Installing a System Battery
91
Replacing the System Fan
92
FIGURE 5-23 Removing the System Fan
92
FIGURE 5-24 Installing the System Fan
93
Replacing the Power Supply
94
FIGURE 5-25 Location of the Power Supply
94
Removing the Power Supply
94
Locations of Power Supply Connections on the Motherboard
95
FIGURE 5-27 Removing the Power Supply from the Chassis
96
FIGURE 5-28 Installing the Power Supply into the Chassis
97
Installing the Power Supply
97
Replacing the I/O Board Assembly
98
Removing the I/O Board Assembly
98
FIGURE 5-29 Removing the I/O Board Assembly
99
FIGURE 5-30 Installing the I/O Board Assembly
100
Installing the I/O Board Assembly
100
Replacing System Cables
101
Replacing the Heatsink and CPU
102
Removing the Heatsink and CPU
102
FIGURE 5-31 Unlatching the Heatsink/Fan Assembly
103
FIGURE 5-32 Removing the Heatsink/Fan Assembly from the Motherboard
104
FIGURE 5-33 Removing the CPU from the Workstation
105
Installing a Heatsink and CPU
105
FIGURE 5-34 Installing the CPU
106
FIGURE 5-35 Installing the Heatsink/Fan Assembly
107
FIGURE 5-36 Securing the Heatsink/Fan Assembly Latches
108
Replacing the Motherboard
109
Removing the Motherboard
109
FIGURE 5-37 Removing the Nine Motherboard Screws
110
FIGURE 5-38 Removing the Motherboard from the Chassis
111
Installing the Motherboard
112
FIGURE 5-39 Installing the Motherboard
113
Updating the BIOS
114
Flashing the BIOS
114
Resetting Previous BIOS Settings
115
System Specifications
117
And Includes the Following Sections:
118
System Components and Features
118
Systemspecifications
118
This Appendix Lists Features and Specifications for the Sun Ultra 20M2 Workstation
118
Section A.5, “Power Specifications” on Page A-5
122
Appendix
118
Section A.1, "System Components and Features
118
Memory Configurations
119
Section A.2, "Memory Configurations
119
PCI-E and PCI Expansion Slots
120
Physical Specifications
120
Section A.3, "PCI-E and PCI Expansion Slots
120
Section A.4, "Physical Specifications
120
TABLE A-3 Internal Expansion Slots
120
A.5 Power Specifications
121
Power Specifications
121
TABLE A-5 Input Voltage Range
121
TABLE A-6 Input Frequency Range
121
Environmental Specifications
122
Section A.6, "Environmental Specifications
122
BIOS POST Codes
123
4
Based on 1 rating
Ask a question
Give review
Questions and Answers:
Need help?
Do you have a question about the Sun Microsystems Ultra 20 M2 and is the answer not in the manual?
Ask a question
Sun Microsystems Ultra 20 M2 Specifications
General
Brand
Sun Microsystems
Model
Ultra 20 M2
Category
Desktop
Language
English
Related product manuals
Sun Microsystems SPARCstation 20
266 pages
Sun Microsystems Ultra 25
198 pages
Sun Microsystems MCS 2000 SL
84 pages
Sun Microsystems Sun Blade 2500
56 pages
Sun Microsystems Blade 1500
500 pages
Sun Microsystems Ultra 45
198 pages
Sun Microsystems Ultra 5
34 pages