Premier Elite Series Installation Manual Installation
INS176-15 23
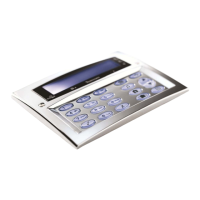
Remote Keypads
Keypad Layout
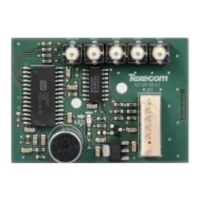
Connecting Keypads
Keypads are connected to the network terminals located at the
bottom left hand corner of the control panel (see pages 20 & 22 for
details).
Keypad Addressing
Each keypad must be assigned a different address using the DIL
switches located on the left hand side of the PCB. The table below
shows the keypad addressing:
Never set two keypads on the same network to the same
address.
When using a keypad as an Engineer’s keypad, the DIL
switches must all be ‘On’.
* 88 168 & 640 only
Keypad Zones
The keypad has two programmable zones (see page 32 for details).
Each zone is also fully programmable (see page 54 for details).
Zone Numbering
The table below shows the zone allocation when the keypads are
installed:
The zones inside the keypads are not seen by the system until
they have been mapped to a zone number (see page 80 for
details).
* 88 168 only
** 640 only
Keypad Output
The remote keypad has one programmable output, which can be
used to drive auxiliary devices such as LED’s, sounders or relays etc.
Wire as per Panel Outputs shown on page 35 (see page 83 for
details). The electrical characteristics for the output are shown below:
Keypad Speaker Output (LCDL/LCDLP Only)
The LCDL and LCDLP keypads have an output that can be used for
driving up to one 16 or two 8 loudspeakers (see page 34 for
details).
The speaker volume is also fully adjustable (see page 80 for
details).
Programmable ‘Info.’ LED
The ‘Info.’ LED on the front of the keypad can be programmed to
mimic the keypad output or show the armed status of an area (see
page 80 for details).
Adjustable Backlighting
To adjust the keypad backlighting press the YES key for 5 seconds,
then with the YES key still pressed use
to increase or decrease
the backlighting until the required brightness is achieved, then
release both keys.
The backlight can only be adjusted when the keypad is not in a
menu.
Keypad Lid Tamper
The lid tamper of each keypad can be disabled if required using the
relevant keypad option in the Keypad Setup menu (see page 80 for
details).

 Loading...