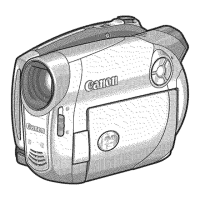
Recording
Movies
Before
You
Begin Recording
Make a test recording first to check if the camcorder operates correctly. Since
recordings made on a DVD-R cannot be deleted, we recommend you use a DVD-RW
disc (commercially available) to make the test recordings.
1.
Holding the lock button pressed
down, move the power switch to
CAMERA.
2.
Move the
-"/0
switch to the
-"
(MOVIES) position.
3.
Open the LCD panel and the lens
cover (move the lens cover switch
down to
~).
4.
Press the start/stop button to
begin recording.
• Press the start/stop button again to
pause recording.
• During the recording and immediately
after pausing it, the disc access indicator
may go on while the scene is being
written on the disc.
When You Have Finished Recording:
1.
Remove
the disc.
2.
Close the
LCD
panel
and
the lens cover (move the lens cover switch
to
@).
3.
Turn off the camcorder.
4.
Disconnect the power source.
Do not turn
off
the camcorder, change the position
of
the
-"
/0
switch,
disconnect the power source, open the memory card/disc cover
or
remove the
memory card/disc while the card access
or
the disc access indicator is flashing.
Doing so could result in data damage.
o The process
of
recognizing a disc may take a moment. The @ display will
move while the disc is being read. Wait until the camcorderfinishes recognizing
the disc before you start recording.
o About the recording time: The recording mode is set by default as SP
(standard play). By changing the recording mode you can change the recording
time available on the disc
(CD
60).
o When recording in bright places it may be difficult to use the LCD screen.
In
such case, use the viewfinder instead.
o When recording
in
very loud places (such as fireworks shows
or
concerts),
sound may become distorted or it may not be recorded at the actual levels. This
is not a malfunction.
33