Ch.3 Sequence of Examination
< 55 >
REGIUS Console CS-3 OPERATION MANUAL Ver. 1.10 2005.2
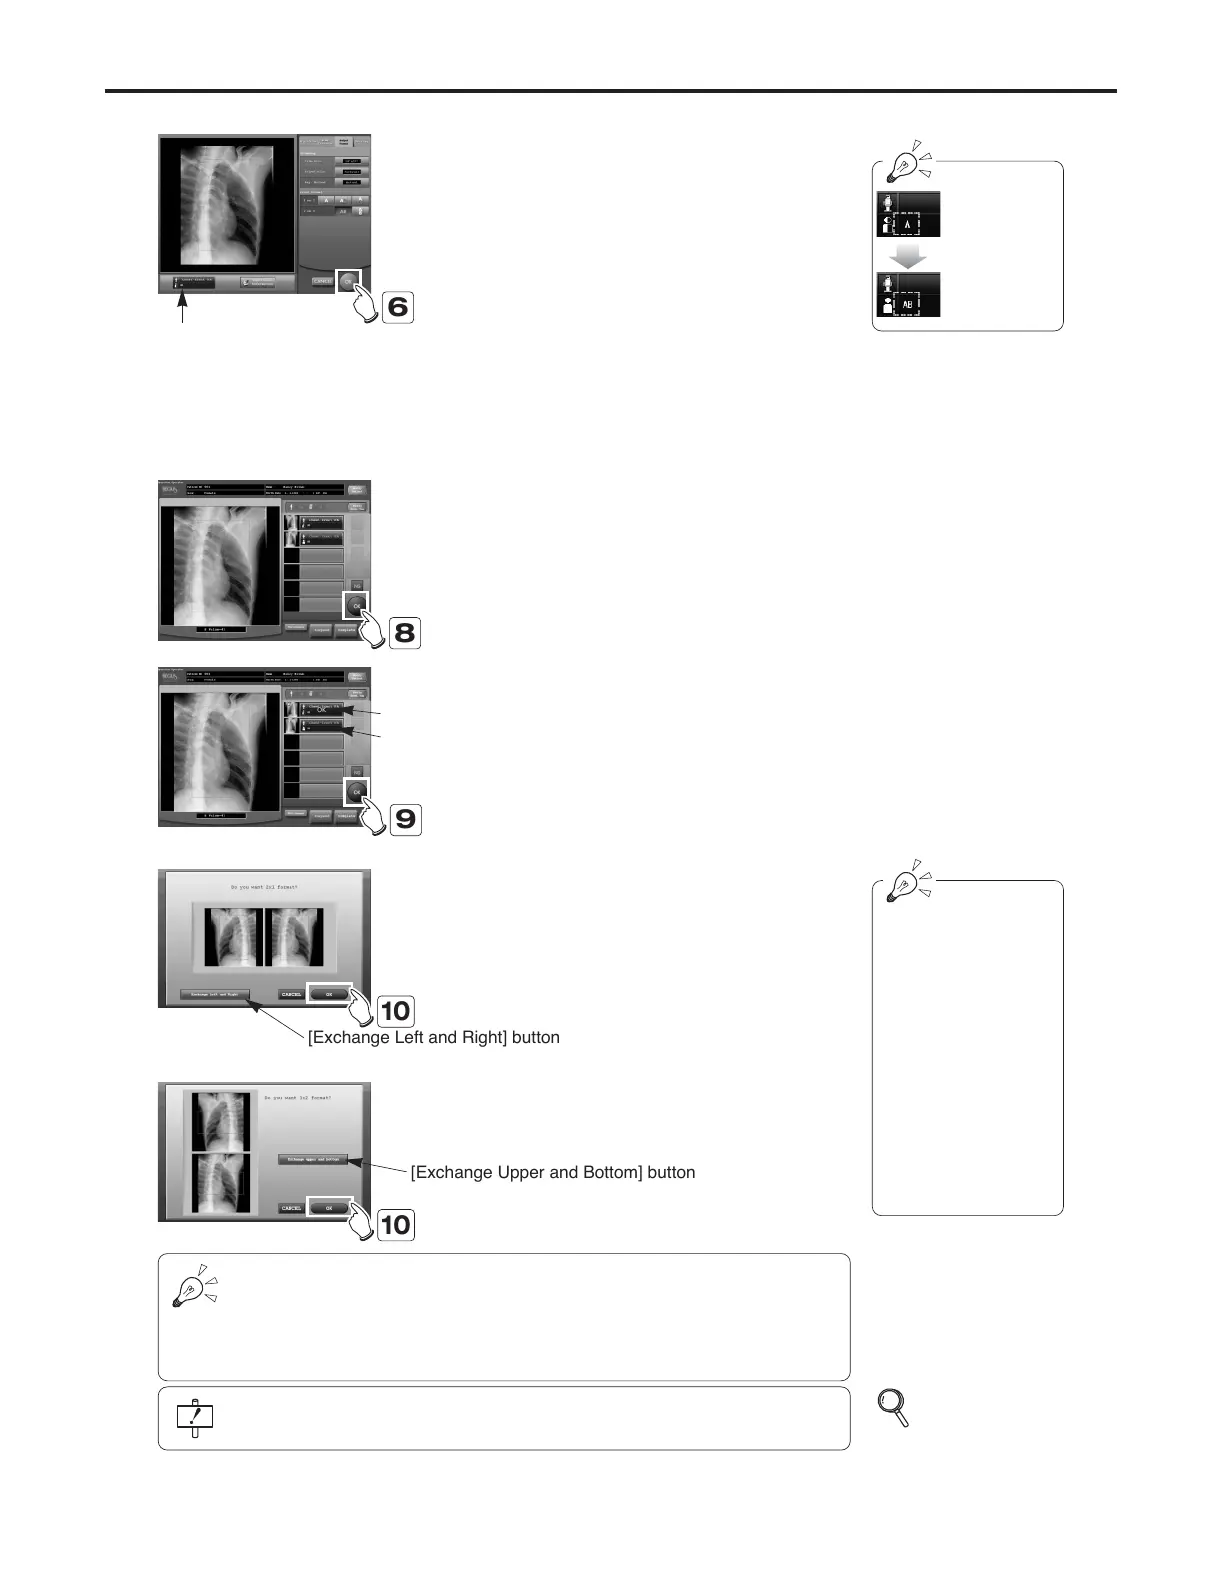
5 Set "Film Size", "Orientation" and "Mag. Method"
under the "Trimming" item.
6 Touch the [OK] button.
• Display will return to the examination check
screen.
7 Repeat steps 2~6 to make "Print Format" and
"Trimming" settings for the second image.
• Settings made must be identical to those for the
first image. If settings differ, the second image will
be identified as the first image of a different "2 on 1
output".
8 Touch the [OK] button for the first image (image
"A") to be output.
• At this point, the image output is just set in the
printer queue, not actually output to the printer.
• The printer icon will remain displayed in the top
left corner of the image display field.
"AB" will be displayed.
The display of
the print for-
mat switches
from "A" to
"AB".
10 Touch the [OK] button.
• Images are output in the 2 on 1 format.
AB is selected.
9 Touch the [OK] button for the second image
(image "B") to be output.
•A message requesting confirmation of "2 on 1 out-
put" will be displayed.
• Touching the [Right/Left Field Switch] button here
will enable switching of the relative positions of
images "A" and "B."
Image A
Image B
If an error has been made in the "2-on-1 output" combination, touch the "CANCEL"
button. This will return the second image to its status prior to touching the "OK but-
ton.
Return the print format of the order mistakenly set to "2-on-1 output" to single-image
format and set the print format of the correct second order to the "2-image" status.
If the examination is completed with only one image confirmed ([OK]), only the con-
firmed image is output on one side of the film.
If the confirming mes-
sage is not displayed,
either the "Print Format"
or "Trimming" settings
for the second image
may differ to those for
the first image.
Check "Print Format"
and "Trimming" settings
and correct them so
that they are same as
those for the first
image.
p.111
Detailed Data
Setting Screen
(Print Format)
is selected.
A
B
@@@@@@@@e?
@@@@@@@@e?
@@h?
@@h?
@@h?
@@h?
@@h?
@@h?
@@@@@@@@e?@@@@@@@@?e
@@@@@@@@e?@@@@@@@@?e
@@@@@@@@
@@@@@@@@
@@
@@
@@
@@
@@
@@
@@
@@
@@
@@
@@
@@
@@
@@
?@@
?@@
?@@
?@@
?@@
?@@
?@@@@@@@@
?@@@@@@@@
?@@@@@@@@?e@@@@@@@@
?@@@@@@@@?e@@@@@@@@
@@g
@@g
@@g
@@g
@@g
@@g
@@@@@@@@
@@@@@@@@
@@
@@
@@
@@
@@
@@
@@
@@
@@@@@@@@e?
@@@@@@@@e?
@@h?
@@h?
@@h?
@@h?
@@h?
@@h?
@@@@@@@@e?@@@@@@@@?e
@@@@@@@@e?@@@@@@@@?e
@@@@@@@@
@@@@@@@@
@@
@@
@@
@@
@@
@@
@@
@@
@@
@@
@@
@@
@@
@@
?@@
?@@
?@@
?@@
?@@
?@@
?@@@@@@@@
?@@@@@@@@
?@@@@@@@@?e@@@@@@@@
?@@@@@@@@?e@@@@@@@@
@@g
@@g
@@g
@@g
@@g
@@g
@@@@@@@@
@@@@@@@@
@@
@@
@@
@@
@@
@@
@@
@@
[Exchange Left and Right] button
[Exchange Upper and Bottom] button
6
8
9
10
10