Installing Welding Device
89
OM-296747A | 4/15/24
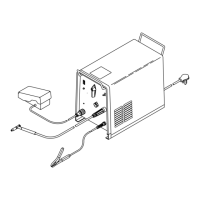
▼Figure 24. Door Interlock Closed - Safety Interlock is Satisfied
3. Have someone (other than the OptX device operator) now open the interlocked
door while the operator is pressing Trigger 1 (gas control) and touching the
nozzle to the part. If the door switches were installed correctly, the external
safety interlocks will open. Confirm that the Interlock LED indicator on the
front panel is turned OFF. Release the trigger 1 control and lift nozzle from
part. Close the door again.
Please Note: The external safety interlocks have two redundant loops. If there
is ever a mismatch (one loop opens while the other remains closed), the Error
LED Indicator will illuminate and the error code Er13 will display. To clear this
error both interlocks loops must first be opened and then closed again to
continue.
4. Clear any errors. Open the interlocked door. Operator should press the
Trigger 1 gas control on the Torch and touch the nozzle to the part. Confirm
that the Interlock LED indicator is OFF. It should never turn ON under this
condition since the external interlocks cannot be satisfied while the door is
open.
5. Closing the door resets the interlocks. The OptX device is ready to operate.
Interlock LED Indicator is lit green when: (1) External Safety Interlocks Closed (e.g.
Door to Laser Controlled Area is closed); (2) Work Sense clamp is connected; (3) Torch
Trigger 1 Control is Pressed; and (4) Nozzle is touching part
DANGER
Operating welder if door interlocks are not functional
Personnel entering the Laser Controlled Area without PPE can be exposed to
invisible Class 4 laser radiation from reflected or scattered laser light. Permanent
and severe eye damage, vision impairment and/or skin burns can occur.
If defective, repair and/or replace interlock switches or wiring.
Redo the test procedure above to confirm the interlocks are functional.